> ## Documentation Index
> Fetch the complete documentation index at: https://docs-staging-chore-management-api-autoupdate.mintlify.site/llms.txt
> Use this file to discover all available pages before exploring further.

> Forms のランタイム中に参照できるよう、Flows 連携の資格情報を Vault に保存する方法を説明します。

# Vault

Vault を使用すると、外部サービスや連携機能へのリクエストを認証するためのシークレットや共通設定 (例: API キー、<Tooltip tip="アクセストークン: API にアクセスするために使用される、不透明な文字列または JWT の形式の認証資格情報。" cta="用語集を見る" href="/docs/ja-jp/glossary?term=access+tokens">アクセストークン</Tooltip>、<Tooltip tip="アクセストークン: API にアクセスするために使用される、不透明な文字列または JWT の形式の認証資格情報。" cta="用語集を見る" href="/docs/ja-jp/glossary?term=refresh+tokens">リフレッシュトークン</Tooltip>) を、Vault 接続として安全に保存できます。

<Callout icon="file-lines" color="#0EA5E9" iconType="regular">
  * 接続によっては、ユーザーが認証情報を提供する必要があります (たとえば、machine-to-machine (M2M) アプリケーションを使用する Auth0 では、有効期限付きのアクセストークンとリフレッシュトークンを生成します) 。接続にはこれら両方のトークンが保存され、アクセストークンの有効期限が切れる前に新しいアクセストークンが生成されます。
  * 外部サービスによっては、API 認証情報を生成するためにスコープの承認が必要です。スコープを変更した場合は、接続の問題を避けるため、それらのサービスへの接続も更新してください。
  * 接続を追加すると、すぐにフローで使用できます。既存の接続に対する更新は、すべて自動的に反映されます。
</Callout>

<h2 id="create-and-modify-vault-connections">
  Vault 接続の作成と変更
</h2>

Vault ページ、またはアクションで認証情報が必要な場合はフローエディターから、Vault 接続を作成および変更できます。

<h3 id="create-vault-connections-from-the-vault-page">
  Vault ページから Vault 接続を作成する
</h3>

次の手順に従って、Vault ページから Vault 接続を追加します。

1. **Auth0 Dashboard > Actions > Forms** を選択して、フォームエディターを開きます。
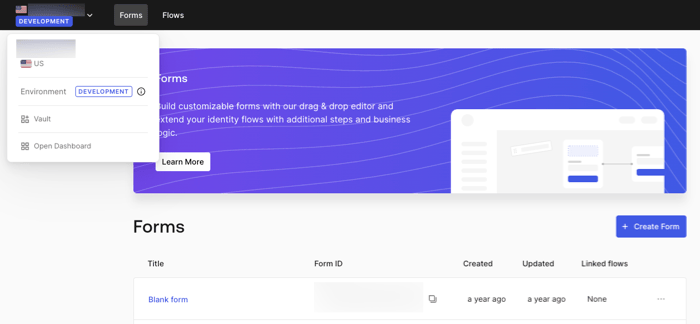
2. 左上にあるテナントメニューを選択し、**Vault** を選択して Vault ページを開きます。
   <Frame>
     <img src="https://mintcdn.com/docs-staging-chore-management-api-autoupdate/oVD85MvA7ZVayXF0/docs/images/cdy7uua7fh8z/1sPNPKO6nuEDCuiYGRWSur/d85dc616170eaf2d7d5f321750863ccf/vault-connection.png?fit=max&auto=format&n=oVD85MvA7ZVayXF0&q=85&s=efb882345920836b1d8f99602d7eacb0" alt="Dashboard > Forms > Vault" data-og-width="700" width="700" data-og-height="324" height="324" data-path="docs/images/cdy7uua7fh8z/1sPNPKO6nuEDCuiYGRWSur/d85dc616170eaf2d7d5f321750863ccf/vault-connection.png" data-optimize="true" data-opv="3" srcset="https://mintcdn.com/docs-staging-chore-management-api-autoupdate/oVD85MvA7ZVayXF0/docs/images/cdy7uua7fh8z/1sPNPKO6nuEDCuiYGRWSur/d85dc616170eaf2d7d5f321750863ccf/vault-connection.png?w=280&fit=max&auto=format&n=oVD85MvA7ZVayXF0&q=85&s=87a2fff267c090fa727bb3a65eeeabae 280w, https://mintcdn.com/docs-staging-chore-management-api-autoupdate/oVD85MvA7ZVayXF0/docs/images/cdy7uua7fh8z/1sPNPKO6nuEDCuiYGRWSur/d85dc616170eaf2d7d5f321750863ccf/vault-connection.png?w=560&fit=max&auto=format&n=oVD85MvA7ZVayXF0&q=85&s=04155af018000acb63c8b580ef005da1 560w, https://mintcdn.com/docs-staging-chore-management-api-autoupdate/oVD85MvA7ZVayXF0/docs/images/cdy7uua7fh8z/1sPNPKO6nuEDCuiYGRWSur/d85dc616170eaf2d7d5f321750863ccf/vault-connection.png?w=840&fit=max&auto=format&n=oVD85MvA7ZVayXF0&q=85&s=9edb43b96c75fdef74e56b93a1fdcdea 840w, https://mintcdn.com/docs-staging-chore-management-api-autoupdate/oVD85MvA7ZVayXF0/docs/images/cdy7uua7fh8z/1sPNPKO6nuEDCuiYGRWSur/d85dc616170eaf2d7d5f321750863ccf/vault-connection.png?w=1100&fit=max&auto=format&n=oVD85MvA7ZVayXF0&q=85&s=34233717e51ab770f3200a9567d6019e 1100w, https://mintcdn.com/docs-staging-chore-management-api-autoupdate/oVD85MvA7ZVayXF0/docs/images/cdy7uua7fh8z/1sPNPKO6nuEDCuiYGRWSur/d85dc616170eaf2d7d5f321750863ccf/vault-connection.png?w=1650&fit=max&auto=format&n=oVD85MvA7ZVayXF0&q=85&s=2e03a63880104a8b17311edc0ac2c93c 1650w, https://mintcdn.com/docs-staging-chore-management-api-autoupdate/oVD85MvA7ZVayXF0/docs/images/cdy7uua7fh8z/1sPNPKO6nuEDCuiYGRWSur/d85dc616170eaf2d7d5f321750863ccf/vault-connection.png?w=2500&fit=max&auto=format&n=oVD85MvA7ZVayXF0&q=85&s=5d43800c893d8ebd7f13485e28996faa 2500w" />
   </Frame>
3. **Add Vault Connection** を選択します。
4. 目的のアクションを選択し、**Continue** を選択します。
5. Vault の **Connection name** を入力し、**Continue** を選択します。
6. 認証情報を入力します。
   必要な認証情報がない場合は、**Create an empty connection** を選択して、後で認証情報を追加できます。空の接続には、認証情報が不足していることを示すオレンジ色のアイコンが表示されます。
7. **Add Vault Connection** を選択します。

<h3 id="create-vault-connections-from-the-flow-editor">
  フローエディターから Vault 接続を作成する
</h3>

次の手順に従って、フローアクションから Vault 接続を追加します。ここでは、Twilio を例に説明します。

1. **Auth0 Dashboard > Actions > Forms > Flows** を選択して、フローエディターを開きます。
2. フローを選択し、**Send SMS with Twilio** アクションを追加します。
3. アクションの **Vault connection** 設定で、**+** アイコンを選択します。

   <Frame>
     <img src="https://mintcdn.com/docs-staging-chore-management-api-autoupdate/NGsN03aWsmM_uYNN/docs/images/cdy7uua7fh8z/1AsaznhRKxm5LZxPlcbfUw/10e5a8af700aab909f5b03fcd266da7e/twilio-vault-connection.png?fit=max&auto=format&n=NGsN03aWsmM_uYNN&q=85&s=85f6d88e4ef8a4e37337fc0733889451" alt="Dashboard > Forms > Vault " data-og-width="1104" width="1104" data-og-height="191" height="191" data-path="docs/images/cdy7uua7fh8z/1AsaznhRKxm5LZxPlcbfUw/10e5a8af700aab909f5b03fcd266da7e/twilio-vault-connection.png" data-optimize="true" data-opv="3" srcset="https://mintcdn.com/docs-staging-chore-management-api-autoupdate/NGsN03aWsmM_uYNN/docs/images/cdy7uua7fh8z/1AsaznhRKxm5LZxPlcbfUw/10e5a8af700aab909f5b03fcd266da7e/twilio-vault-connection.png?w=280&fit=max&auto=format&n=NGsN03aWsmM_uYNN&q=85&s=3e05c1d5f2f99458f23e7985b68c922d 280w, https://mintcdn.com/docs-staging-chore-management-api-autoupdate/NGsN03aWsmM_uYNN/docs/images/cdy7uua7fh8z/1AsaznhRKxm5LZxPlcbfUw/10e5a8af700aab909f5b03fcd266da7e/twilio-vault-connection.png?w=560&fit=max&auto=format&n=NGsN03aWsmM_uYNN&q=85&s=8d865a299ef83b9fd631881177cb44e1 560w, https://mintcdn.com/docs-staging-chore-management-api-autoupdate/NGsN03aWsmM_uYNN/docs/images/cdy7uua7fh8z/1AsaznhRKxm5LZxPlcbfUw/10e5a8af700aab909f5b03fcd266da7e/twilio-vault-connection.png?w=840&fit=max&auto=format&n=NGsN03aWsmM_uYNN&q=85&s=c3c2cc7f022cee149902de100d884519 840w, https://mintcdn.com/docs-staging-chore-management-api-autoupdate/NGsN03aWsmM_uYNN/docs/images/cdy7uua7fh8z/1AsaznhRKxm5LZxPlcbfUw/10e5a8af700aab909f5b03fcd266da7e/twilio-vault-connection.png?w=1100&fit=max&auto=format&n=NGsN03aWsmM_uYNN&q=85&s=0767653bcbb5b9fc5f9f82d8bf8f1b2d 1100w, https://mintcdn.com/docs-staging-chore-management-api-autoupdate/NGsN03aWsmM_uYNN/docs/images/cdy7uua7fh8z/1AsaznhRKxm5LZxPlcbfUw/10e5a8af700aab909f5b03fcd266da7e/twilio-vault-connection.png?w=1650&fit=max&auto=format&n=NGsN03aWsmM_uYNN&q=85&s=85664b497517b04661c9fb266b4e5437 1650w, https://mintcdn.com/docs-staging-chore-management-api-autoupdate/NGsN03aWsmM_uYNN/docs/images/cdy7uua7fh8z/1AsaznhRKxm5LZxPlcbfUw/10e5a8af700aab909f5b03fcd266da7e/twilio-vault-connection.png?w=2500&fit=max&auto=format&n=NGsN03aWsmM_uYNN&q=85&s=d1f0b4e197db2608b0ca7481bca11bf3 2500w" />
   </Frame>
4. Vault の **Connection name** を入力し、**Continue** を選択します。
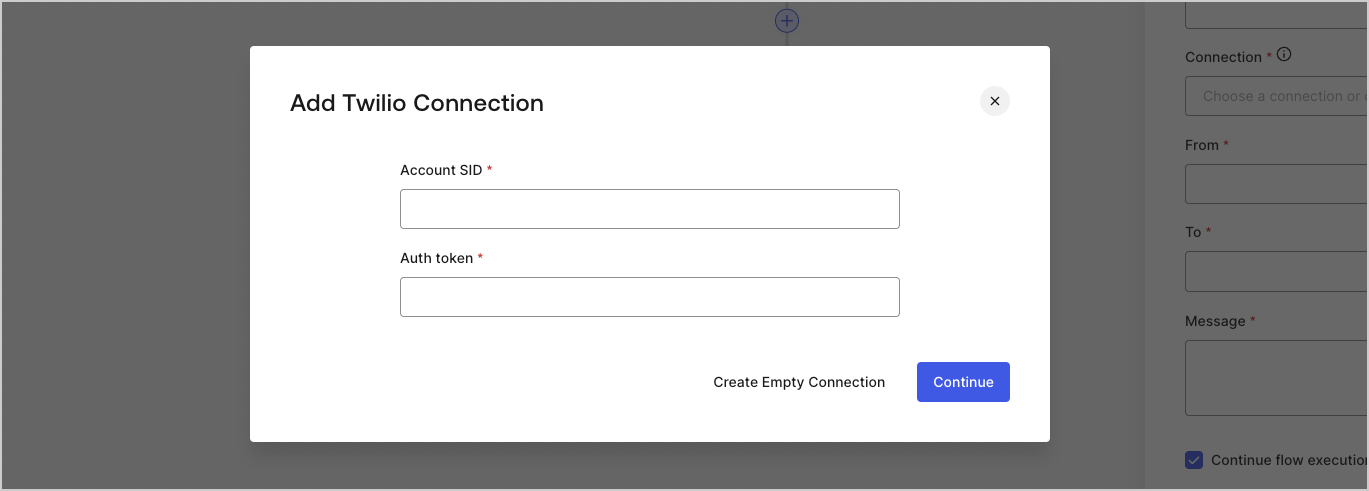
5. 認証情報を入力します。
   必要な認証情報がない場合は、**Create an empty connection** を選択して、後で認証情報を追加できます。空の接続には、認証情報が不足していることを示すオレンジ色のアイコンが表示されます。
   <Frame>
     <img src="https://mintcdn.com/docs-staging-chore-management-api-autoupdate/2q2UjVNt_eeGj7XX/docs/images/cdy7uua7fh8z/yobXanutPRCO3FWek8cOk/bc29e39fb8593cff35e2738234bfe6fe/twilio-vault-settings.png?fit=max&auto=format&n=2q2UjVNt_eeGj7XX&q=85&s=b118e08f4fbd9f5c749d39496d35e959" alt="Dashboard > Forms > Vault > Twilio connection settings" data-og-width="1369" width="1369" data-og-height="491" height="491" data-path="docs/images/cdy7uua7fh8z/yobXanutPRCO3FWek8cOk/bc29e39fb8593cff35e2738234bfe6fe/twilio-vault-settings.png" data-optimize="true" data-opv="3" srcset="https://mintcdn.com/docs-staging-chore-management-api-autoupdate/2q2UjVNt_eeGj7XX/docs/images/cdy7uua7fh8z/yobXanutPRCO3FWek8cOk/bc29e39fb8593cff35e2738234bfe6fe/twilio-vault-settings.png?w=280&fit=max&auto=format&n=2q2UjVNt_eeGj7XX&q=85&s=608f07034c41cef10bec8a2421a8a602 280w, https://mintcdn.com/docs-staging-chore-management-api-autoupdate/2q2UjVNt_eeGj7XX/docs/images/cdy7uua7fh8z/yobXanutPRCO3FWek8cOk/bc29e39fb8593cff35e2738234bfe6fe/twilio-vault-settings.png?w=560&fit=max&auto=format&n=2q2UjVNt_eeGj7XX&q=85&s=d283f555ad0a526eae2d7e59c778337a 560w, https://mintcdn.com/docs-staging-chore-management-api-autoupdate/2q2UjVNt_eeGj7XX/docs/images/cdy7uua7fh8z/yobXanutPRCO3FWek8cOk/bc29e39fb8593cff35e2738234bfe6fe/twilio-vault-settings.png?w=840&fit=max&auto=format&n=2q2UjVNt_eeGj7XX&q=85&s=07b8e8e8b643fa4f4260b1160ff78f34 840w, https://mintcdn.com/docs-staging-chore-management-api-autoupdate/2q2UjVNt_eeGj7XX/docs/images/cdy7uua7fh8z/yobXanutPRCO3FWek8cOk/bc29e39fb8593cff35e2738234bfe6fe/twilio-vault-settings.png?w=1100&fit=max&auto=format&n=2q2UjVNt_eeGj7XX&q=85&s=c1cd17211bef32aae4ebcf51da4b2951 1100w, https://mintcdn.com/docs-staging-chore-management-api-autoupdate/2q2UjVNt_eeGj7XX/docs/images/cdy7uua7fh8z/yobXanutPRCO3FWek8cOk/bc29e39fb8593cff35e2738234bfe6fe/twilio-vault-settings.png?w=1650&fit=max&auto=format&n=2q2UjVNt_eeGj7XX&q=85&s=b1b21f992450dcdaafc7847a151a1bca 1650w, https://mintcdn.com/docs-staging-chore-management-api-autoupdate/2q2UjVNt_eeGj7XX/docs/images/cdy7uua7fh8z/yobXanutPRCO3FWek8cOk/bc29e39fb8593cff35e2738234bfe6fe/twilio-vault-settings.png?w=2500&fit=max&auto=format&n=2q2UjVNt_eeGj7XX&q=85&s=282625866e9fccd60cfe5030e256f56a 2500w" />
   </Frame>
6. **Add Vault Connection** を選択します。
