> ## Documentation Index
> Fetch the complete documentation index at: https://docs-staging-chore-management-api-autoupdate.mintlify.site/llms.txt
> Use this file to discover all available pages before exploring further.

> Forms for Actions を使用して、ユーザーが新しい利用規約または同意に関する更新内容を確認して承諾できるように、更新ポリシーフォームを設定する方法を学びます。

# ユースケース: Forms を使用して更新ポリシーフォームを設定する

<Card title="始める前に">
  1. 次のスコープを有効にして、[Machine-to-Machine Application](/docs/ja-jp/get-started/auth0-overview/create-applications/machine-to-machine-apps) を作成します。

  * `read:users`
  * `update:users`
  * `create:users`
  * `read:users_app_metadata`
  * `update:users_app_metadata`
  * `create:users_app_metadata`

  2. M2M アプリケーションの認証情報を使用して、[Vault 接続](/docs/ja-jp/customize/forms/vault) を追加します。
</Card>

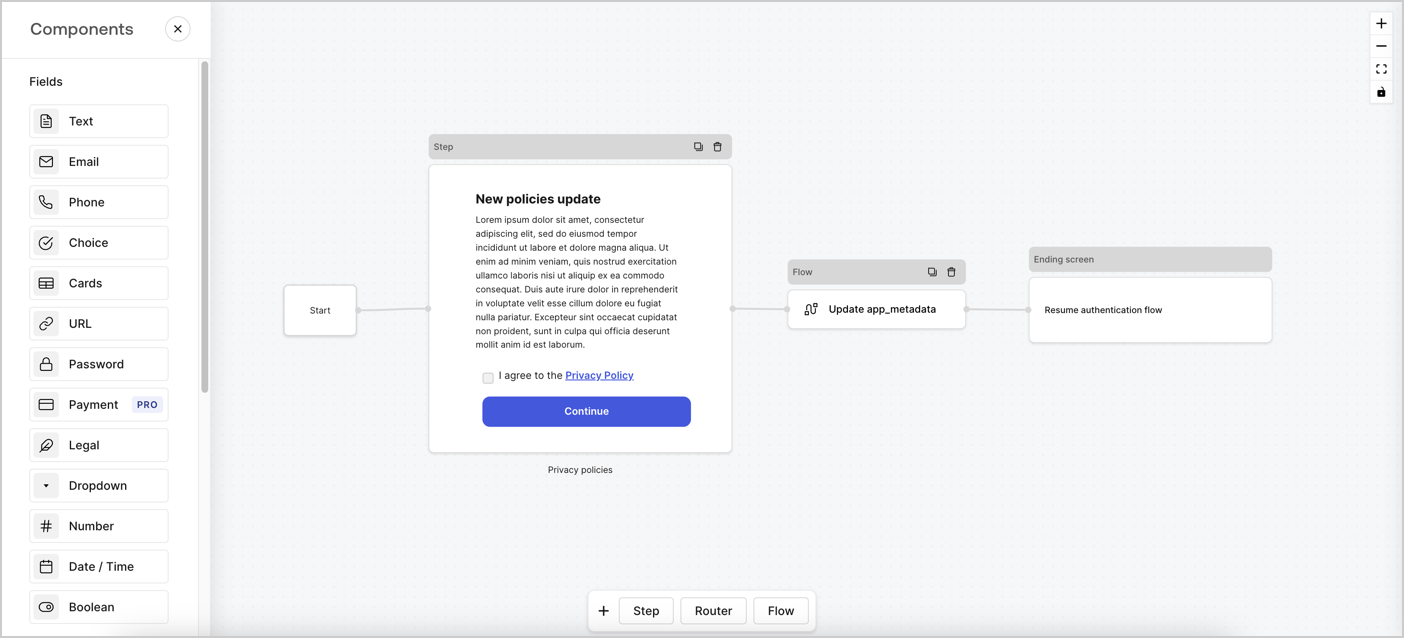
Forms for Actions では、カスタムのプライバシーポリシーフローを作成し、その同意内容を `app_metadata` オブジェクトに保存できます。
<Frame>
  <img src="https://mintcdn.com/docs-staging-chore-management-api-autoupdate/oiDO-PkIrC6oywTQ/docs/images/cdy7uua7fh8z/6i68dMvHDTijfRmSgN1x8Q/ad900e7d4c0fb34645921435472b8684/privavy-policy-form.png?fit=max&auto=format&n=oiDO-PkIrC6oywTQ&q=85&s=b6bc65d1fa67ab23845bef07c4598294" alt="Dashboard > Actions > Forms > Privacy policy use case" data-og-width="1404" width="1404" data-og-height="638" height="638" data-path="docs/images/cdy7uua7fh8z/6i68dMvHDTijfRmSgN1x8Q/ad900e7d4c0fb34645921435472b8684/privavy-policy-form.png" data-optimize="true" data-opv="3" srcset="https://mintcdn.com/docs-staging-chore-management-api-autoupdate/oiDO-PkIrC6oywTQ/docs/images/cdy7uua7fh8z/6i68dMvHDTijfRmSgN1x8Q/ad900e7d4c0fb34645921435472b8684/privavy-policy-form.png?w=280&fit=max&auto=format&n=oiDO-PkIrC6oywTQ&q=85&s=4694df987bd1ac05c3cb6806ed0af039 280w, https://mintcdn.com/docs-staging-chore-management-api-autoupdate/oiDO-PkIrC6oywTQ/docs/images/cdy7uua7fh8z/6i68dMvHDTijfRmSgN1x8Q/ad900e7d4c0fb34645921435472b8684/privavy-policy-form.png?w=560&fit=max&auto=format&n=oiDO-PkIrC6oywTQ&q=85&s=de92bb6c5105359c6a95823ec6c2f88e 560w, https://mintcdn.com/docs-staging-chore-management-api-autoupdate/oiDO-PkIrC6oywTQ/docs/images/cdy7uua7fh8z/6i68dMvHDTijfRmSgN1x8Q/ad900e7d4c0fb34645921435472b8684/privavy-policy-form.png?w=840&fit=max&auto=format&n=oiDO-PkIrC6oywTQ&q=85&s=05bdb298dc57a3f5dbde5579f6654588 840w, https://mintcdn.com/docs-staging-chore-management-api-autoupdate/oiDO-PkIrC6oywTQ/docs/images/cdy7uua7fh8z/6i68dMvHDTijfRmSgN1x8Q/ad900e7d4c0fb34645921435472b8684/privavy-policy-form.png?w=1100&fit=max&auto=format&n=oiDO-PkIrC6oywTQ&q=85&s=50cf010da400eef1aaeb6f687af1e459 1100w, https://mintcdn.com/docs-staging-chore-management-api-autoupdate/oiDO-PkIrC6oywTQ/docs/images/cdy7uua7fh8z/6i68dMvHDTijfRmSgN1x8Q/ad900e7d4c0fb34645921435472b8684/privavy-policy-form.png?w=1650&fit=max&auto=format&n=oiDO-PkIrC6oywTQ&q=85&s=1bedece2be991320d61c7179c1974324 1650w, https://mintcdn.com/docs-staging-chore-management-api-autoupdate/oiDO-PkIrC6oywTQ/docs/images/cdy7uua7fh8z/6i68dMvHDTijfRmSgN1x8Q/ad900e7d4c0fb34645921435472b8684/privavy-policy-form.png?w=2500&fit=max&auto=format&n=oiDO-PkIrC6oywTQ&q=85&s=dec032be1ccc63bb860829f41b14fb03 2500w" />
</Frame>

以下のセクションでは、ノードとフローを使用して更新ポリシーフォームを作成する方法と、そのフォームを [Post Login](/docs/ja-jp/customize/actions/explore-triggers/signup-and-login-triggers/login-trigger) Action に追加する手順について説明します。

<h2 id="create-a-form-from-scratch">
  フォームを一から作成する
</h2>

情報を収集するためのフォームを作成するには、次の手順に従います。

1. **Auth0 Dashboard > Actions > Forms** を選択して、フォームエディターを開きます。
2. **Create Form** > **Start from scratch** を選択します。

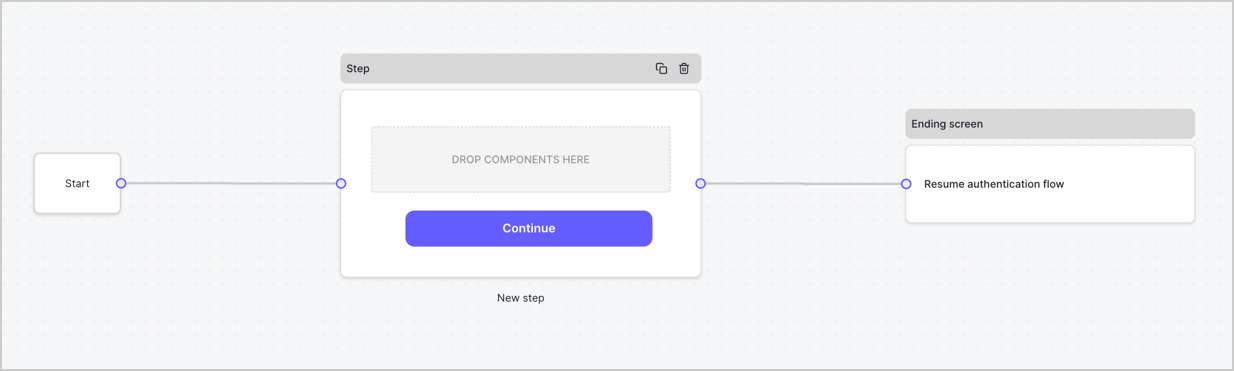
デフォルトでは、新しいフォームには Start ノード、Step ノード、Ending screen ノードが含まれています。
<Frame>
  <img src="https://mintcdn.com/docs-staging-chore-management-api-autoupdate/5OH5qupGbDGigNkI/docs/images/cdy7uua7fh8z/2TZ9jSjgEcARFpULI6hz4R/a4319a1bd482f2ee5cc23100fdb2f42c/New-form-Forms-for-action-use-case.png?fit=max&auto=format&n=5OH5qupGbDGigNkI&q=85&s=52ee07c6be793b8e3957427b4c06a70d" alt="Dashboard > Forms > Use Cases > Form" data-og-width="1234" width="1234" data-og-height="371" height="371" data-path="docs/images/cdy7uua7fh8z/2TZ9jSjgEcARFpULI6hz4R/a4319a1bd482f2ee5cc23100fdb2f42c/New-form-Forms-for-action-use-case.png" data-optimize="true" data-opv="3" srcset="https://mintcdn.com/docs-staging-chore-management-api-autoupdate/5OH5qupGbDGigNkI/docs/images/cdy7uua7fh8z/2TZ9jSjgEcARFpULI6hz4R/a4319a1bd482f2ee5cc23100fdb2f42c/New-form-Forms-for-action-use-case.png?w=280&fit=max&auto=format&n=5OH5qupGbDGigNkI&q=85&s=c0e17107ac26ba6b92f7201dfbe34849 280w, https://mintcdn.com/docs-staging-chore-management-api-autoupdate/5OH5qupGbDGigNkI/docs/images/cdy7uua7fh8z/2TZ9jSjgEcARFpULI6hz4R/a4319a1bd482f2ee5cc23100fdb2f42c/New-form-Forms-for-action-use-case.png?w=560&fit=max&auto=format&n=5OH5qupGbDGigNkI&q=85&s=1ee8bf336acc45435e8780b5a515ebc5 560w, https://mintcdn.com/docs-staging-chore-management-api-autoupdate/5OH5qupGbDGigNkI/docs/images/cdy7uua7fh8z/2TZ9jSjgEcARFpULI6hz4R/a4319a1bd482f2ee5cc23100fdb2f42c/New-form-Forms-for-action-use-case.png?w=840&fit=max&auto=format&n=5OH5qupGbDGigNkI&q=85&s=abff23856df4920ddb687d97ad3722e6 840w, https://mintcdn.com/docs-staging-chore-management-api-autoupdate/5OH5qupGbDGigNkI/docs/images/cdy7uua7fh8z/2TZ9jSjgEcARFpULI6hz4R/a4319a1bd482f2ee5cc23100fdb2f42c/New-form-Forms-for-action-use-case.png?w=1100&fit=max&auto=format&n=5OH5qupGbDGigNkI&q=85&s=50b4052411d782feb91aab139f756af3 1100w, https://mintcdn.com/docs-staging-chore-management-api-autoupdate/5OH5qupGbDGigNkI/docs/images/cdy7uua7fh8z/2TZ9jSjgEcARFpULI6hz4R/a4319a1bd482f2ee5cc23100fdb2f42c/New-form-Forms-for-action-use-case.png?w=1650&fit=max&auto=format&n=5OH5qupGbDGigNkI&q=85&s=076022785762532eb39e28b1df3013b0 1650w, https://mintcdn.com/docs-staging-chore-management-api-autoupdate/5OH5qupGbDGigNkI/docs/images/cdy7uua7fh8z/2TZ9jSjgEcARFpULI6hz4R/a4319a1bd482f2ee5cc23100fdb2f42c/New-form-Forms-for-action-use-case.png?w=2500&fit=max&auto=format&n=5OH5qupGbDGigNkI&q=85&s=bb75874f6bd35e2bb7c9b62a5f1f3e01 2500w" />
</Frame>

<h3 id="configure-the-step-node">
  Step ノードを設定する
</h3>

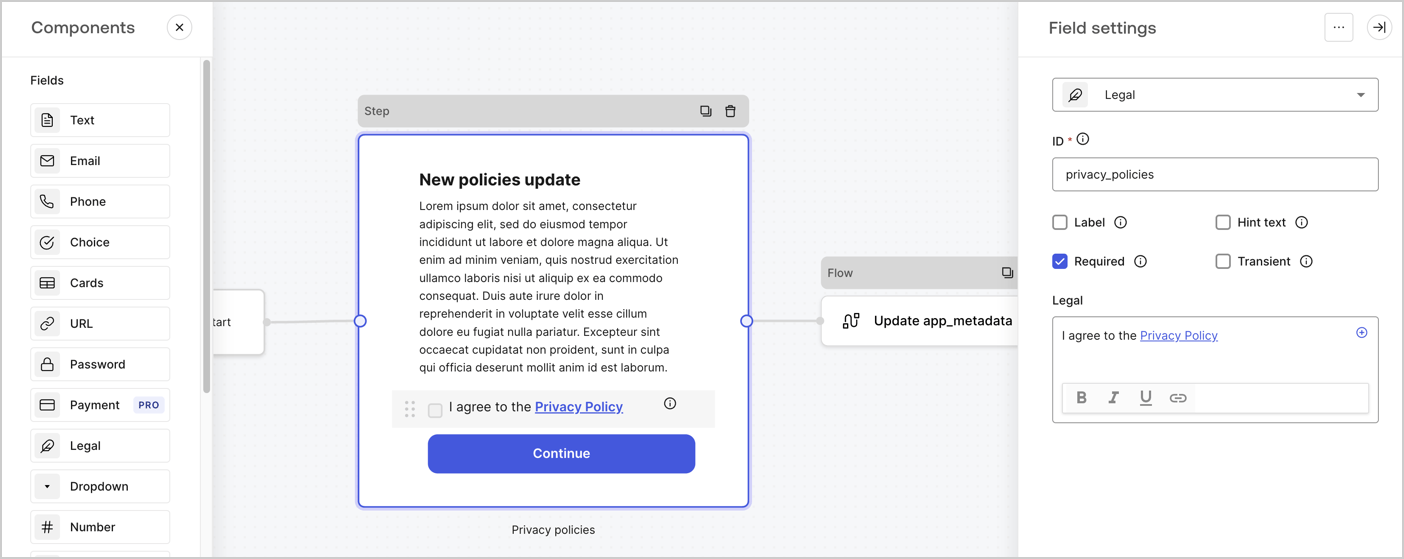
Step ノードは、ユーザーに表示されるグラフィカルインターフェースです。次の手順で、新しい同意の承諾値を収集するための [Fields](/docs/ja-jp/customize/forms/nodes-and-components) を Step ノードに追加します。

1. **Components menu** から **Rich text** フィールドを **Step** ノードにドラッグします。

   * **Rich text**: プライバシーポリシーの更新内容に関する説明を入力します。
   * **Save** を選択します。
2. **Legal** フィールドを **Step** ノードにドラッグします。

   * **ID**: `privacy_policies` と入力します。
   * **Required**: チェックボックスをオンにします。
   * **Legal**: `I agree to the Privacy Policy` と入力します。
   * **Save** を選択します。
3. 保存するには **Publish** を選択します。
<Frame>
  <img src="https://mintcdn.com/docs-staging-chore-management-api-autoupdate/uxaWpNuZEjMCtl4x/docs/images/cdy7uua7fh8z/59zFFjQjAnjogkc2QGIqqJ/0ad66b1b636544122aa4e65968b76c2c/privacy-policy-step-node.png?fit=max&auto=format&n=uxaWpNuZEjMCtl4x&q=85&s=5e8ecec1c5bff6f4d5e550708a47c7a1" alt="Dashboard > Actions > Forms > プライバシーポリシーのユースケースの Step ノード" data-og-width="1404" width="1404" data-og-height="559" height="559" data-path="docs/images/cdy7uua7fh8z/59zFFjQjAnjogkc2QGIqqJ/0ad66b1b636544122aa4e65968b76c2c/privacy-policy-step-node.png" data-optimize="true" data-opv="3" srcset="https://mintcdn.com/docs-staging-chore-management-api-autoupdate/uxaWpNuZEjMCtl4x/docs/images/cdy7uua7fh8z/59zFFjQjAnjogkc2QGIqqJ/0ad66b1b636544122aa4e65968b76c2c/privacy-policy-step-node.png?w=280&fit=max&auto=format&n=uxaWpNuZEjMCtl4x&q=85&s=2168e5579c56dae976b03ee15cbe0458 280w, https://mintcdn.com/docs-staging-chore-management-api-autoupdate/uxaWpNuZEjMCtl4x/docs/images/cdy7uua7fh8z/59zFFjQjAnjogkc2QGIqqJ/0ad66b1b636544122aa4e65968b76c2c/privacy-policy-step-node.png?w=560&fit=max&auto=format&n=uxaWpNuZEjMCtl4x&q=85&s=0aa5ee5db178ea0f45a5cf974ba418c8 560w, https://mintcdn.com/docs-staging-chore-management-api-autoupdate/uxaWpNuZEjMCtl4x/docs/images/cdy7uua7fh8z/59zFFjQjAnjogkc2QGIqqJ/0ad66b1b636544122aa4e65968b76c2c/privacy-policy-step-node.png?w=840&fit=max&auto=format&n=uxaWpNuZEjMCtl4x&q=85&s=abbacf98f2bbcb70dc3a39876fb34ba8 840w, https://mintcdn.com/docs-staging-chore-management-api-autoupdate/uxaWpNuZEjMCtl4x/docs/images/cdy7uua7fh8z/59zFFjQjAnjogkc2QGIqqJ/0ad66b1b636544122aa4e65968b76c2c/privacy-policy-step-node.png?w=1100&fit=max&auto=format&n=uxaWpNuZEjMCtl4x&q=85&s=0b49204aaa8e1daed577fced41d9862d 1100w, https://mintcdn.com/docs-staging-chore-management-api-autoupdate/uxaWpNuZEjMCtl4x/docs/images/cdy7uua7fh8z/59zFFjQjAnjogkc2QGIqqJ/0ad66b1b636544122aa4e65968b76c2c/privacy-policy-step-node.png?w=1650&fit=max&auto=format&n=uxaWpNuZEjMCtl4x&q=85&s=53584aead606546989afd7b1de15a355 1650w, https://mintcdn.com/docs-staging-chore-management-api-autoupdate/uxaWpNuZEjMCtl4x/docs/images/cdy7uua7fh8z/59zFFjQjAnjogkc2QGIqqJ/0ad66b1b636544122aa4e65968b76c2c/privacy-policy-step-node.png?w=2500&fit=max&auto=format&n=uxaWpNuZEjMCtl4x&q=85&s=a01c132d1086626ae4646bec04ca6b56 2500w" />
</Frame>

<h3 id="configure-the-flow-node">
  Flow ノードを設定する
</h3>

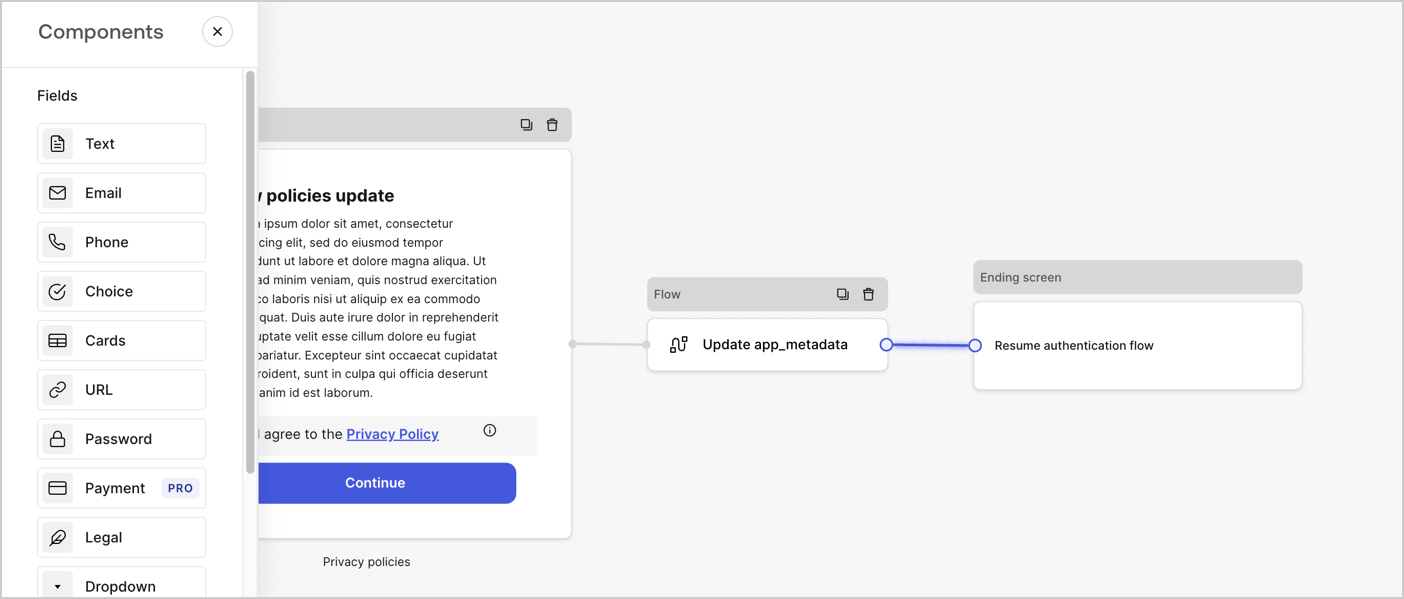
次の手順に従って、**Step** ノードの後に **Flow** ノードを追加し、`app_metadata` を更新して認証フローを再開します。

1. フォームエディターの下部で **Flow** を選択します。
2. **Step** ノードと **Ending Screen** ノードの間にある既存のリンクを削除します。
3. 新しい **Flow** > **Click to add a flow** > **Create a new flow.** を選択します。

   * **Name** フィールドに `Update app_metadata` と入力します。
   * **Create** を選択します。
   * **Save** を選択します。
4. 下図のように、**Flow** ノードを **Step** ノードと **Ending Screen** ノードにリンクします。
5. 保存するには **Publish** を選択します。
<Frame>
  <img src="https://mintcdn.com/docs-staging-chore-management-api-autoupdate/oiDO-PkIrC6oywTQ/docs/images/cdy7uua7fh8z/6YIkzm7SrpM9LW76AXuRzh/353c518fe82bbaa440836da1d83596d6/link-policies.png?fit=max&auto=format&n=oiDO-PkIrC6oywTQ&q=85&s=bb3cc3b62ecb0f62c41999c098476098" alt="Dashboard > Actions > Forms > Form" data-og-width="1404" width="1404" data-og-height="599" height="599" data-path="docs/images/cdy7uua7fh8z/6YIkzm7SrpM9LW76AXuRzh/353c518fe82bbaa440836da1d83596d6/link-policies.png" data-optimize="true" data-opv="3" srcset="https://mintcdn.com/docs-staging-chore-management-api-autoupdate/oiDO-PkIrC6oywTQ/docs/images/cdy7uua7fh8z/6YIkzm7SrpM9LW76AXuRzh/353c518fe82bbaa440836da1d83596d6/link-policies.png?w=280&fit=max&auto=format&n=oiDO-PkIrC6oywTQ&q=85&s=e90088312fa8a99e0afa57a4bf5bb615 280w, https://mintcdn.com/docs-staging-chore-management-api-autoupdate/oiDO-PkIrC6oywTQ/docs/images/cdy7uua7fh8z/6YIkzm7SrpM9LW76AXuRzh/353c518fe82bbaa440836da1d83596d6/link-policies.png?w=560&fit=max&auto=format&n=oiDO-PkIrC6oywTQ&q=85&s=bb944838928b127925b623e2d42c14ef 560w, https://mintcdn.com/docs-staging-chore-management-api-autoupdate/oiDO-PkIrC6oywTQ/docs/images/cdy7uua7fh8z/6YIkzm7SrpM9LW76AXuRzh/353c518fe82bbaa440836da1d83596d6/link-policies.png?w=840&fit=max&auto=format&n=oiDO-PkIrC6oywTQ&q=85&s=9c40f1359850102a89c53bd0070e46ce 840w, https://mintcdn.com/docs-staging-chore-management-api-autoupdate/oiDO-PkIrC6oywTQ/docs/images/cdy7uua7fh8z/6YIkzm7SrpM9LW76AXuRzh/353c518fe82bbaa440836da1d83596d6/link-policies.png?w=1100&fit=max&auto=format&n=oiDO-PkIrC6oywTQ&q=85&s=4d1645049cae084f852b5d51a13fc6e8 1100w, https://mintcdn.com/docs-staging-chore-management-api-autoupdate/oiDO-PkIrC6oywTQ/docs/images/cdy7uua7fh8z/6YIkzm7SrpM9LW76AXuRzh/353c518fe82bbaa440836da1d83596d6/link-policies.png?w=1650&fit=max&auto=format&n=oiDO-PkIrC6oywTQ&q=85&s=a1ebcbe6f699479fbc2c86f1d032a842 1650w, https://mintcdn.com/docs-staging-chore-management-api-autoupdate/oiDO-PkIrC6oywTQ/docs/images/cdy7uua7fh8z/6YIkzm7SrpM9LW76AXuRzh/353c518fe82bbaa440836da1d83596d6/link-policies.png?w=2500&fit=max&auto=format&n=oiDO-PkIrC6oywTQ&q=85&s=d8bb61de5f96e675e78ded3b7751d005 2500w" />
</Frame>

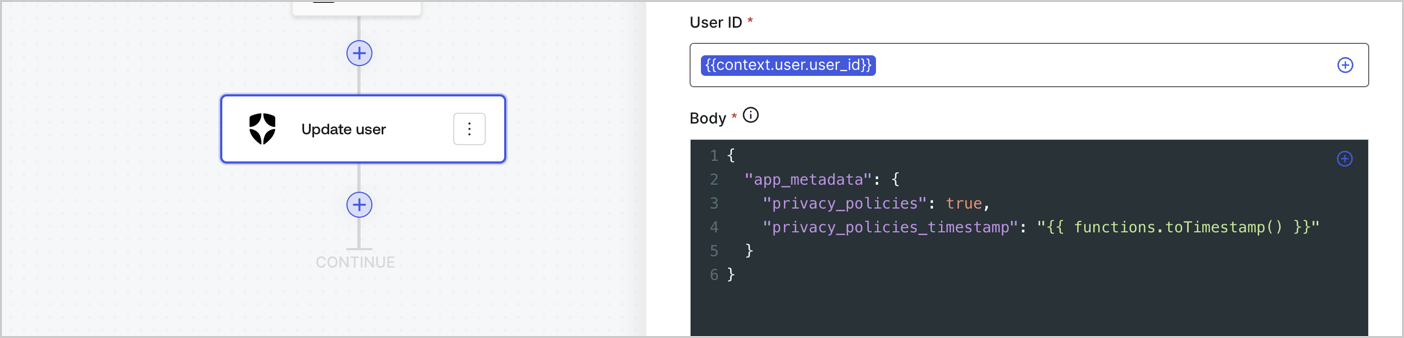
次の手順に従って、フローに Auth0 の Update user アクションを追加します。

1. **Flow** **Update app\_metadata** > **Edit flow** を選択し、新しいタブで Flow エディターを開きます。
2. StartAction の下にある **+** アイコンを選択して **Update user** アクションを追加します。以下のフィールドに入力し、**Save** を選択して続行します。

   * **Connection**: ドロップダウンから、M2M アプリケーション用の Vault 接続を選択します。

   * **User ID**: `{{context.user.user_id}}` と入力します。

   * **Body**: 次のコードをコピー＆ペーストして、privacy\_policies プロパティと privacy\_policies\_timestamp プロパティで app\_metadata を更新します。

     ```text lines theme={null}
     {
       "app_metadata": {
         "privacy_policies": true,
         "privacy_policies_timestamp": "{{ functions.toTimestamp() }}"
       }
     }
     ```

   * **Save** を選択します。
3. 保存するには **Publish** を選択します。
<Frame>
  <img src="https://mintcdn.com/docs-staging-chore-management-api-autoupdate/QLz_5h5hh6UlDAQ8/docs/images/cdy7uua7fh8z/CvMNIwWrOUwaFW4X3G28p/1fb70ae57a20749d9ffaaba8dc0b7e26/update-user-privacy.png?fit=max&auto=format&n=QLz_5h5hh6UlDAQ8&q=85&s=4cfcdcefe27fc753ca9fab05b6bf0a70" alt="Dashboard > Actions > Forms > User case privacy policy code" data-og-width="1404" width="1404" data-og-height="338" height="338" data-path="docs/images/cdy7uua7fh8z/CvMNIwWrOUwaFW4X3G28p/1fb70ae57a20749d9ffaaba8dc0b7e26/update-user-privacy.png" data-optimize="true" data-opv="3" srcset="https://mintcdn.com/docs-staging-chore-management-api-autoupdate/QLz_5h5hh6UlDAQ8/docs/images/cdy7uua7fh8z/CvMNIwWrOUwaFW4X3G28p/1fb70ae57a20749d9ffaaba8dc0b7e26/update-user-privacy.png?w=280&fit=max&auto=format&n=QLz_5h5hh6UlDAQ8&q=85&s=6e29f3a830cd21dcce3e6db7265dbce6 280w, https://mintcdn.com/docs-staging-chore-management-api-autoupdate/QLz_5h5hh6UlDAQ8/docs/images/cdy7uua7fh8z/CvMNIwWrOUwaFW4X3G28p/1fb70ae57a20749d9ffaaba8dc0b7e26/update-user-privacy.png?w=560&fit=max&auto=format&n=QLz_5h5hh6UlDAQ8&q=85&s=1d67a05388d67e16e00609708b2e16dd 560w, https://mintcdn.com/docs-staging-chore-management-api-autoupdate/QLz_5h5hh6UlDAQ8/docs/images/cdy7uua7fh8z/CvMNIwWrOUwaFW4X3G28p/1fb70ae57a20749d9ffaaba8dc0b7e26/update-user-privacy.png?w=840&fit=max&auto=format&n=QLz_5h5hh6UlDAQ8&q=85&s=843d1a1157ae6f723e8a888ffee4496c 840w, https://mintcdn.com/docs-staging-chore-management-api-autoupdate/QLz_5h5hh6UlDAQ8/docs/images/cdy7uua7fh8z/CvMNIwWrOUwaFW4X3G28p/1fb70ae57a20749d9ffaaba8dc0b7e26/update-user-privacy.png?w=1100&fit=max&auto=format&n=QLz_5h5hh6UlDAQ8&q=85&s=ffc81a11fc01a08165d698f94b8ed061 1100w, https://mintcdn.com/docs-staging-chore-management-api-autoupdate/QLz_5h5hh6UlDAQ8/docs/images/cdy7uua7fh8z/CvMNIwWrOUwaFW4X3G28p/1fb70ae57a20749d9ffaaba8dc0b7e26/update-user-privacy.png?w=1650&fit=max&auto=format&n=QLz_5h5hh6UlDAQ8&q=85&s=06d0ddd33c8eba44e26f1b17783bfb75 1650w, https://mintcdn.com/docs-staging-chore-management-api-autoupdate/QLz_5h5hh6UlDAQ8/docs/images/cdy7uua7fh8z/CvMNIwWrOUwaFW4X3G28p/1fb70ae57a20749d9ffaaba8dc0b7e26/update-user-privacy.png?w=2500&fit=max&auto=format&n=QLz_5h5hh6UlDAQ8&q=85&s=39705a44af3bc6daead42d24b4ee0b6d 2500w" />
</Frame>

<Callout icon="file-lines" color="#0EA5E9" iconType="regular">
  フロー **Update app\_metadata** では、app`_metadata` オブジェクトに `privacy_policies: true` を追加し、さらに [helper function.](/docs/ja-jp/customize/forms/variables) を使ってタイムスタンプを生成します。
</Callout>

<h2 id="retrieve-the-form-render-code">
  フォームのレンダリングコードを取得する
</h2>

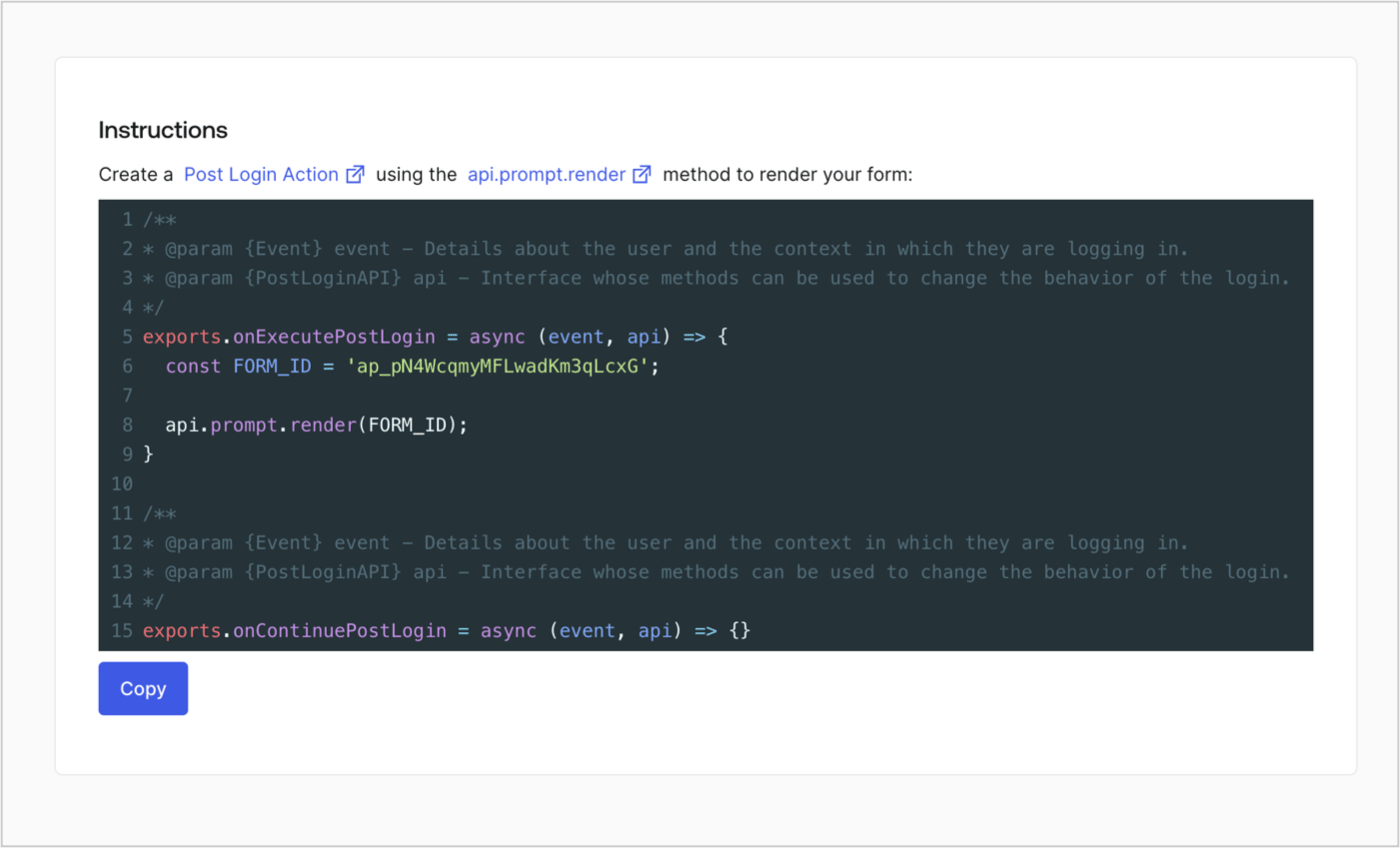
以下の手順に従って、カスタムの Post Login Action でフォームを表示するためのレンダリングコードを取得します。

* フォームエディターで、**`<> Render`** を選択します。
* **Copy** を選択します。
<Frame>
  <img src="https://mintcdn.com/docs-staging-chore-management-api-autoupdate/oVD85MvA7ZVayXF0/docs/images/cdy7uua7fh8z/2EIUzc539sq9lwoTKbjoJv/496a864c0fc44a782c9cadca119dbfb0/embed.png?fit=max&auto=format&n=oVD85MvA7ZVayXF0&q=85&s=23db17feff5783488b80b783cd37bc1e" alt="Dashboard > Actions > Forms > Form > Embed" data-og-width="1400" width="1400" data-og-height="848" height="848" data-path="docs/images/cdy7uua7fh8z/2EIUzc539sq9lwoTKbjoJv/496a864c0fc44a782c9cadca119dbfb0/embed.png" data-optimize="true" data-opv="3" srcset="https://mintcdn.com/docs-staging-chore-management-api-autoupdate/oVD85MvA7ZVayXF0/docs/images/cdy7uua7fh8z/2EIUzc539sq9lwoTKbjoJv/496a864c0fc44a782c9cadca119dbfb0/embed.png?w=280&fit=max&auto=format&n=oVD85MvA7ZVayXF0&q=85&s=88af01e18dfda65e15c8eb68c011f272 280w, https://mintcdn.com/docs-staging-chore-management-api-autoupdate/oVD85MvA7ZVayXF0/docs/images/cdy7uua7fh8z/2EIUzc539sq9lwoTKbjoJv/496a864c0fc44a782c9cadca119dbfb0/embed.png?w=560&fit=max&auto=format&n=oVD85MvA7ZVayXF0&q=85&s=e8f06dfd4ffc9450f98542b62a8888d9 560w, https://mintcdn.com/docs-staging-chore-management-api-autoupdate/oVD85MvA7ZVayXF0/docs/images/cdy7uua7fh8z/2EIUzc539sq9lwoTKbjoJv/496a864c0fc44a782c9cadca119dbfb0/embed.png?w=840&fit=max&auto=format&n=oVD85MvA7ZVayXF0&q=85&s=14e3d15cd1189eabb74dfbf256ed2a22 840w, https://mintcdn.com/docs-staging-chore-management-api-autoupdate/oVD85MvA7ZVayXF0/docs/images/cdy7uua7fh8z/2EIUzc539sq9lwoTKbjoJv/496a864c0fc44a782c9cadca119dbfb0/embed.png?w=1100&fit=max&auto=format&n=oVD85MvA7ZVayXF0&q=85&s=54814b0bcc88702b3dd22c1c6e7973fa 1100w, https://mintcdn.com/docs-staging-chore-management-api-autoupdate/oVD85MvA7ZVayXF0/docs/images/cdy7uua7fh8z/2EIUzc539sq9lwoTKbjoJv/496a864c0fc44a782c9cadca119dbfb0/embed.png?w=1650&fit=max&auto=format&n=oVD85MvA7ZVayXF0&q=85&s=45e97eff68fb5e1188c8b64d86b91e10 1650w, https://mintcdn.com/docs-staging-chore-management-api-autoupdate/oVD85MvA7ZVayXF0/docs/images/cdy7uua7fh8z/2EIUzc539sq9lwoTKbjoJv/496a864c0fc44a782c9cadca119dbfb0/embed.png?w=2500&fit=max&auto=format&n=oVD85MvA7ZVayXF0&q=85&s=78ba3303d36d196439c571f270cdd8b9 2500w" />
</Frame>

<h2 id="create-a-post-login-action">
  Post Login Action を作成する
</h2>

次の手順に従って、フォームを表示する post-login Action を作成します。

1. **Auth0 Dashboard > Actions > Flows > Login** に移動します。
2. **+** アイコンを選択し、**Build from scratch** を選択します。

   * **Name**: `Render Update Policy Form` と入力します。
   * **Trigger**: `Login / Post Login` を選択します。
   * **Runtime**: 推奨バージョンを選択します。
3. **Create** を選択します。

post-login Action を設定するには、次の手順を実行します。

1. Code editor 内の既存のコードを削除します。
2. フォームを表示するコードを Code editor に貼り付けます。
3. フォームを表示するための条件ロジックを定義するよう、コードを編集します。

   ```javascript lines theme={null}
   /**
   * @param {Event} event - ユーザーと、そのユーザーがログインしているコンテキストに関する詳細。
   * @param {PostLoginAPI} api - ログインの動作を変更するためにメソッドを使用できるインターフェース。
   */
   exports.onExecutePostLogin = async (event, api) => {
     const FORM_ID = 'REPLACE_WITH_YOUR_FORM_ID';

     if (event.user.app_metadata.privacy_policies !== true) {
       api.prompt.render(FORM_ID);
     }
   }

   exports.onContinuePostLogin = async (event, api) => { }
   ```

   <Callout icon="file-lines" color="#0EA5E9" iconType="regular">
     上記のコード例では、ユーザーの app metadata に `privacy_policies` プロパティがない場合、フォームが表示されます。
   </Callout>
4. **Deploy** を選択します。
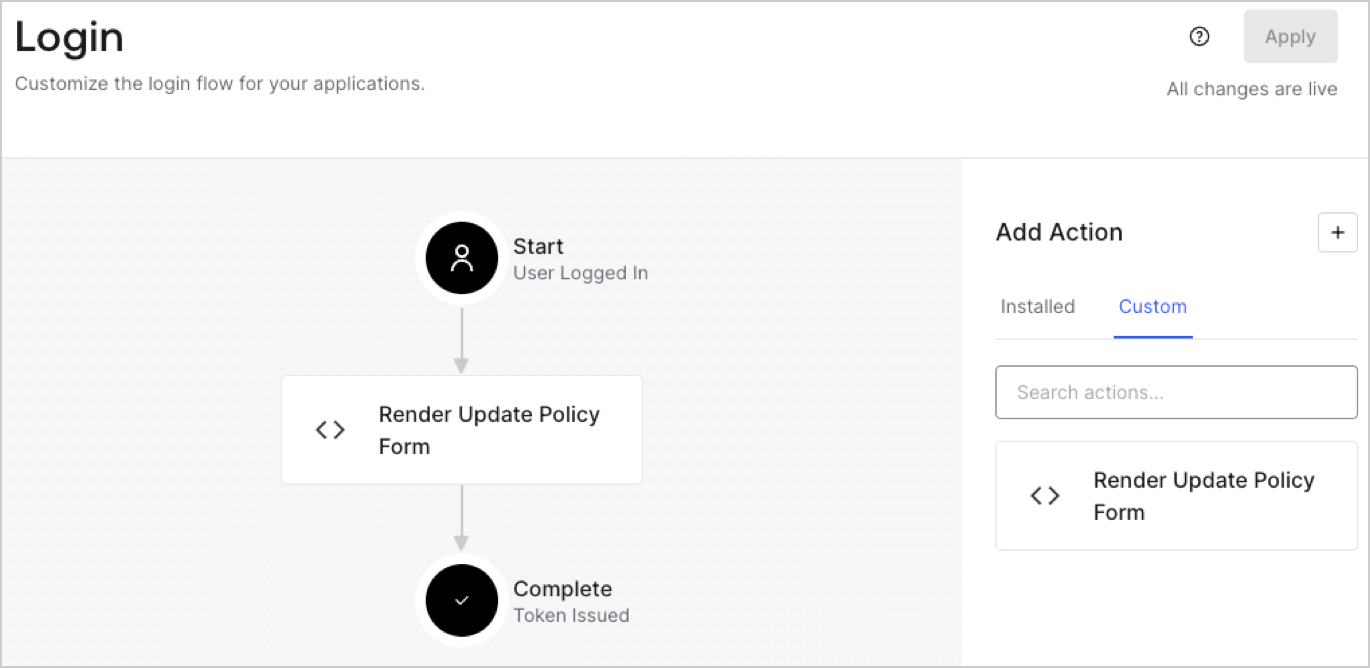
5. **Render Update Policy Form** Action を **Login** フローにドラッグ＆ドロップします。

   <Frame>
     <img src="https://mintcdn.com/docs-staging-chore-management-api-autoupdate/Hlj5AELI6oQmnetW/docs/images/cdy7uua7fh8z/5TOwDgevZsBqd7yZynUYWU/41ca909dc3007aed4f40ff794a05efa5/postlogin.png?fit=max&auto=format&n=Hlj5AELI6oQmnetW&q=85&s=d98e7703013038cd0a086042a85867dd" alt="Dashboard > Forms > Use Case > Render update policy form login action" data-og-width="1370" width="1370" data-og-height="668" height="668" data-path="docs/images/cdy7uua7fh8z/5TOwDgevZsBqd7yZynUYWU/41ca909dc3007aed4f40ff794a05efa5/postlogin.png" data-optimize="true" data-opv="3" srcset="https://mintcdn.com/docs-staging-chore-management-api-autoupdate/Hlj5AELI6oQmnetW/docs/images/cdy7uua7fh8z/5TOwDgevZsBqd7yZynUYWU/41ca909dc3007aed4f40ff794a05efa5/postlogin.png?w=280&fit=max&auto=format&n=Hlj5AELI6oQmnetW&q=85&s=4da7e755072fe765497f9538b11604f7 280w, https://mintcdn.com/docs-staging-chore-management-api-autoupdate/Hlj5AELI6oQmnetW/docs/images/cdy7uua7fh8z/5TOwDgevZsBqd7yZynUYWU/41ca909dc3007aed4f40ff794a05efa5/postlogin.png?w=560&fit=max&auto=format&n=Hlj5AELI6oQmnetW&q=85&s=0a529271c811943eebe742455fc96ae7 560w, https://mintcdn.com/docs-staging-chore-management-api-autoupdate/Hlj5AELI6oQmnetW/docs/images/cdy7uua7fh8z/5TOwDgevZsBqd7yZynUYWU/41ca909dc3007aed4f40ff794a05efa5/postlogin.png?w=840&fit=max&auto=format&n=Hlj5AELI6oQmnetW&q=85&s=d84889d9e8a7d700e1a62425ce8552e3 840w, https://mintcdn.com/docs-staging-chore-management-api-autoupdate/Hlj5AELI6oQmnetW/docs/images/cdy7uua7fh8z/5TOwDgevZsBqd7yZynUYWU/41ca909dc3007aed4f40ff794a05efa5/postlogin.png?w=1100&fit=max&auto=format&n=Hlj5AELI6oQmnetW&q=85&s=1643be8d2ef793aa84d1fde773e7d516 1100w, https://mintcdn.com/docs-staging-chore-management-api-autoupdate/Hlj5AELI6oQmnetW/docs/images/cdy7uua7fh8z/5TOwDgevZsBqd7yZynUYWU/41ca909dc3007aed4f40ff794a05efa5/postlogin.png?w=1650&fit=max&auto=format&n=Hlj5AELI6oQmnetW&q=85&s=9a1fb0919976ea3d6a51e2d6eccf052f 1650w, https://mintcdn.com/docs-staging-chore-management-api-autoupdate/Hlj5AELI6oQmnetW/docs/images/cdy7uua7fh8z/5TOwDgevZsBqd7yZynUYWU/41ca909dc3007aed4f40ff794a05efa5/postlogin.png?w=2500&fit=max&auto=format&n=Hlj5AELI6oQmnetW&q=85&s=30818d47992a5d5f1f08bebe529b74a4 2500w" />
   </Frame>
6. **Apply** を選択します。

<h3 id="test-implementation">
  実装をテストする
</h3>

次の手順に従って、実装をテストします。

1. `app_metadata` 属性の `privacy_policies` に値が設定されていない既存ユーザーでログインします。
2. Login フロー の post-login Action によってフォームが表示され、同意を求めるプロンプトが表示されます。
3. **Auth0 Dashboard > User Management > Users** を選択し、該当するユーザーを見つけて、`app_metadata` 属性の `privacy_policies` に `true` の値とタイムスタンプが含まれていることを確認します。