> ## Documentation Index
> Fetch the complete documentation index at: https://docs-staging-chore-management-api-autoupdate.mintlify.site/llms.txt
> Use this file to discover all available pages before exploring further.

> Cross App Access（XAA）のOIDCアイデンティティプロバイダーとしてOktaを設定する方法を説明します。

# OIDC IdPとしてのOkta

export const ReleaseStageNotice = ({feature, stage, plans, contact, terms}) => {
  const stageTextMap = {
    "beta": "Beta",
    "ea": "早期アクセス"
  };
  const stageText = stageTextMap[stage] || "製品リリース段階";
  const prsLink = "/docs/troubleshoot/product-lifecycle/product-release-stages";
  const linkify = (text, url) => {
    return <a href={url} target="_blank" rel="noreferrer" class="link">{text}</a>;
  };
  const includeDetails = (plans, contact, terms) => {
    const hasDetails = terms || plans || contact;
    if (!hasDetails) return null;
    return <span data-as="p">
            {plans && <>この機能は{linkify(`${plans}プラン`, "https://auth0.com/pricing")}でご利用いただけます。 </>}
            {contact && "参加をご希望の場合は、" + contact + "までお問い合わせください。 "}
            {terms && <>この機能を使用することにより、Oktaの該当する無料トライアル規約および{linkify("Master Subscription Agreement", "https://www.okta.com/legal")}に同意したものとみなされます。</>}
        </span>;
  };
  return <Warning>
            <span data-as="p">
                <strong>{feature}機能は現在、{linkify(stageText, prsLink)}です。</strong>
            </span>

            {includeDetails(plans, contact, terms)}
        </Warning>;
};

<ReleaseStageNotice feature="Cross App Access (XAA) for the Resource App" stage="ea" plans="Enterprise, B2B Pro, and B2B Essential" terms="true" />

<Callout icon="file-lines" color="#0EA5E9" iconType="regular">
  このガイドでは、Oktaをエンタープライズアイデンティティプロバイダー (IdP) として使用し、テストに使用できるOkta テナントへの管理者アクセス権をお持ちであることを前提としています。お持ちでない場合は、[Okta テナントを作成して構成する](/docs/ja-jp/ai-agents-mcp/cross-app-access/idp/okta-as-oidc-idp#create-and-configure-your-okta-tenant)を参照してください。
</Callout>

Cross App Access (XAA) のOIDCエンタープライズアイデンティティプロバイダーとしてOktaを設定します。Okta テナントをセットアップし、OktaにResource AppとRequesting Appを登録した後、Auth0 テナントとOktaをフェデレーションするWorkforce Enterprise接続を設定します。

<h2 id="create-and-configure-your-okta-tenant">
  Okta テナントを作成して構成する
</h2>

Cross App Access 用の Okta テナントを作成して構成するには、次の手順に従います。

* [Okta Developer サイト](https://developer.okta.com/signup/)で **Okta Integrator Free Plan** にサインアップします。サインアップ後、新しい Okta テナントにリダイレクトされます。
* Okta テナントで Cross App Access が有効になっていない場合は、`developers@okta.com` にメールで連絡し、Okta テナントでの XAA の有効化をリクエストしてください。

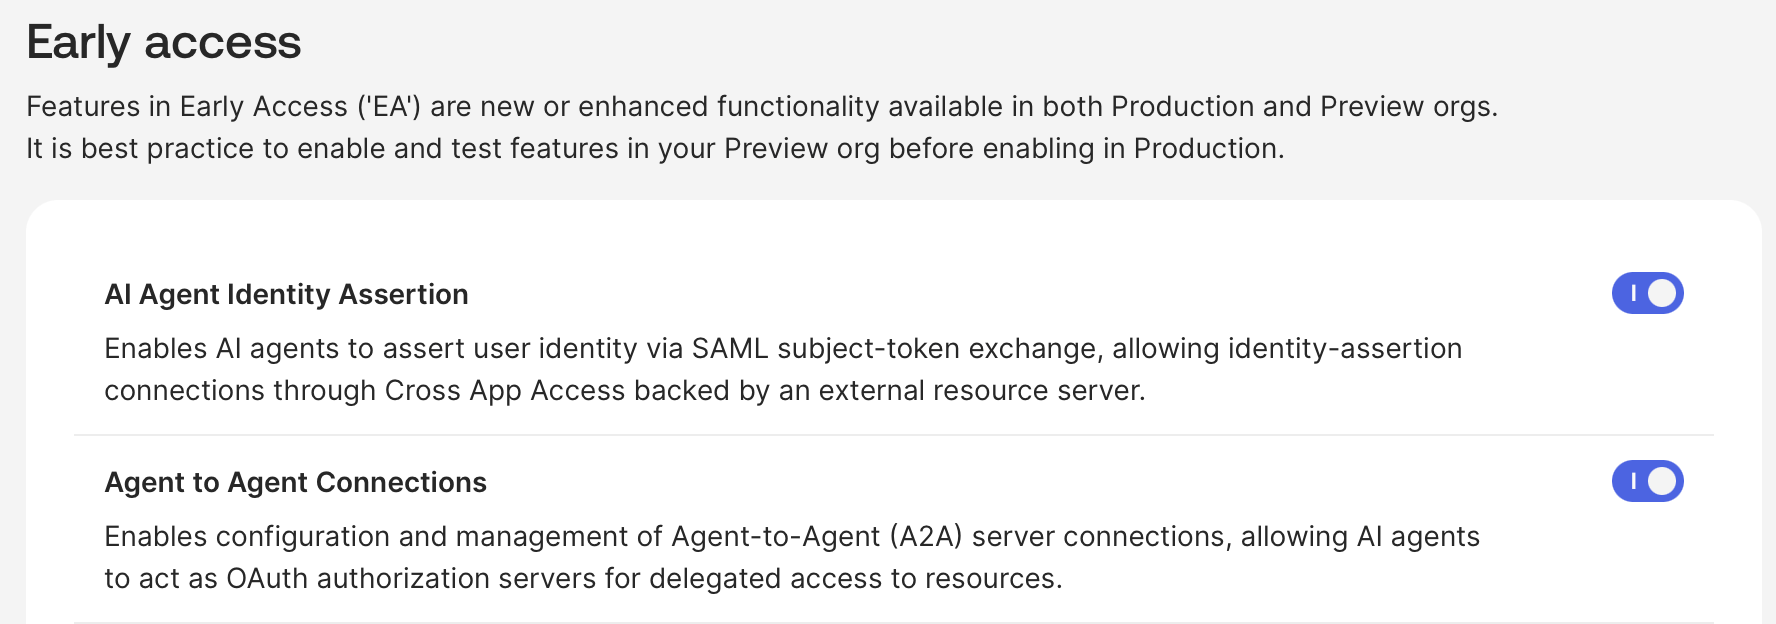
Cross App Access を有効にしたら、Okta Admin Console の **Okta Admin > 設定 > Features** で、以下の機能がオンになっていることを確認してください。
<Frame>
  <img src="https://mintcdn.com/docs-staging-chore-management-api-autoupdate/oO2QSWk9OPIJm0Gq/docs/images/xaa/xaa_okta_flags_ea.png?fit=max&auto=format&n=oO2QSWk9OPIJm0Gq&q=85&s=6506ec7c54e5d628ff69c321863f5588" alt="" width="1776" height="624" data-path="docs/images/xaa/xaa_okta_flags_ea.png" />
</Frame>

<h2 id="register-the-requesting-app-in-okta">
  Okta で Requesting App を登録する
</h2>

<h3 id="create-requesting-app-in-okta">
  Okta で Requesting App を作成する
</h3>

Requesting App は標準的な OIDC アプリケーションです。Okta で Requesting App を作成するには、次の手順を実行します。

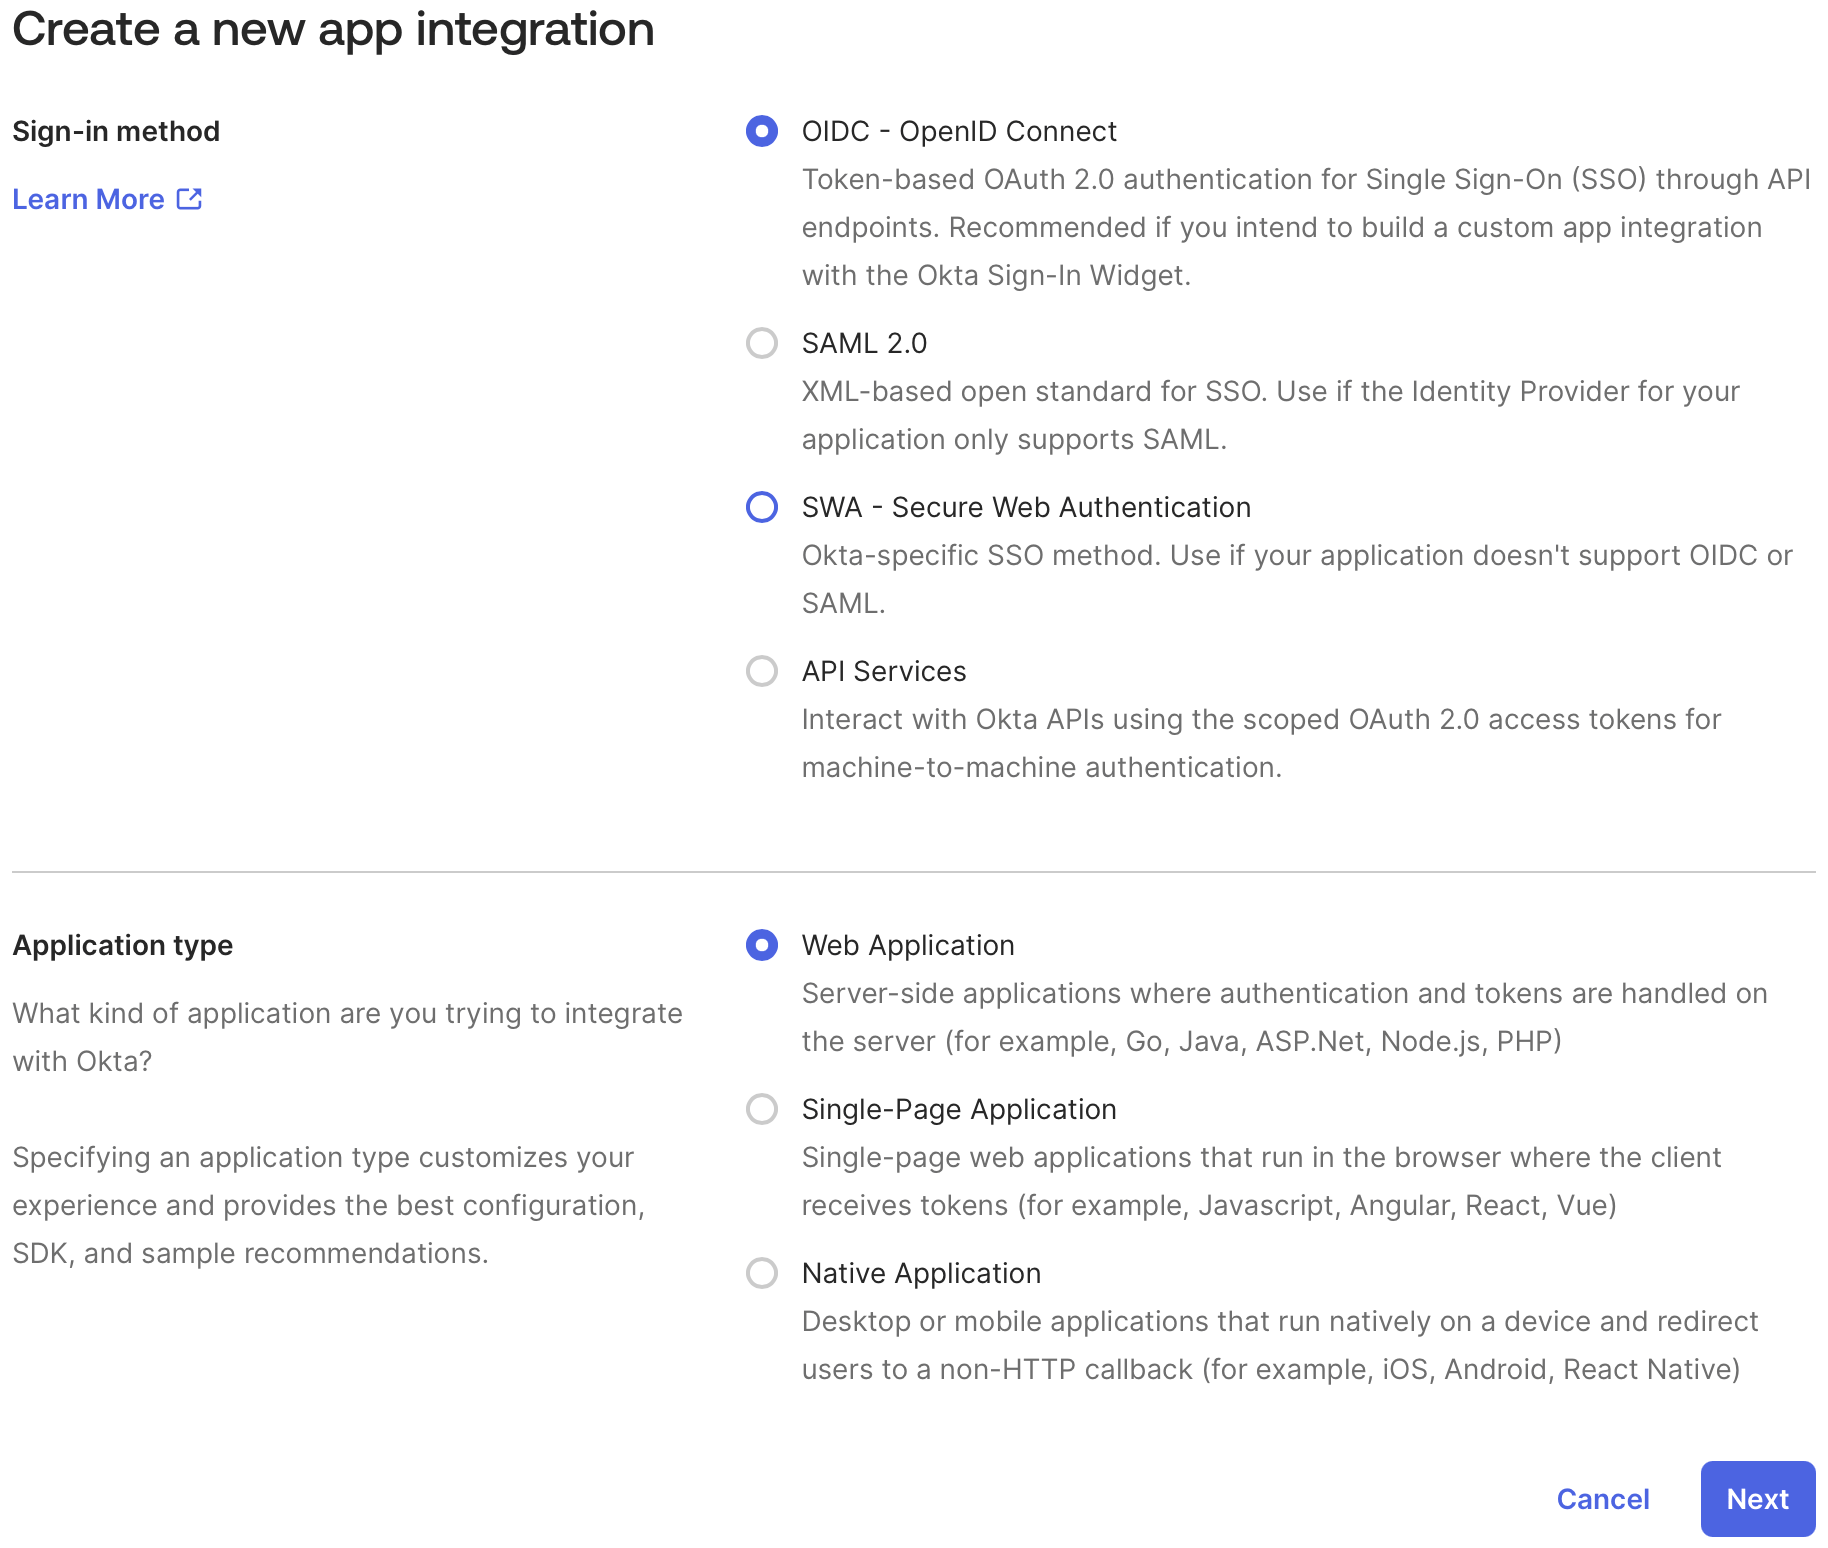
1. Okta Admin Console で、**アプリケーション > アプリケーション > Create App Integration** に移動し、**アプリケーションの種類**として **Web Application** を選択します。
<Frame>
  <img src="https://mintcdn.com/docs-staging-chore-management-api-autoupdate/oO2QSWk9OPIJm0Gq/docs/images/xaa/xaa_okta_req_app_new_type.png?fit=max&auto=format&n=oO2QSWk9OPIJm0Gq&q=85&s=b4acdd8258cd1399b988b21bda05506f" alt="" width="1828" height="1548" data-path="docs/images/xaa/xaa_okta_req_app_new_type.png" />
</Frame>

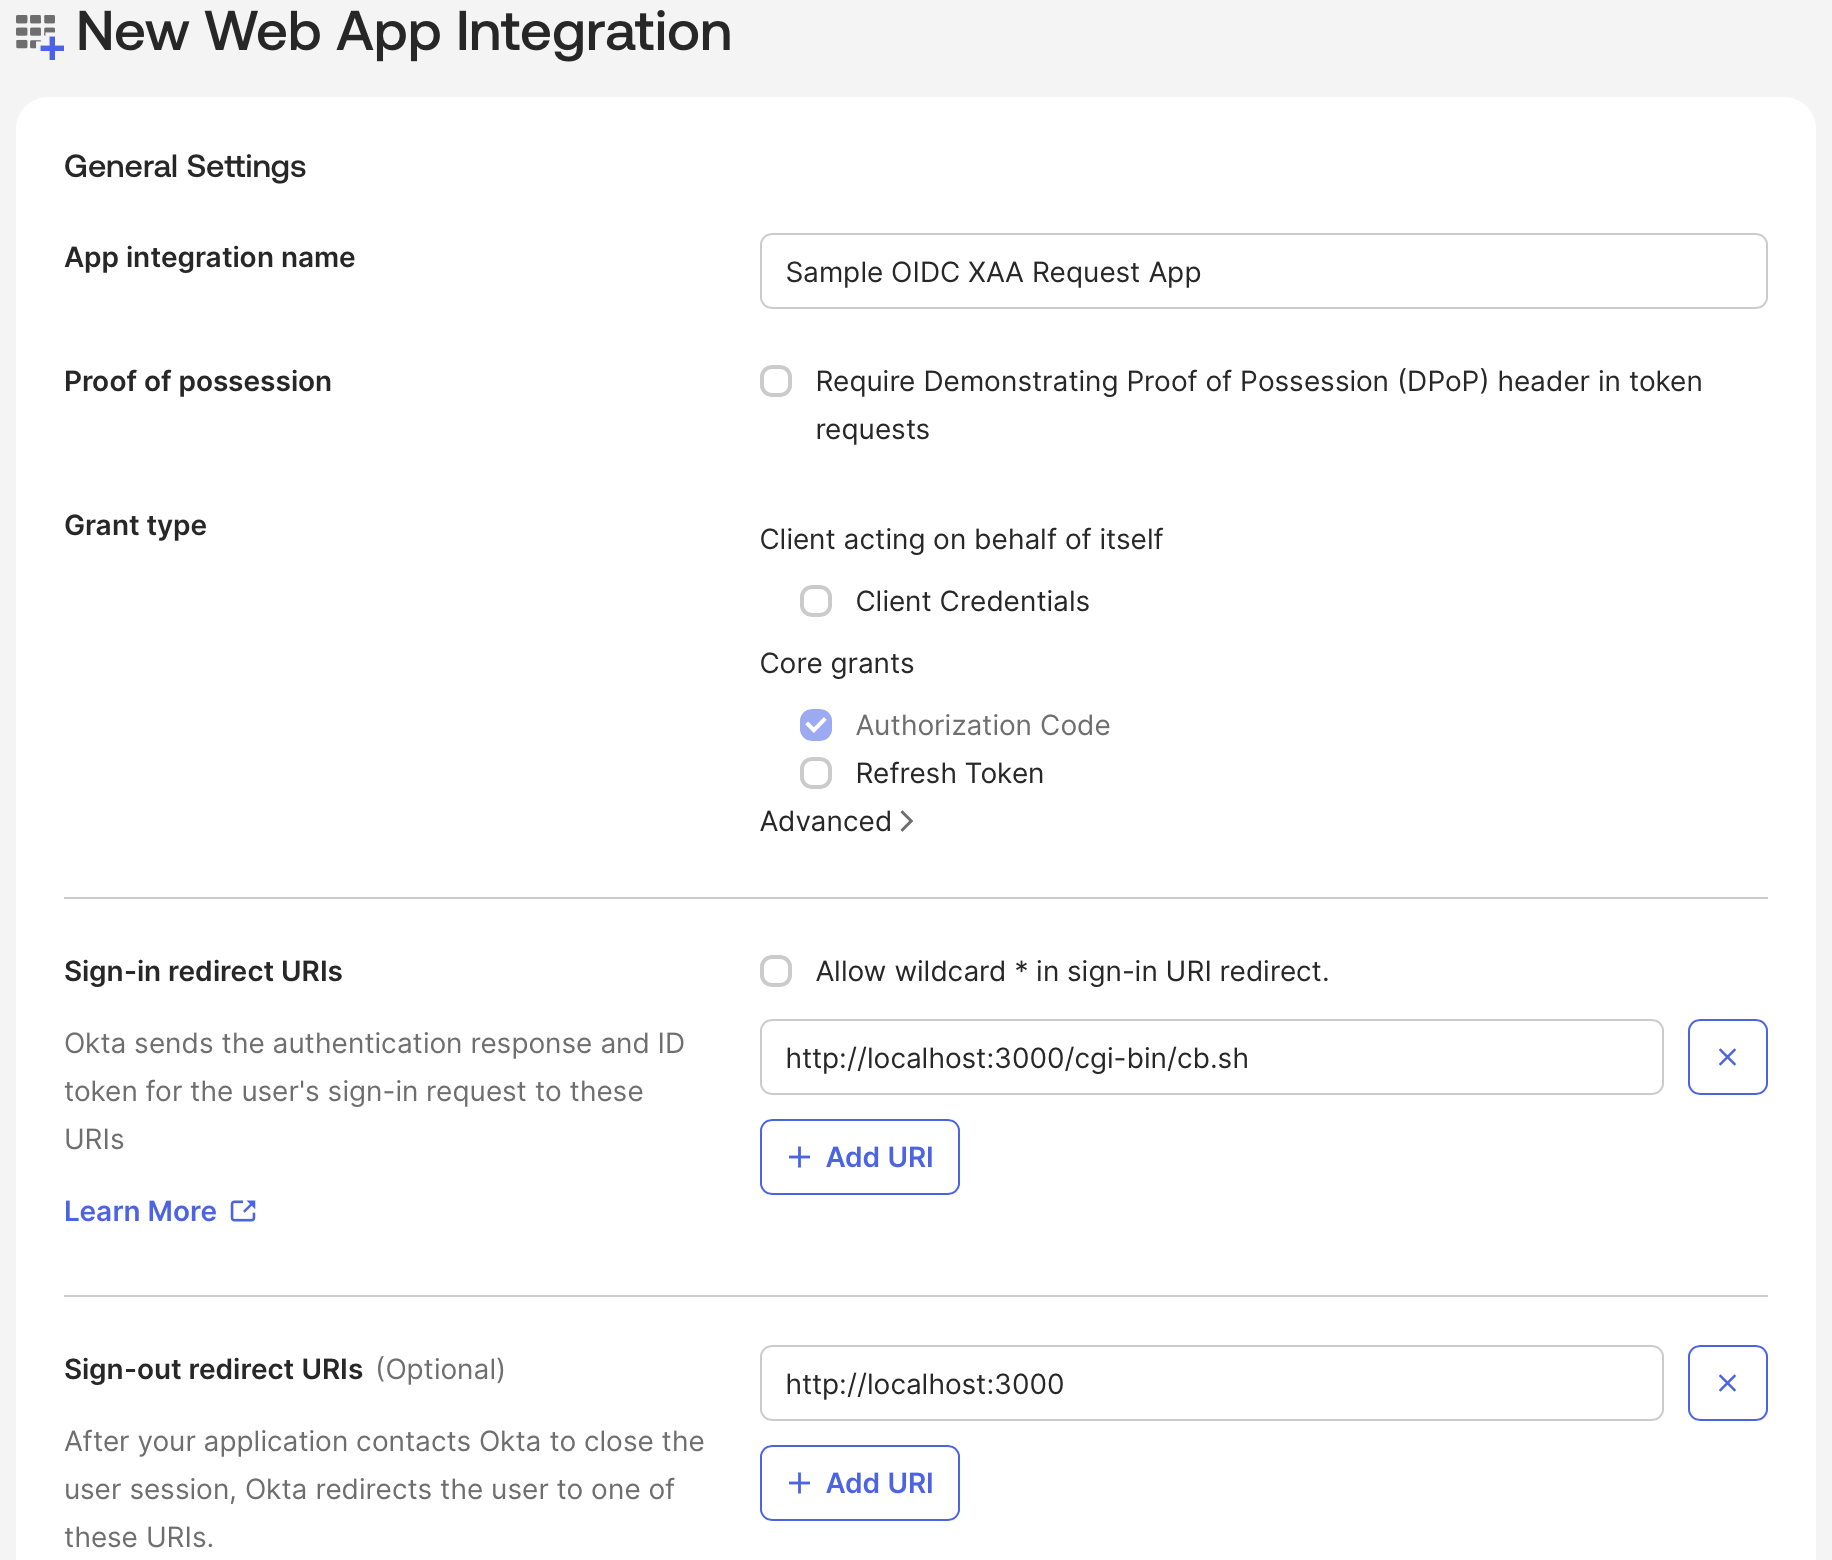
アプリケーション名と、Web アプリケーションにリダイレクトするサインイン用およびサインアウト用のリダイレクト URI を入力します。グループの割り当てはスキップし、**Save** を選択します。
<Frame>
  <img src="https://mintcdn.com/docs-staging-chore-management-api-autoupdate/QdI83TbahvpDNTUy/docs/images/xaa/okta_req_app_new_application.png?fit=max&auto=format&n=QdI83TbahvpDNTUy&q=85&s=6cf1e052d1003d47ad49c74469dd5a83" alt="" width="1832" height="1560" data-path="docs/images/xaa/okta_req_app_new_application.png" />
</Frame>

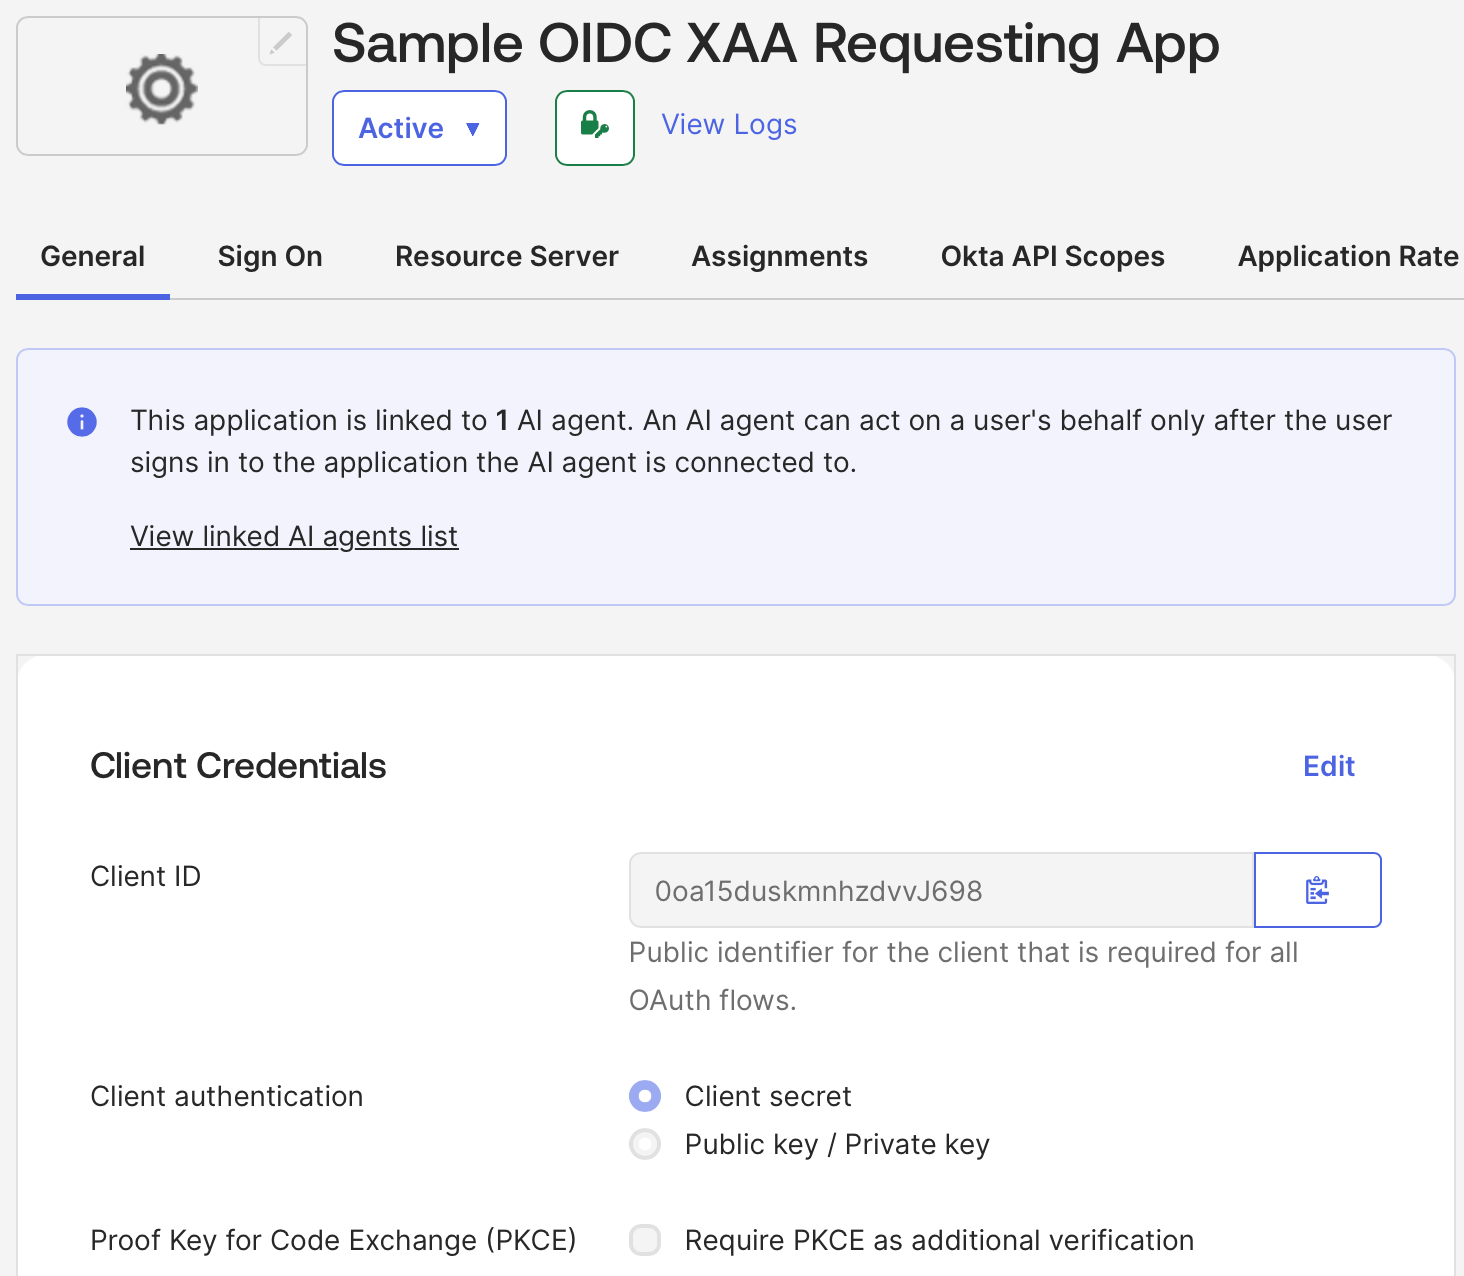
Requesting App を作成すると、Okta から OIDC Client ID と Secret が割り当てられます。
<Frame>
  <img src="https://mintcdn.com/docs-staging-chore-management-api-autoupdate/oO2QSWk9OPIJm0Gq/docs/images/xaa/xaa_okta_req_app_general.png?fit=max&auto=format&n=oO2QSWk9OPIJm0Gq&q=85&s=332899fe1d8c3d8d8ec1d3b92e4310a2" alt="" width="1464" height="1276" data-path="docs/images/xaa/xaa_okta_req_app_general.png" />
</Frame>

<h3 id="assign-requesting-app-to-test-users">
  Requesting App をテストユーザーに割り当てる
</h3>

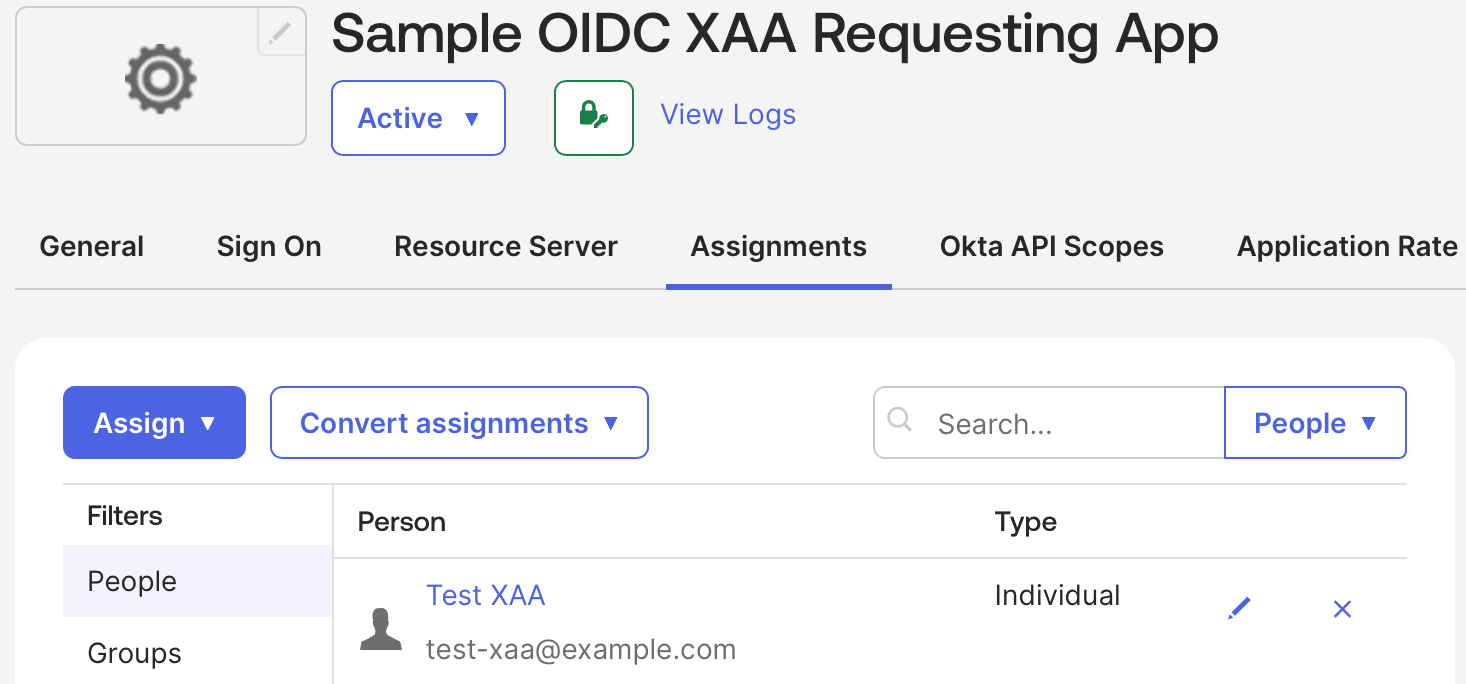
テストユーザーが Okta で Requesting App にログインできるようにします。

Okta Admin Console で、次の操作を行います。

1. **アプリケーション** に移動し、作成した Requesting App を選択します。
2. **Assign > Assign to People** を選択し、テストユーザーを選択します。
3. **Save** を選択します。
<Frame>
  <img src="https://mintcdn.com/docs-staging-chore-management-api-autoupdate/oO2QSWk9OPIJm0Gq/docs/images/xaa/xaa_okta_req_app_user_assignment.png?fit=max&auto=format&n=oO2QSWk9OPIJm0Gq&q=85&s=16221149a29b46ae2f009bac6e303bca" alt="" width="1466" height="684" data-path="docs/images/xaa/xaa_okta_req_app_user_assignment.png" />
</Frame>

<h2 id="register-the-resource-app-in-okta">
  Okta に Resource App を登録する
</h2>

<h3 id="create-resource-app-in-okta">
  Okta で Resource App を作成する
</h3>

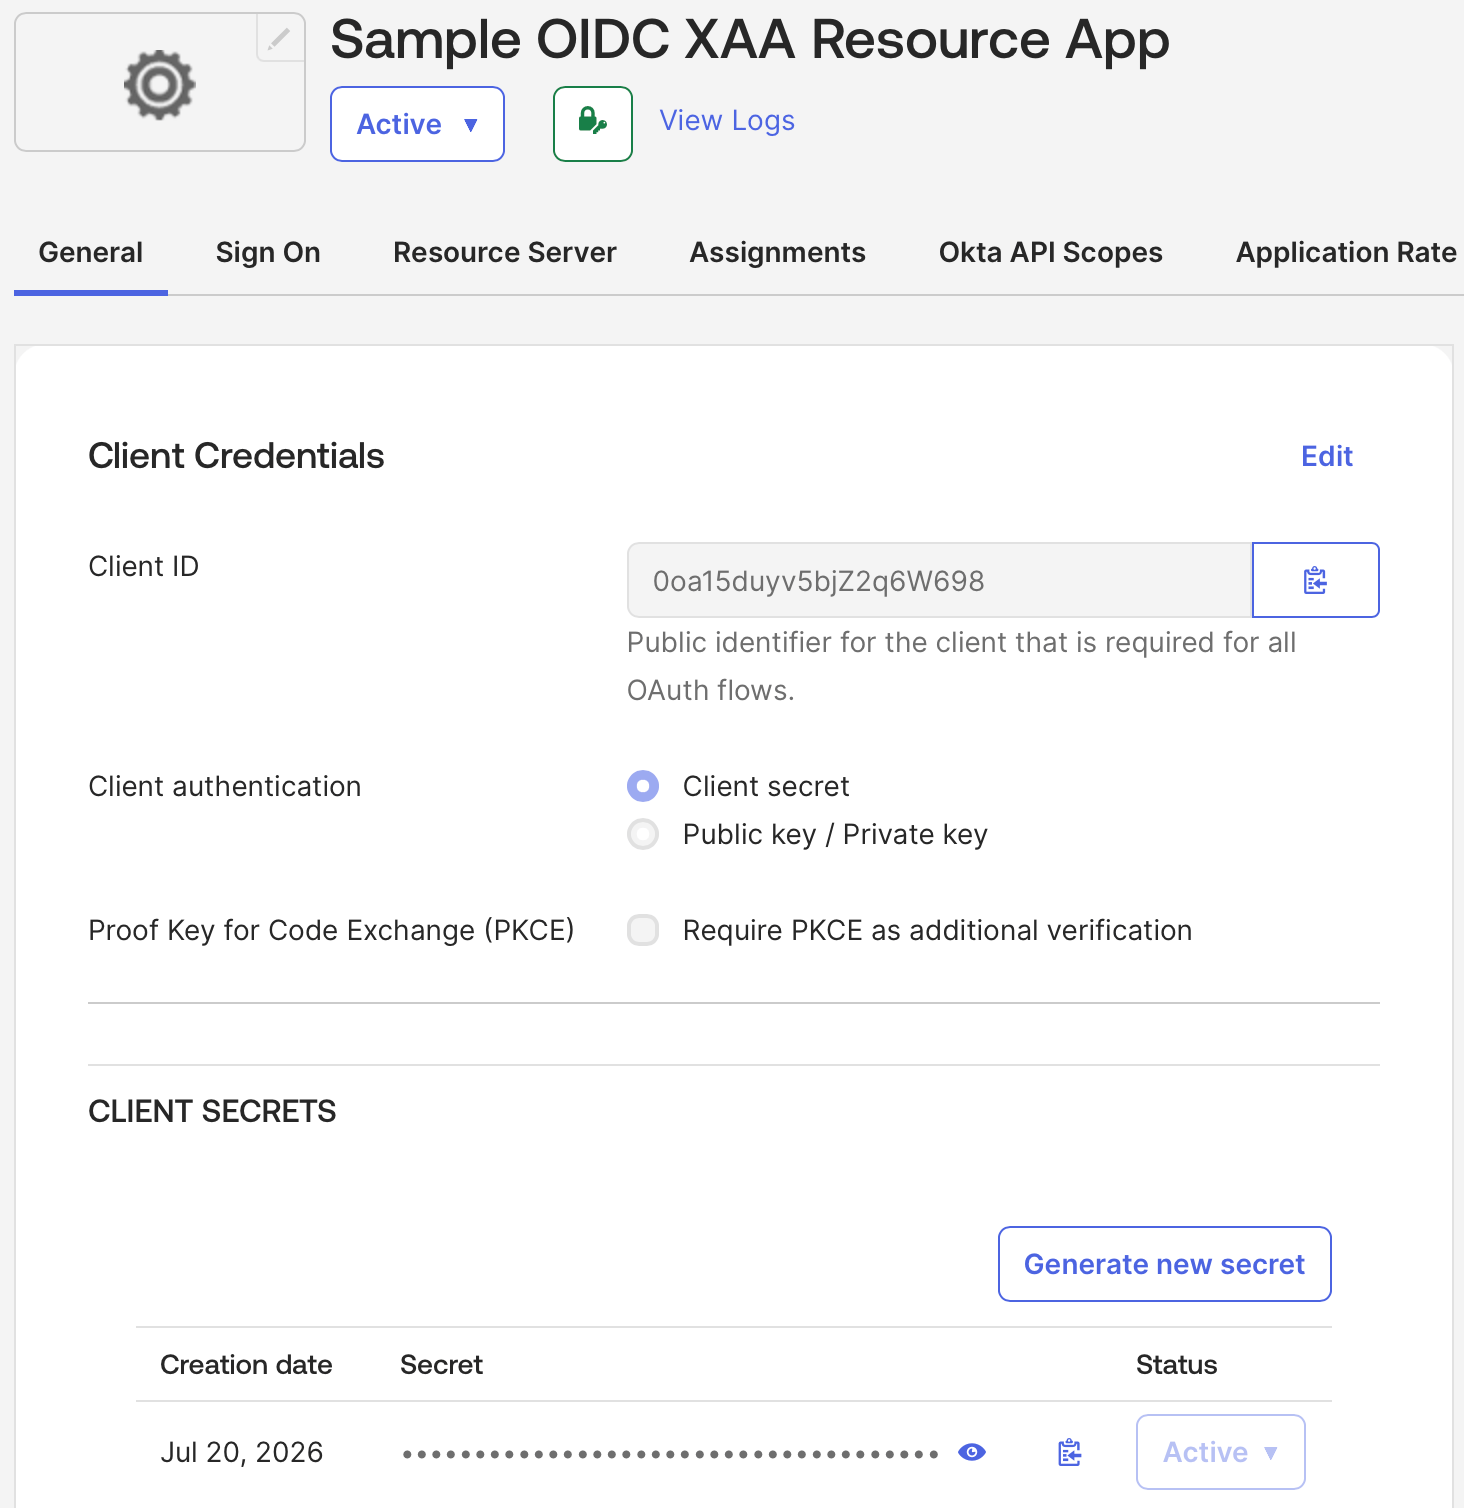
Requesting App と同様に、Resource App は OIDC Web アプリケーションです。

1. Okta Admin Console で、**アプリケーション > アプリケーション > Create App Integration** に移動し、**アプリケーションの種類**として **Web Application** を選択します。
2. **Sign On** で **Edit** を選択し、**Redirect URI** フィールドに **Auth0 テナントのコールバック URL** を追加します。コールバック URL は、Auth0 ドメインの末尾に `/login/callback` を付けた URL です。
3. **Save** を選択します。
<Frame>
  <img src="https://mintcdn.com/docs-staging-chore-management-api-autoupdate/oO2QSWk9OPIJm0Gq/docs/images/xaa/xaa_okta_resource_app_details.png?fit=max&auto=format&n=oO2QSWk9OPIJm0Gq&q=85&s=82f8e26e56b00b35789385e08499c2c9" alt="" width="1464" height="1508" data-path="docs/images/xaa/xaa_okta_resource_app_details.png" />
</Frame>

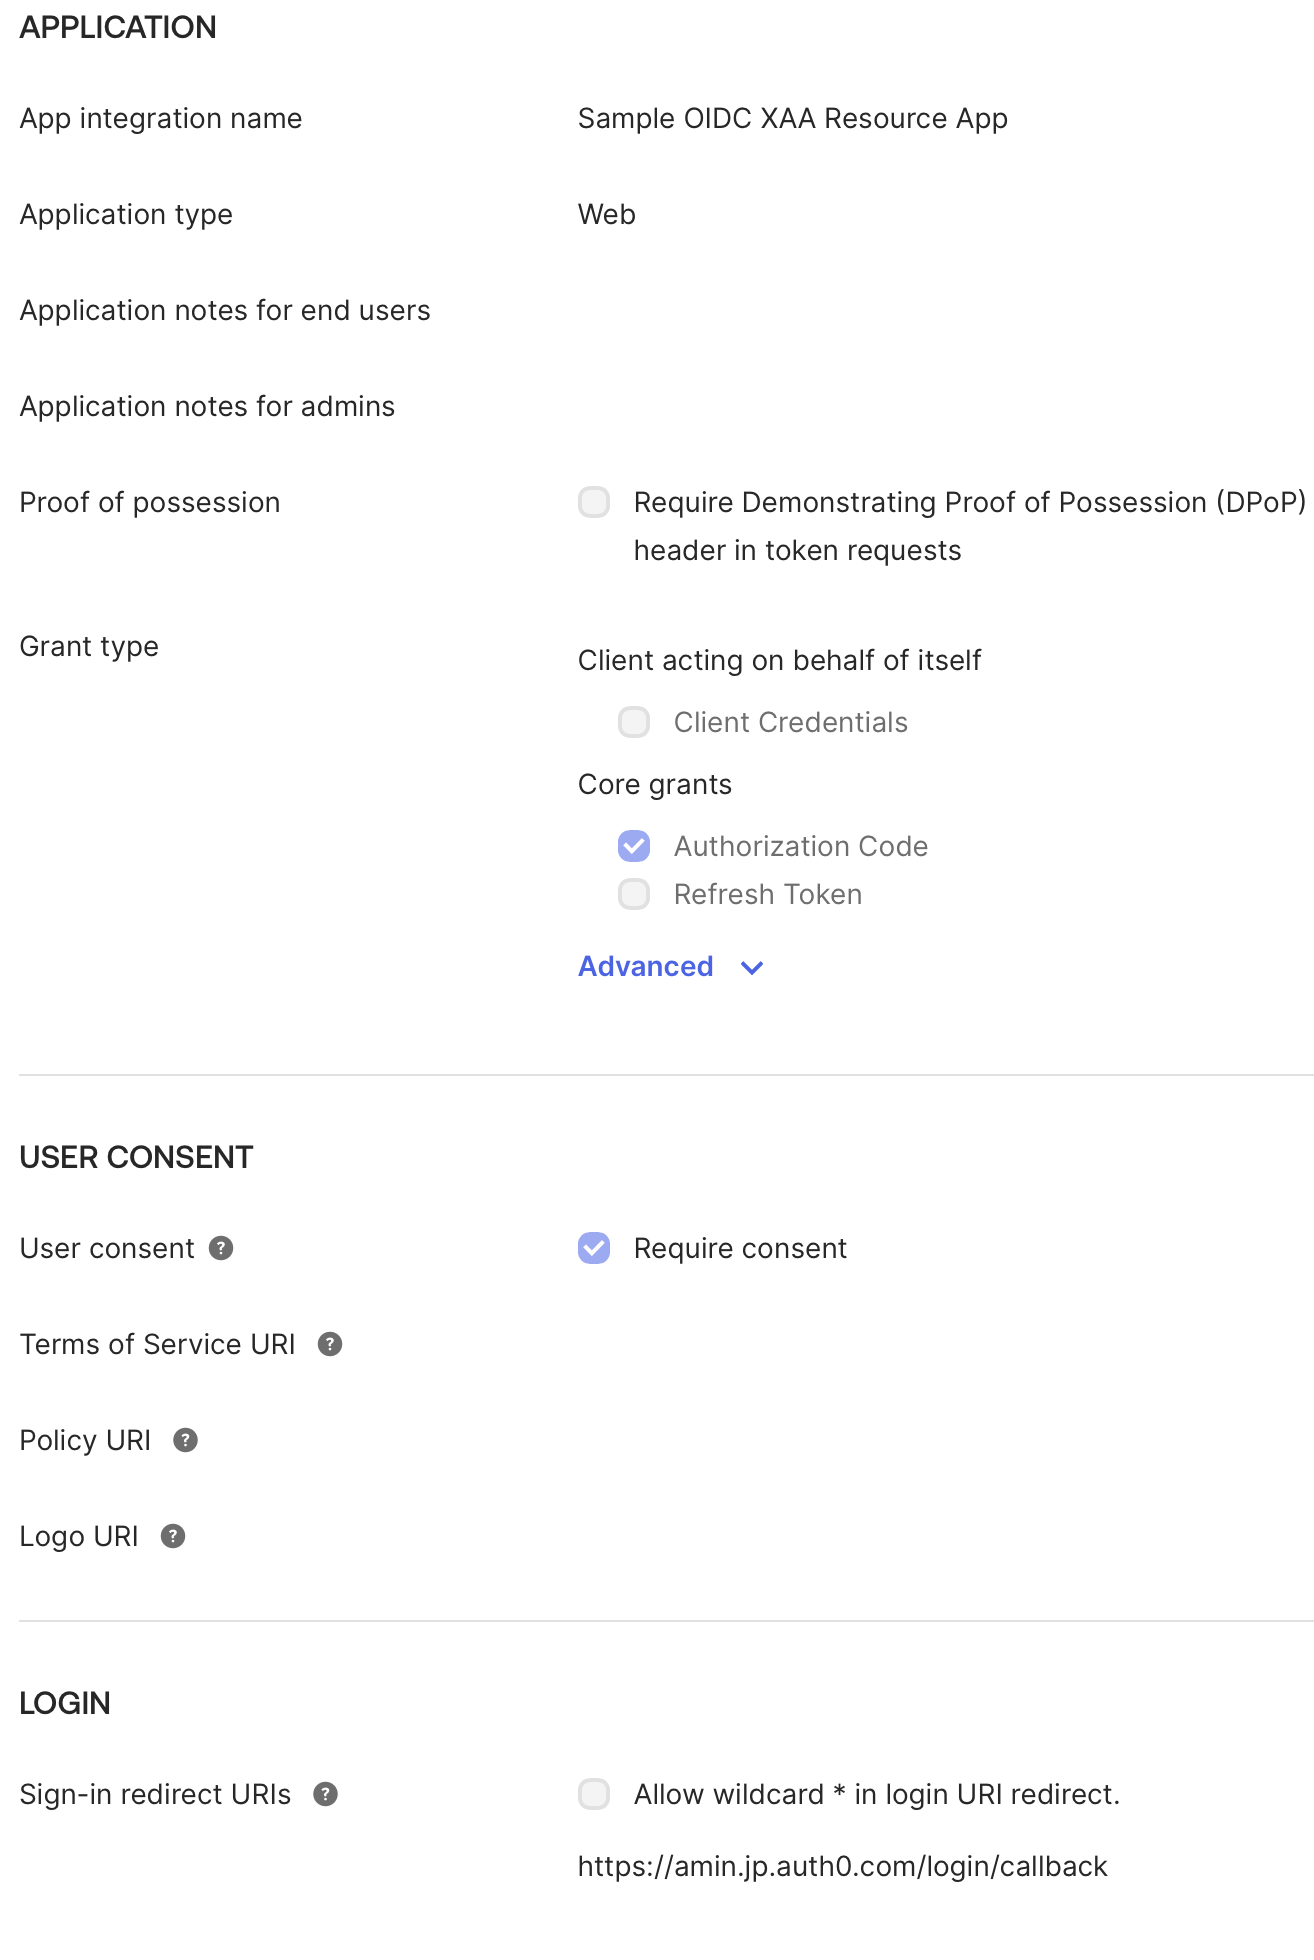
Resource App のサインイン用リダイレクト URI が Auth0 テナントの `/login/callback` URL を指していることを確認するには、**General > LOGIN** に移動します。
<Frame>
  <img src="https://mintcdn.com/docs-staging-chore-management-api-autoupdate/oO2QSWk9OPIJm0Gq/docs/images/xaa/xaa_okta_resource_app_details2.png?fit=max&auto=format&n=oO2QSWk9OPIJm0Gq&q=85&s=1166907b1881e3f7a8a832aac76bb16c" alt="" width="1314" height="1960" data-path="docs/images/xaa/xaa_okta_resource_app_details2.png" />
</Frame>

<h3 id="assign-resource-app-to-test-users">
  Resource App をテストユーザーに割り当てる
</h3>

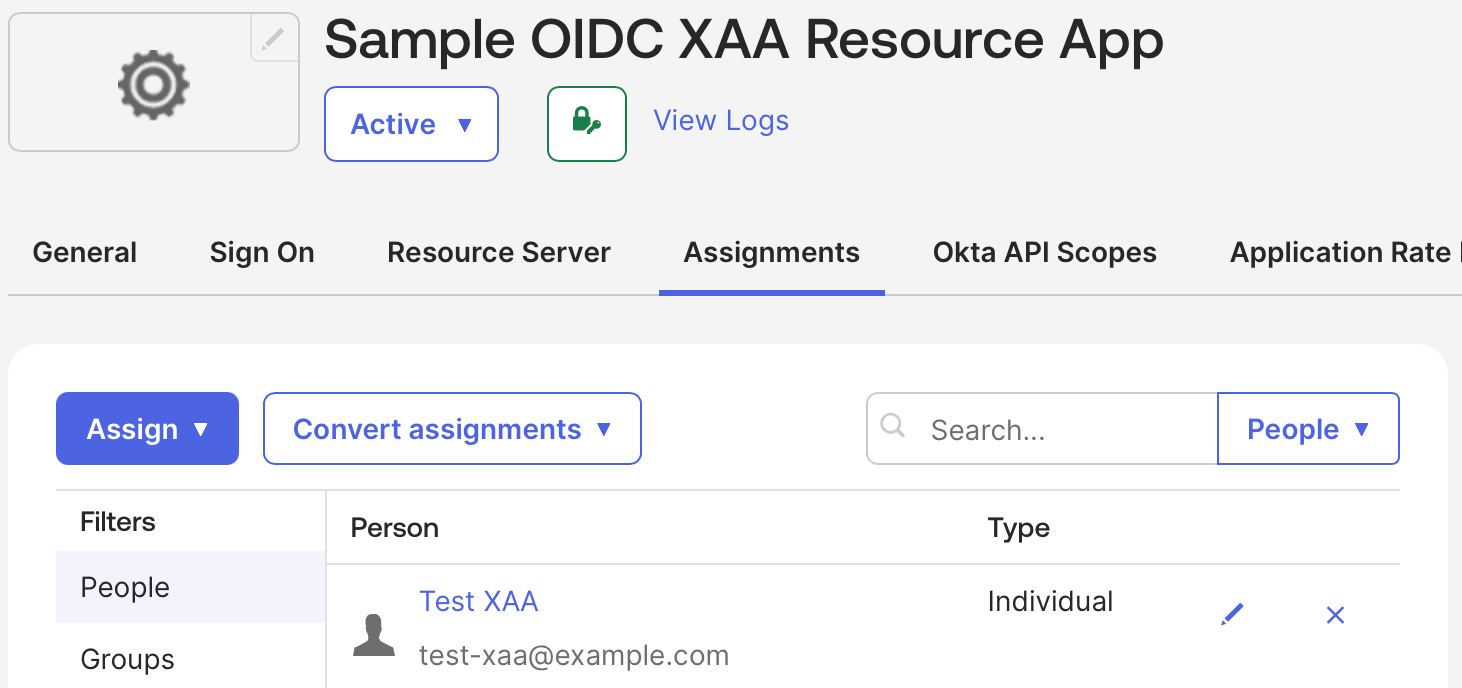
テストユーザーが Okta の Resource App にログインできるようにします。

Okta Admin Console で、次の操作を行います。

1. **アプリケーション** に移動し、作成した Resource App を選択します。
2. **Assign > Assign to People** を選択し、テストユーザーを選択します。
3. **Save** を選択します。
<Frame>
  <img src="https://mintcdn.com/docs-staging-chore-management-api-autoupdate/oO2QSWk9OPIJm0Gq/docs/images/xaa/xaa_okta_resource_app_user_assignment.png?fit=max&auto=format&n=oO2QSWk9OPIJm0Gq&q=85&s=3c63f79f73284a1f08d48cb1b0c6fec2" alt="" width="1462" height="688" data-path="docs/images/xaa/xaa_okta_resource_app_user_assignment.png" />
</Frame>

<h3 id="enable-cross-app-access-xaa-in-resource-app">
  Resource App で Cross-app Access (XAA) を有効にする
</h3>

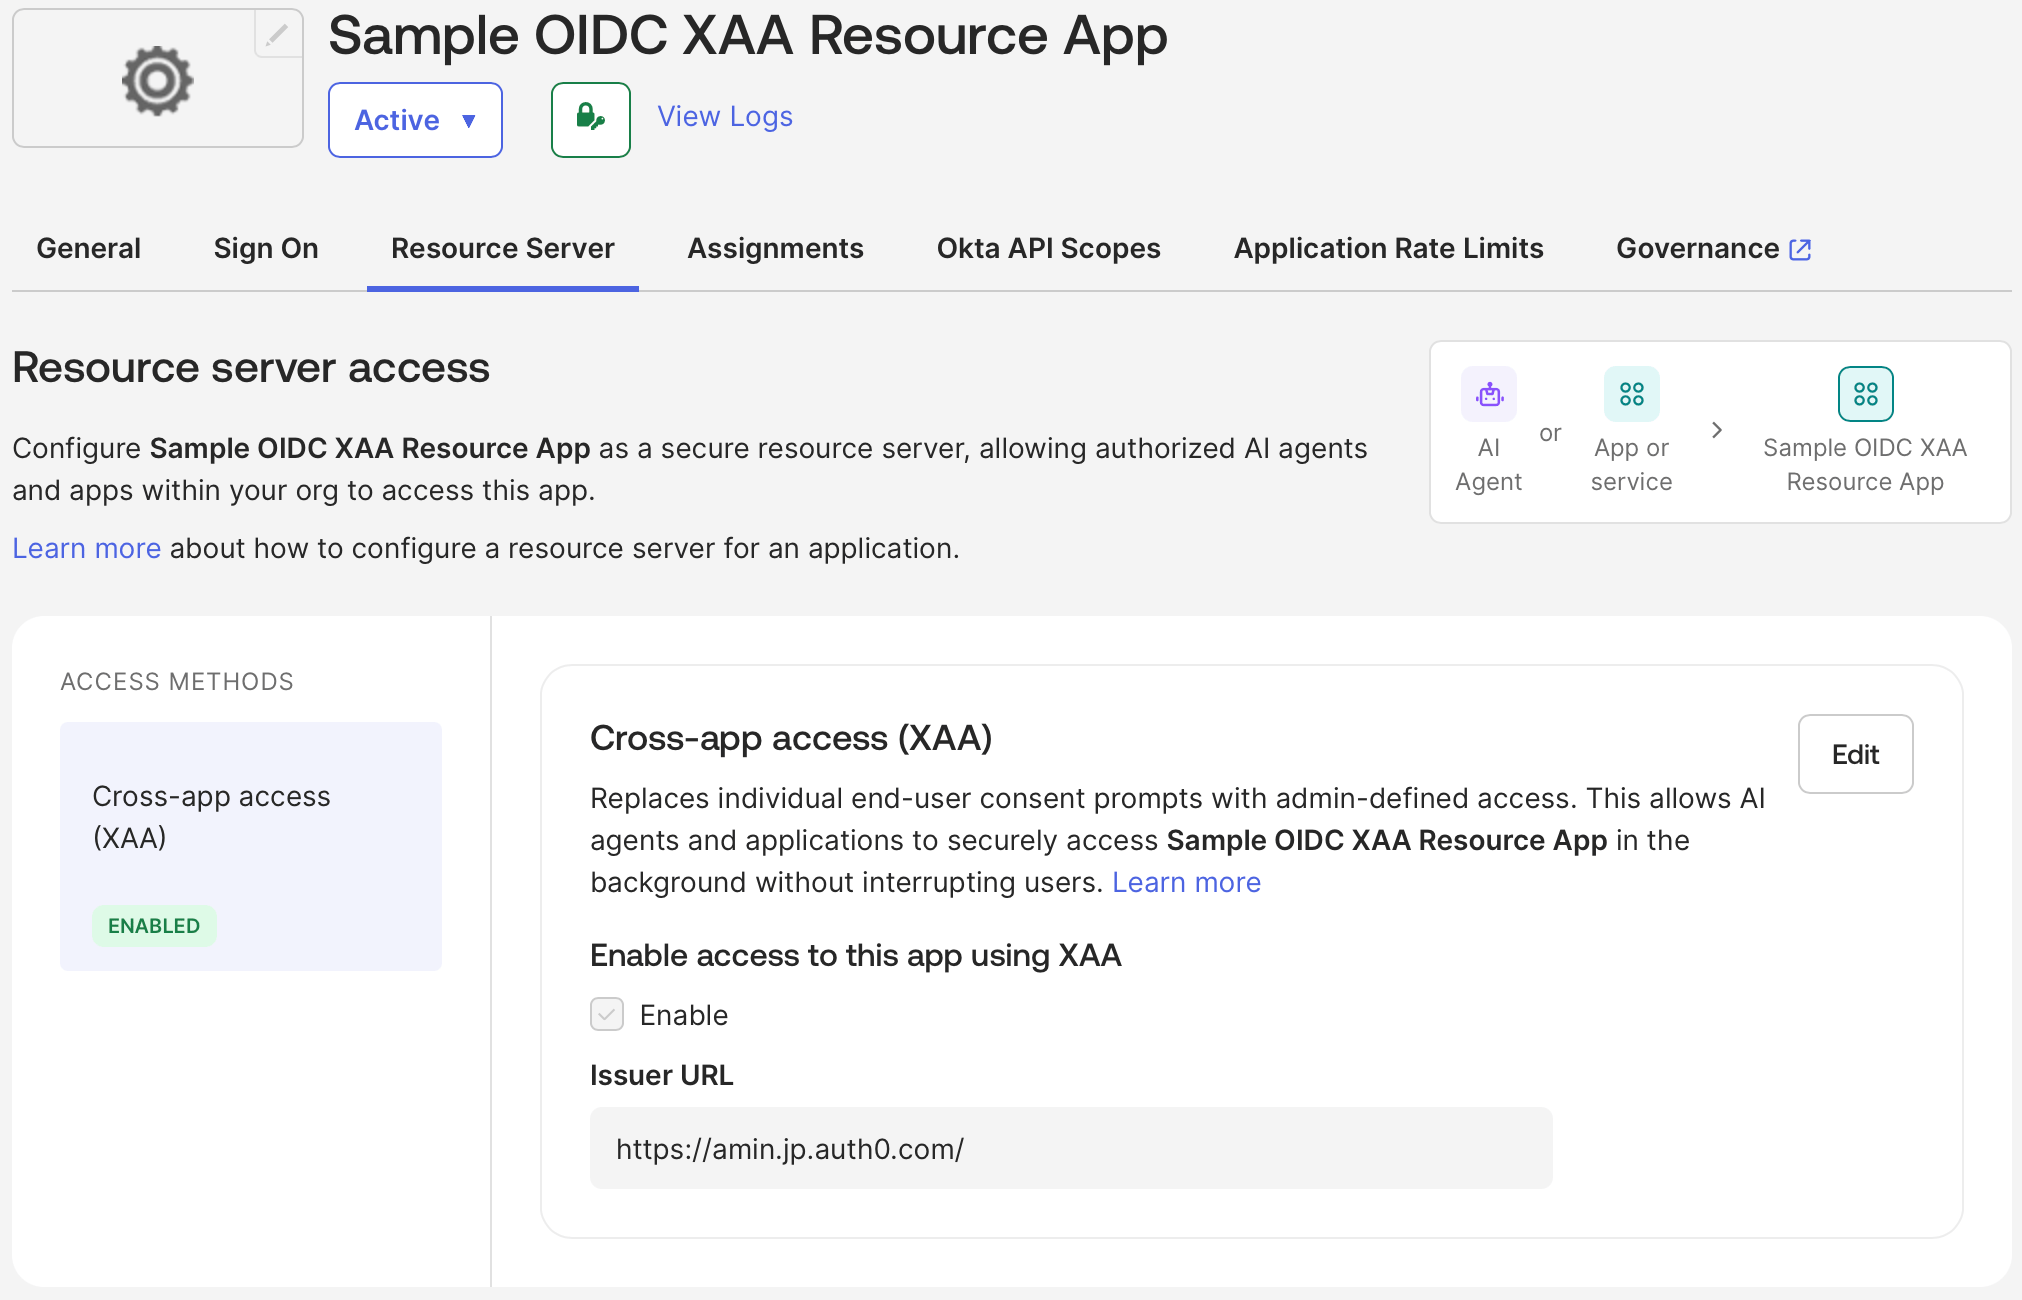
**Resource Server** タブで、Resource App の Cross-app access (XAA) を有効にします。Resource App の認可サーバーの **Issuer URL** を入力します：`https://YOUR_AUTH0_DOMAIN/`.

<Frame>
  <img src="https://mintcdn.com/docs-staging-chore-management-api-autoupdate/oO2QSWk9OPIJm0Gq/docs/images/xaa/xaa_okta_resource_app_resource_server.png?fit=max&auto=format&n=oO2QSWk9OPIJm0Gq&q=85&s=729d9647e8364a42a1f6ee1c9823f7ab" alt="" width="2022" height="1300" data-path="docs/images/xaa/xaa_okta_resource_app_resource_server.png" />
</Frame>

<Callout icon="file-lines" color="#0EA5E9" iconType="regular">
  Auth0 は、末尾がフォワードスラッシュ **`/`** である issuer URL を持つトークンを発行および受け入れます。
</Callout>

<h2 id="register-ai-agent-in-okta">
  Okta に AI エージェントを登録する
</h2>

<h3 id="create-ai-agent">
  AIエージェントを作成
</h3>

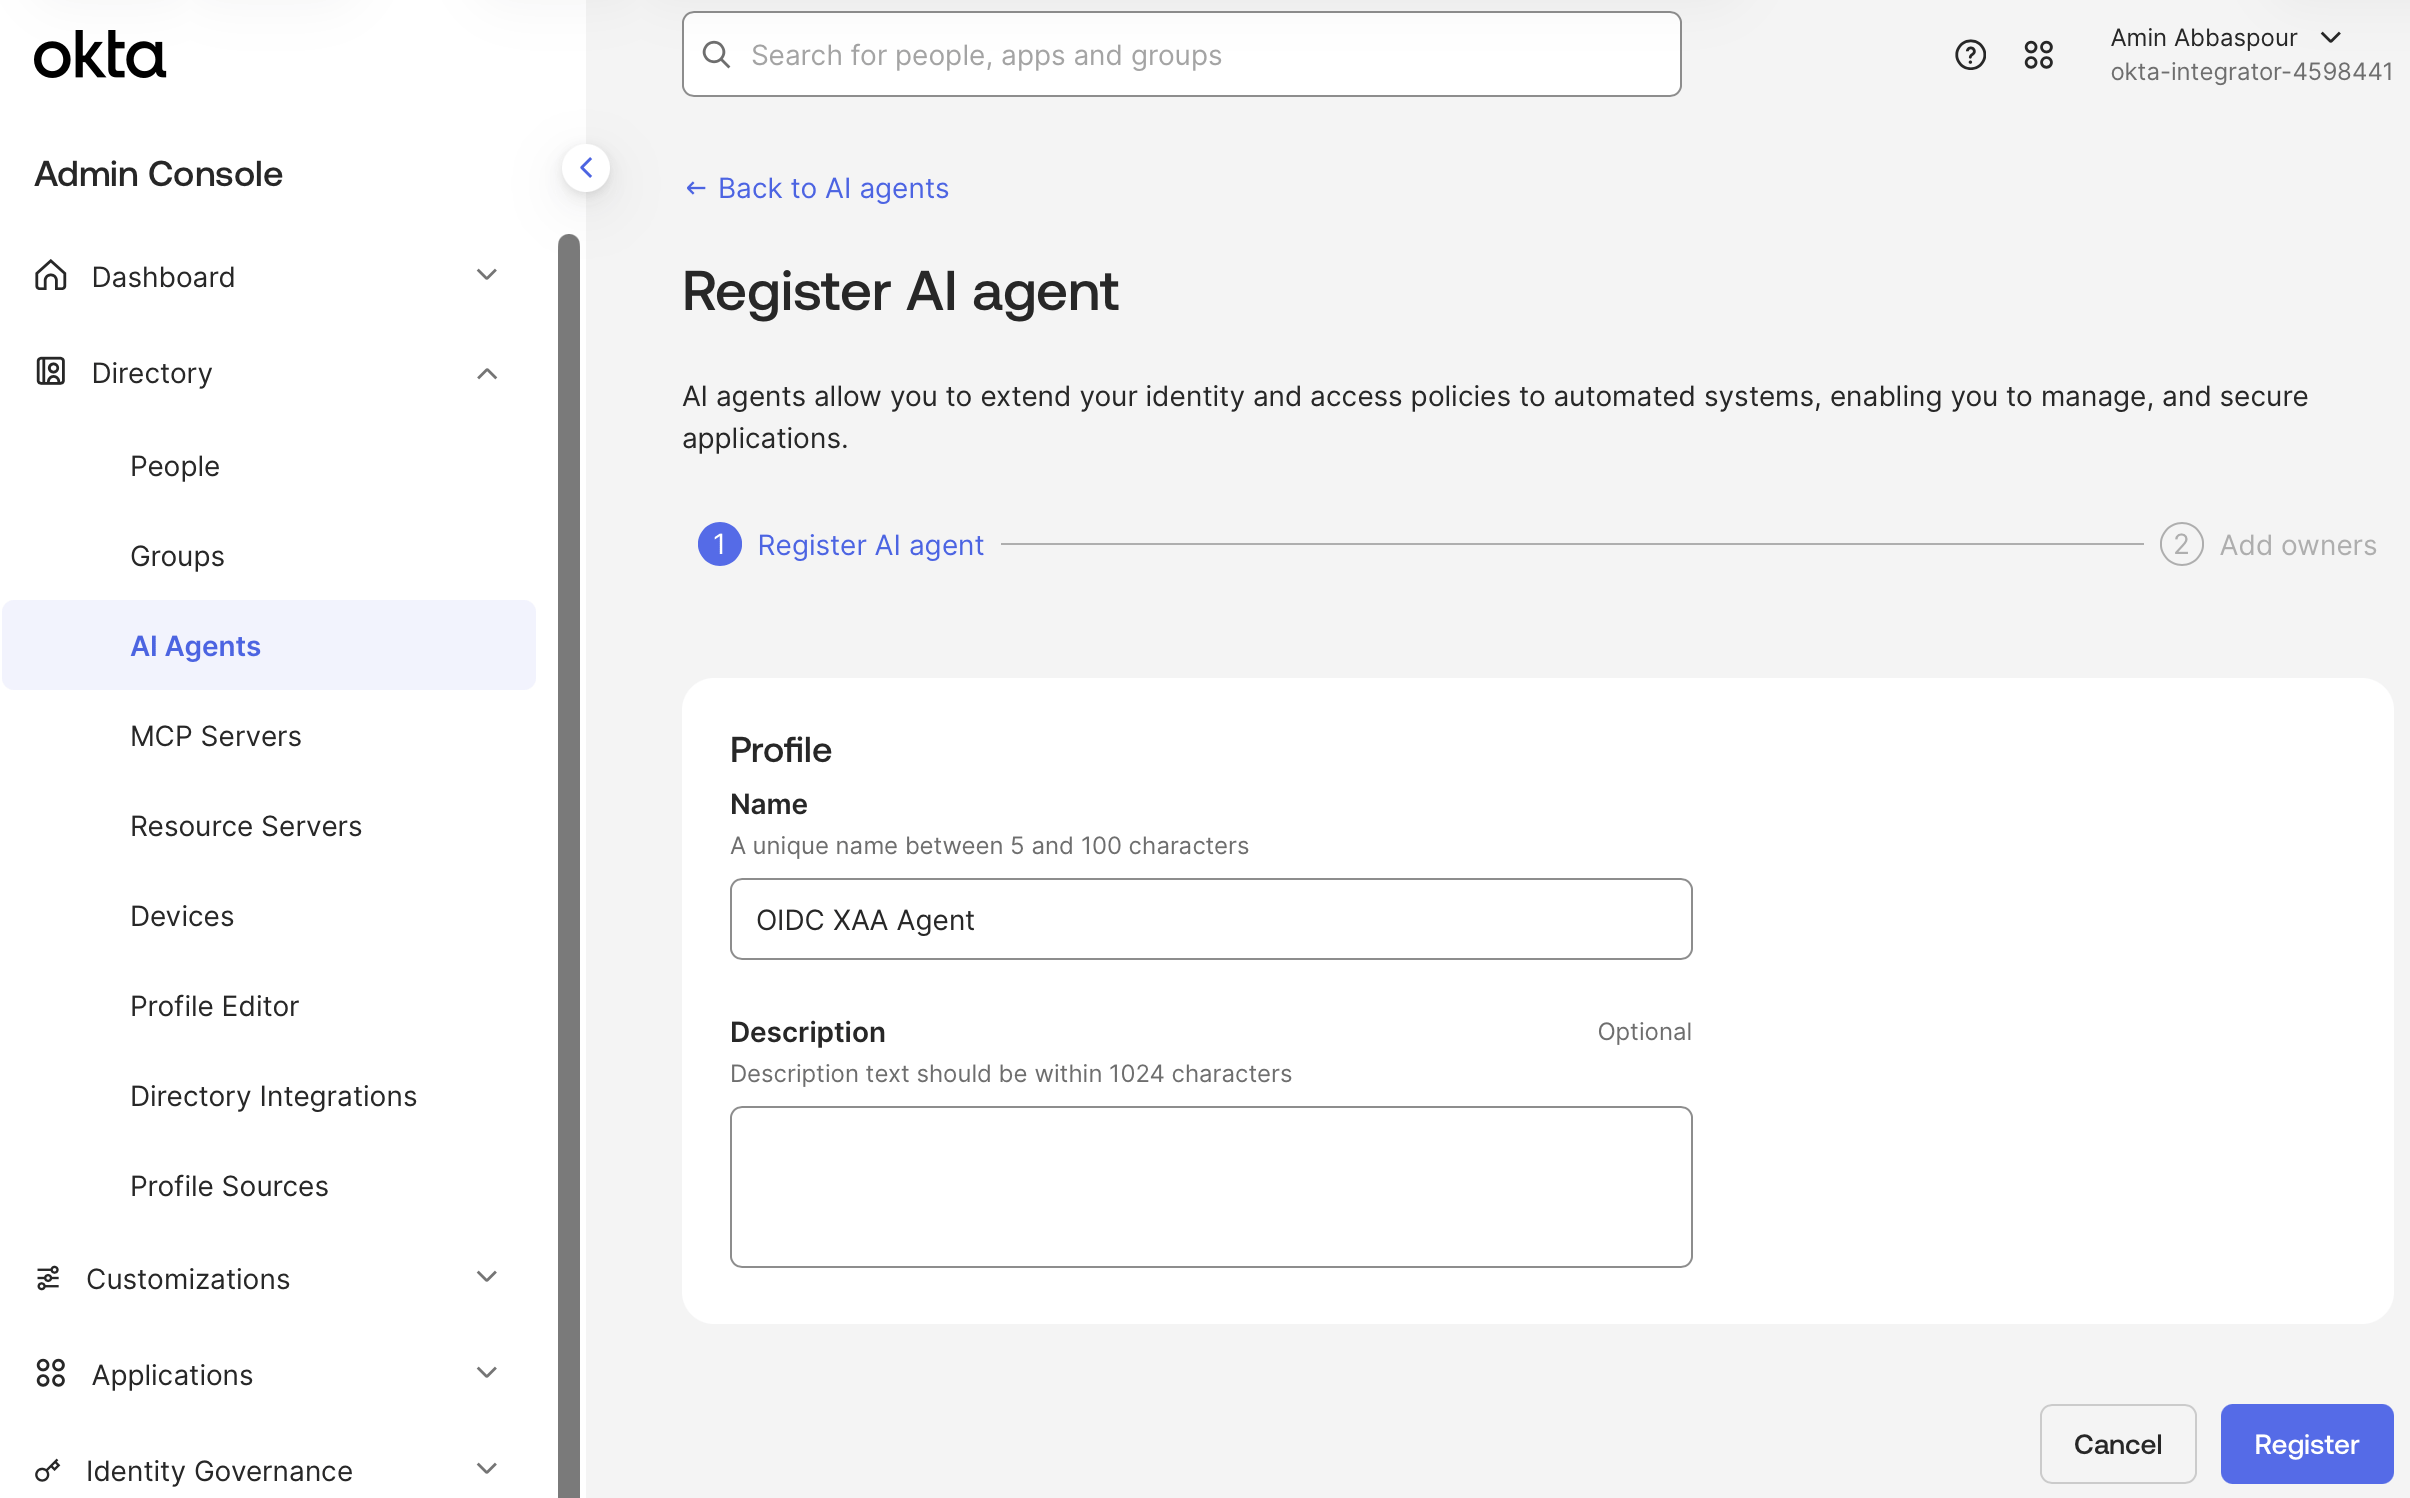
**ディレクトリ > AIエージェント > AIエージェントを登録** に移動し、**手動で登録** を選択します。AIエージェントの名前を入力し、所有者を割り当てます。
<Frame>
  <img src="https://mintcdn.com/docs-staging-chore-management-api-autoupdate/oO2QSWk9OPIJm0Gq/docs/images/xaa/xaa_okta_register_ai_agent.png?fit=max&auto=format&n=oO2QSWk9OPIJm0Gq&q=85&s=4e88df96b74e28b907bd1100bd017fa4" alt="" width="2410" height="1498" data-path="docs/images/xaa/xaa_okta_register_ai_agent.png" />
</Frame>

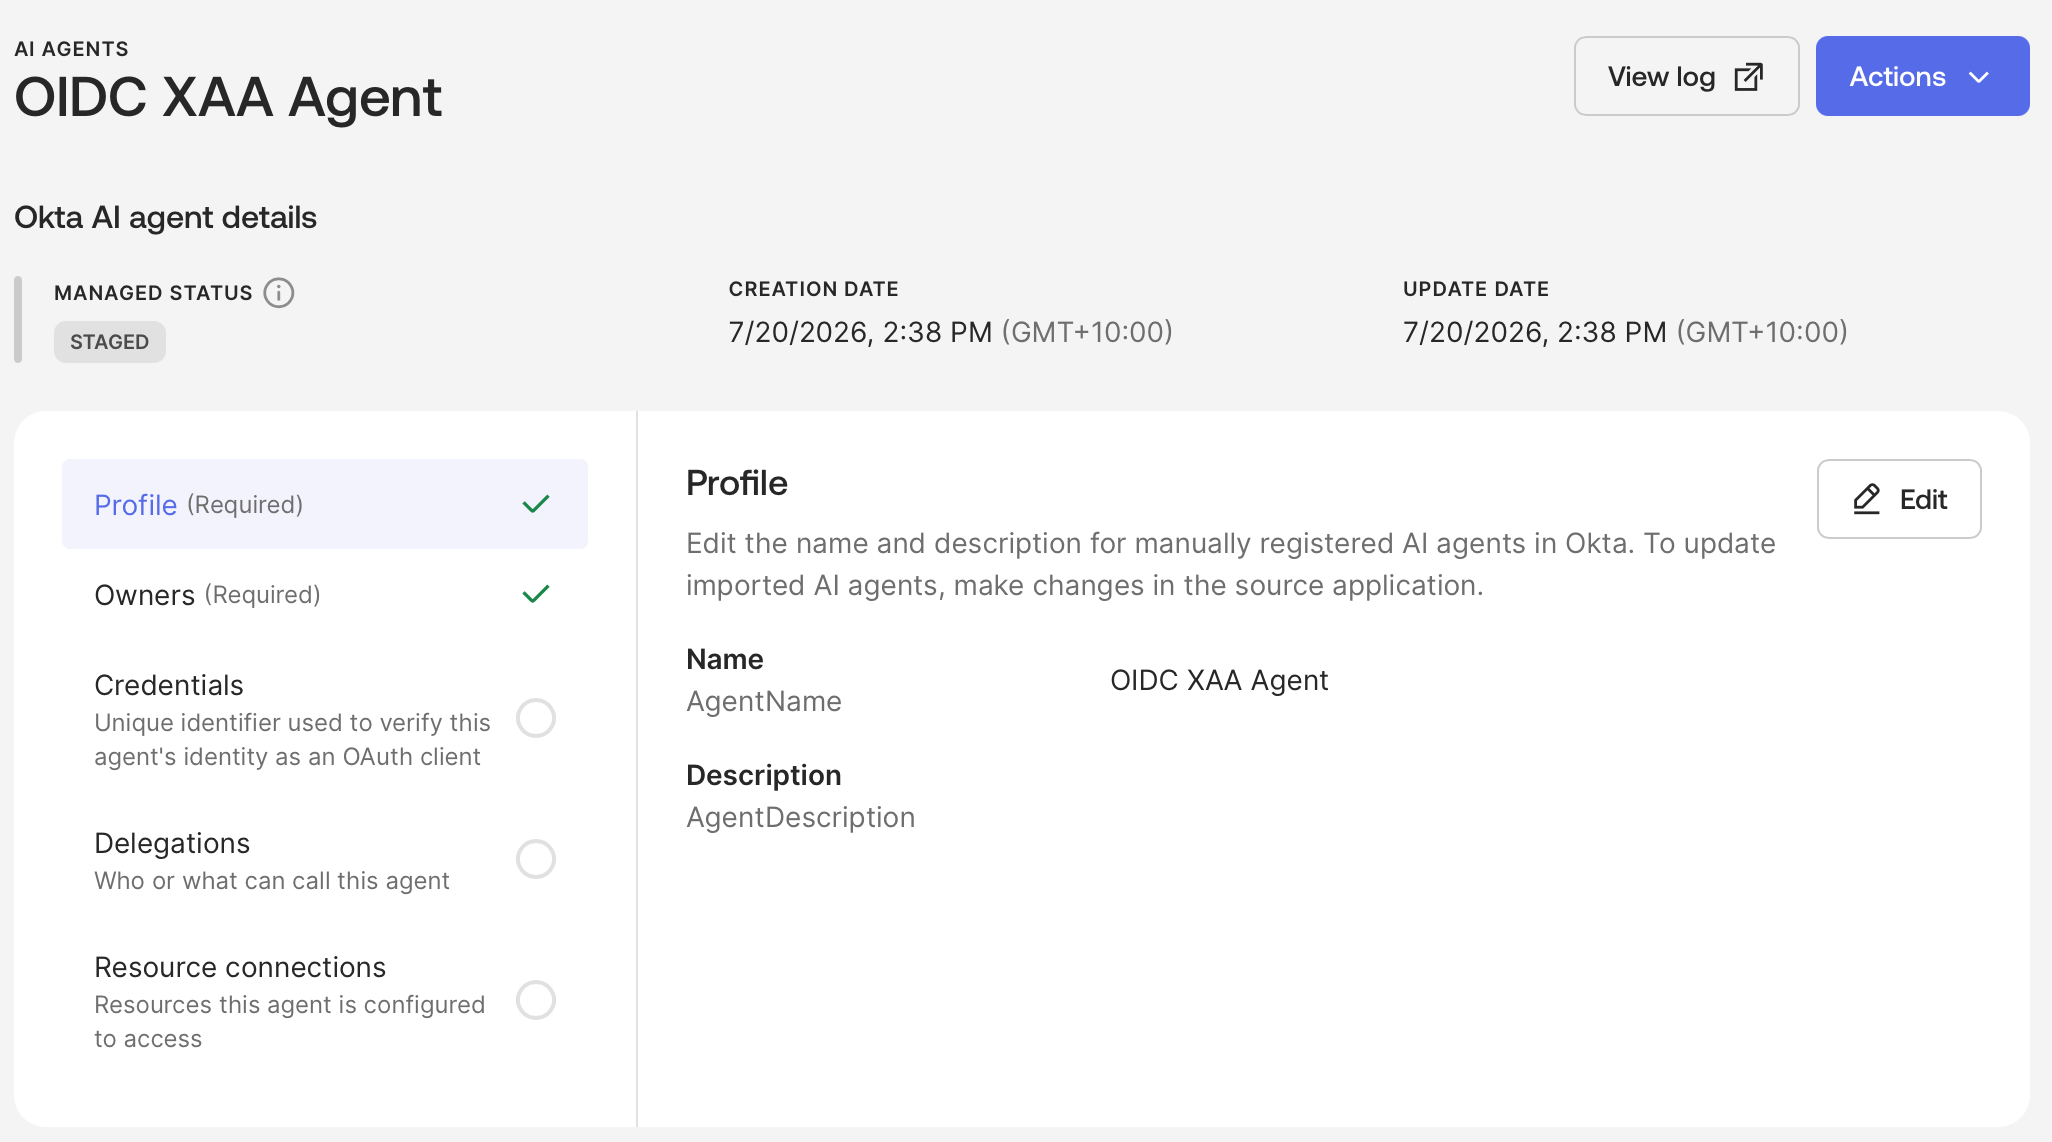
この時点では、AIエージェントは `STAGED` 状態です。AIエージェントを有効化する前に、以下の手順を完了してください。
<Frame>
  <img src="https://mintcdn.com/docs-staging-chore-management-api-autoupdate/oO2QSWk9OPIJm0Gq/docs/images/xaa/xaa_okta_ai_agent_staged.png?fit=max&auto=format&n=oO2QSWk9OPIJm0Gq&q=85&s=b65b68683fe55c375734026df94a1b45" alt="" width="2052" height="1142" data-path="docs/images/xaa/xaa_okta_ai_agent_staged.png" />
</Frame>

<h3 id="add-agent-credentials">
  Agentの資格情報を追加
</h3>

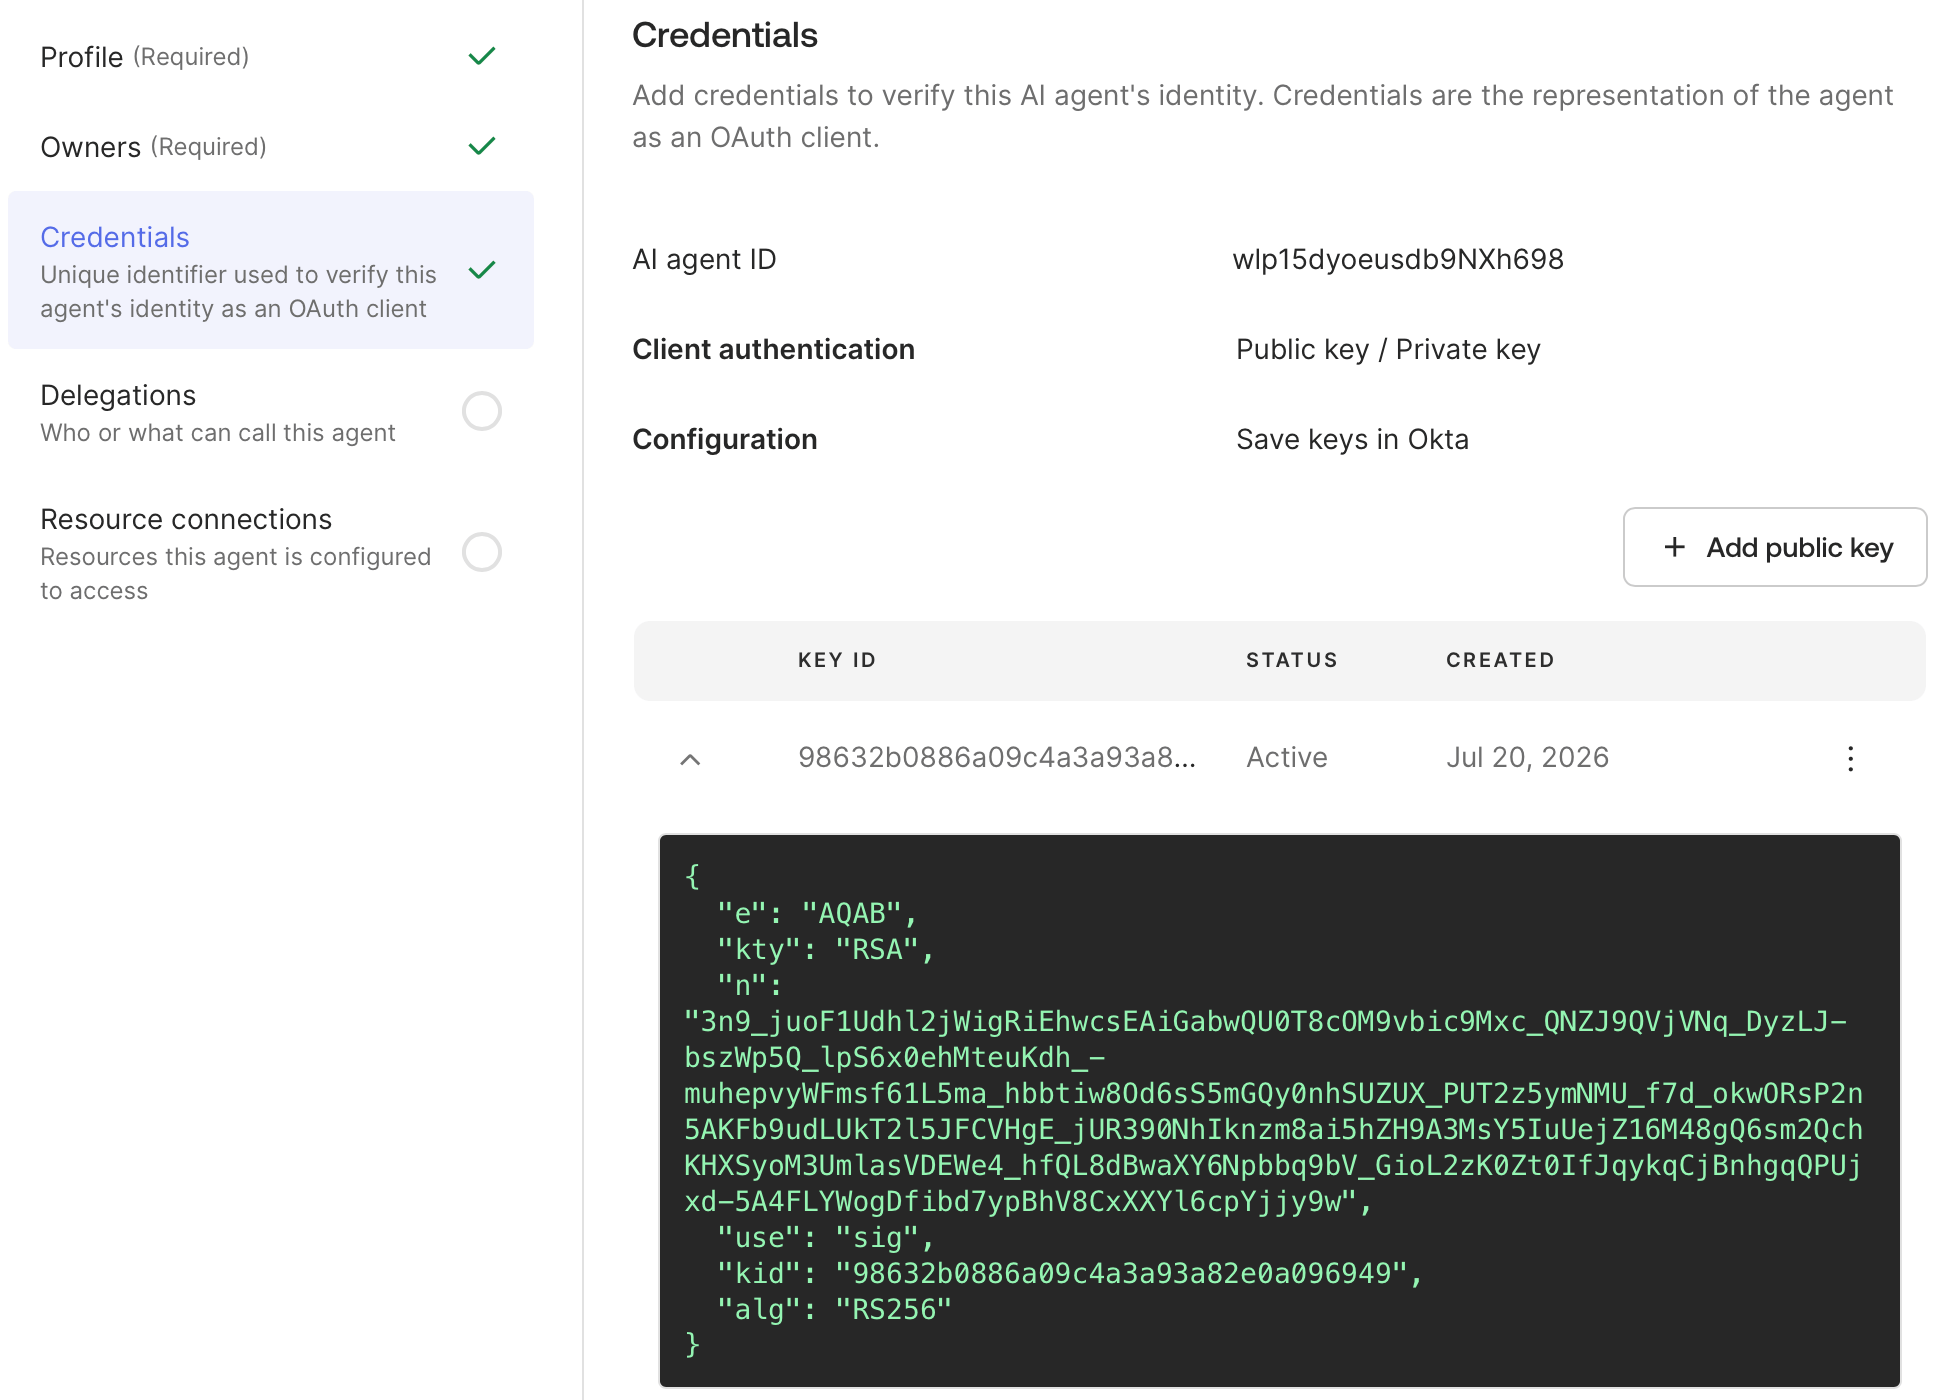
AI エージェントは、[Private Key JWT](/docs/ja-jp/get-started/authentication-and-authorization-flow/authenticate-with-private-key-jwt) を使用して、アプリケーションに代わって認証を行います。**Credentials** タブで、**Add public key** を選択します。
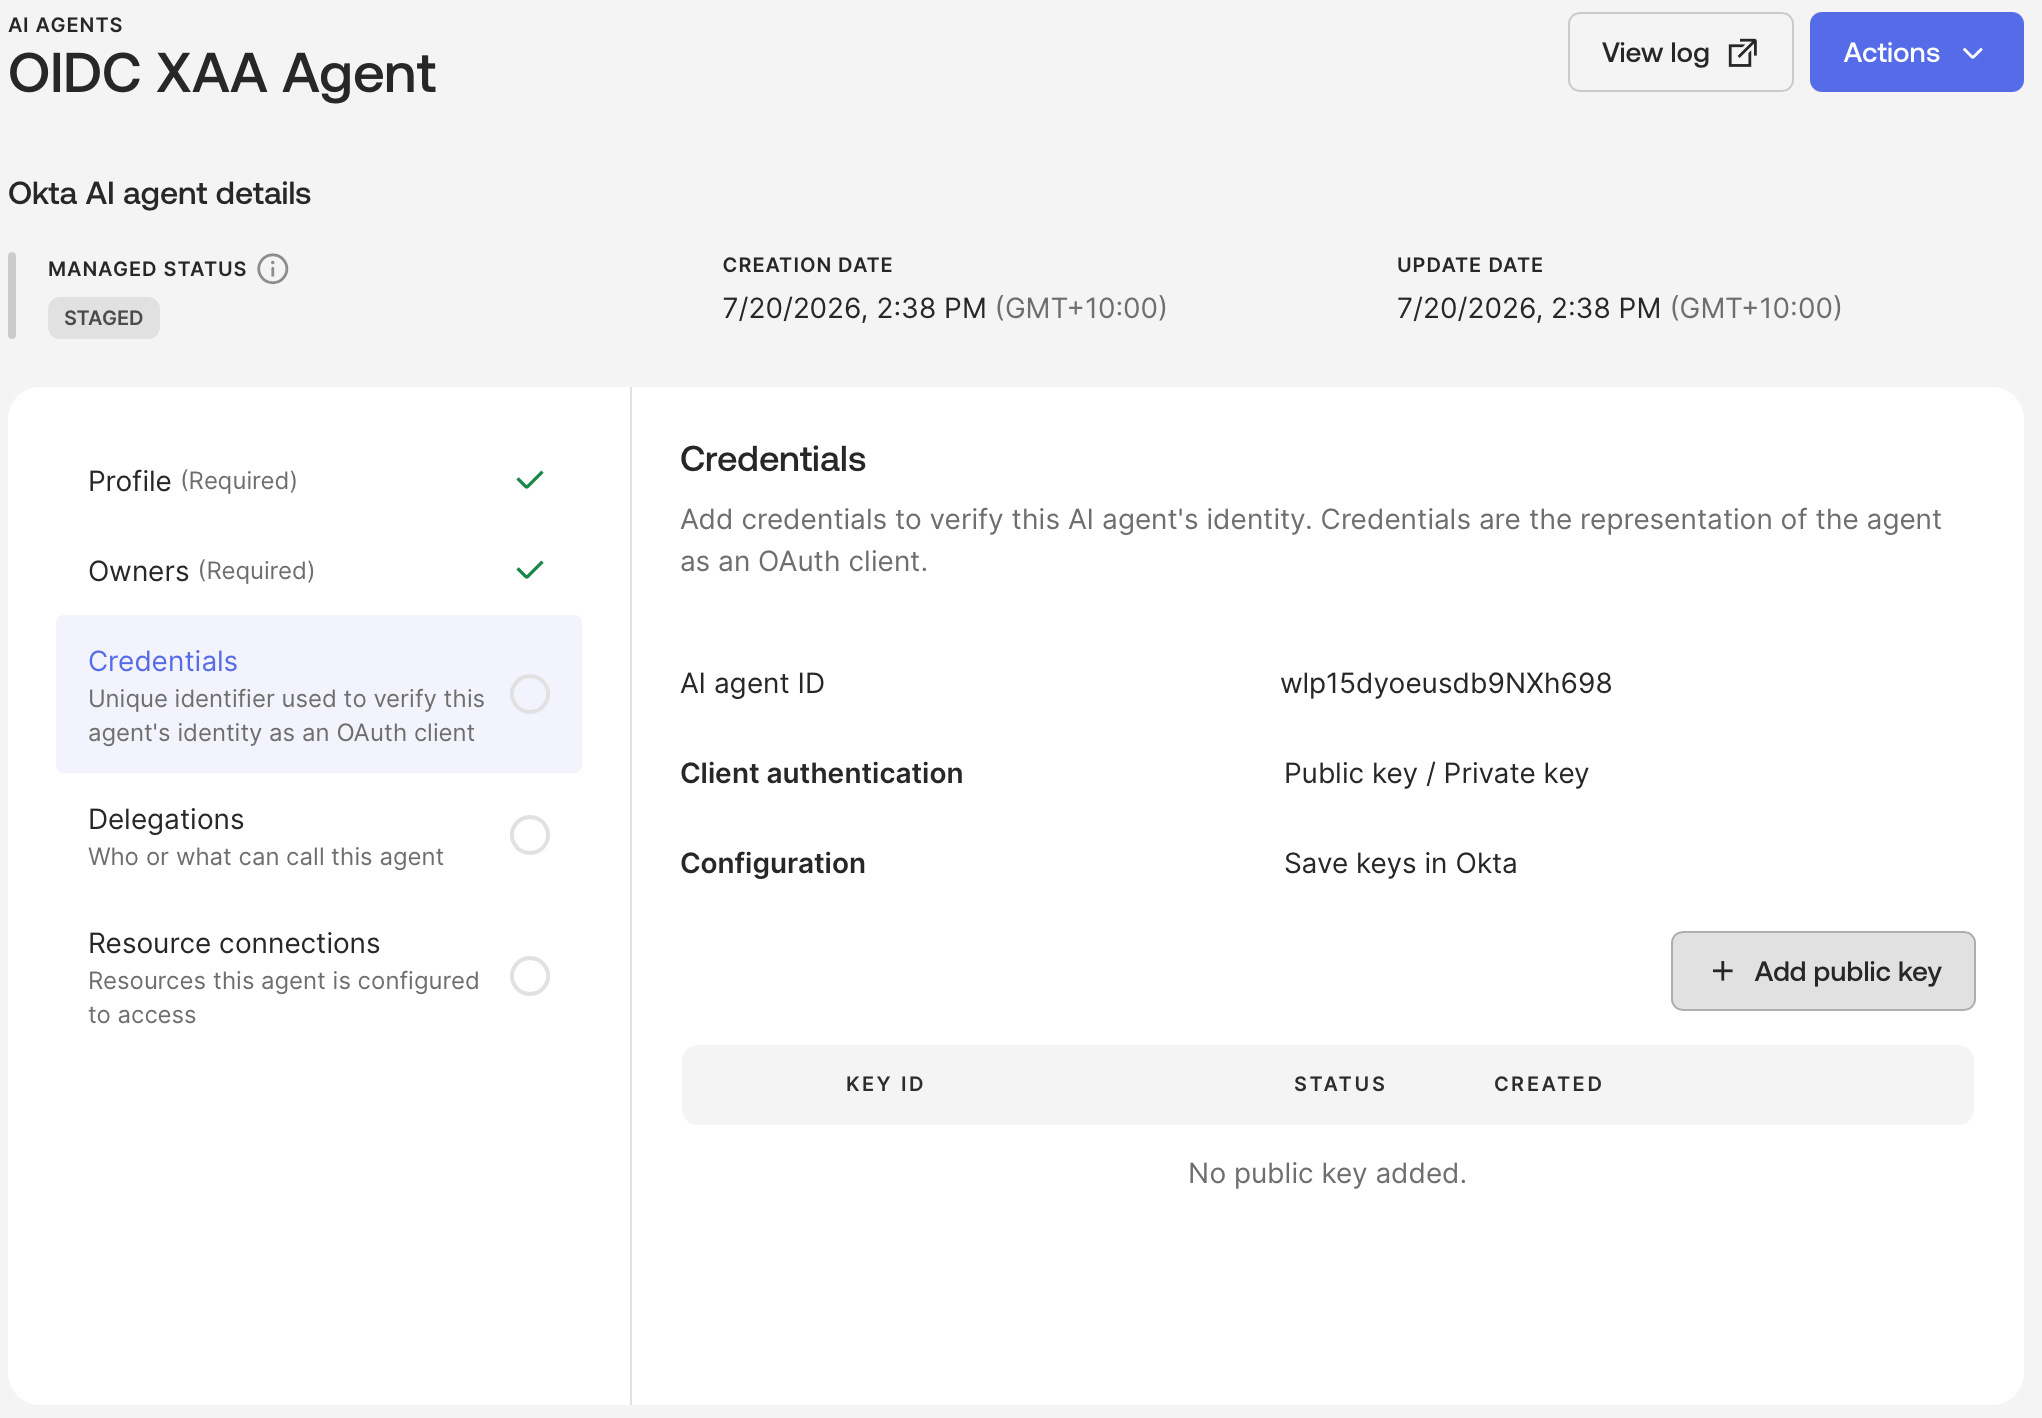
<Frame>
  <img src="https://mintcdn.com/docs-staging-chore-management-api-autoupdate/oO2QSWk9OPIJm0Gq/docs/images/xaa/xaa_okta_ai_agent_credentials_tab.png?fit=max&auto=format&n=oO2QSWk9OPIJm0Gq&q=85&s=22026ce6e89848604f7488be2f40b4b7" alt="" width="2042" height="1418" data-path="docs/images/xaa/xaa_okta_ai_agent_credentials_tab.png" />
</Frame>

自身のキーペアの公開鍵を指定することも、**Generate new key** を選択して秘密キーとキー ID (`kid`) をダウンロードすることもできます。
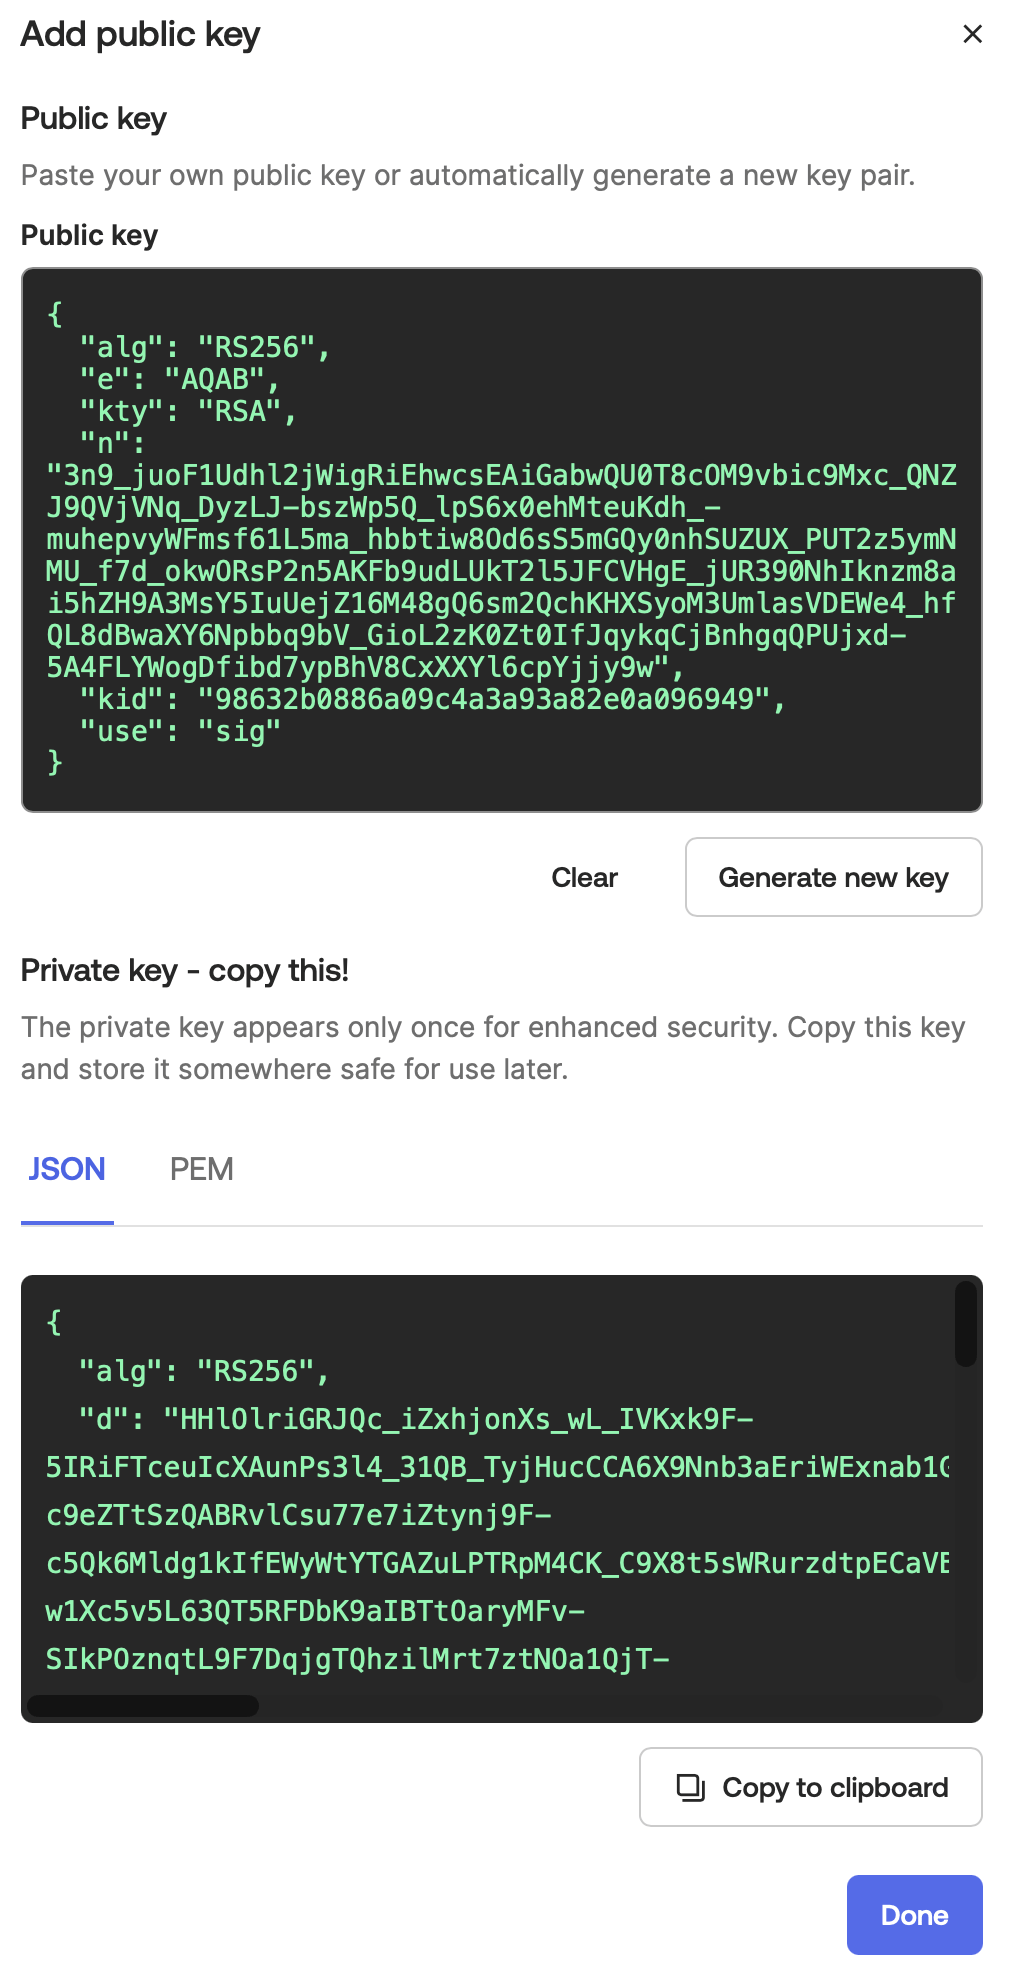
<Frame>
  <img src="https://mintcdn.com/docs-staging-chore-management-api-autoupdate/oO2QSWk9OPIJm0Gq/docs/images/xaa/xaa_okta_ai_agent_credentials_generate.png?fit=max&auto=format&n=oO2QSWk9OPIJm0Gq&q=85&s=bc33df5a7c7a990034a39712a8dd42d6" alt="" width="1016" height="1970" data-path="docs/images/xaa/xaa_okta_ai_agent_credentials_generate.png" />
</Frame>

資格情報を設定すると、タブの横にチェックマークが表示されます。

<Frame>
  <img src="https://mintcdn.com/docs-staging-chore-management-api-autoupdate/oO2QSWk9OPIJm0Gq/docs/images/xaa/xaa_okta_ai_agent_credentials_set.png?fit=max&auto=format&n=oO2QSWk9OPIJm0Gq&q=85&s=955a05dadf89dd2121581838590515b5" alt="" width="1938" height="1400" data-path="docs/images/xaa/xaa_okta_ai_agent_credentials_set.png" />
</Frame>

<h3 id="add-agent-delegations">
  エージェントの委譲を追加
</h3>

**Delegations** タブの **User sign-on** セクションで、**Add Caller** を選択します。
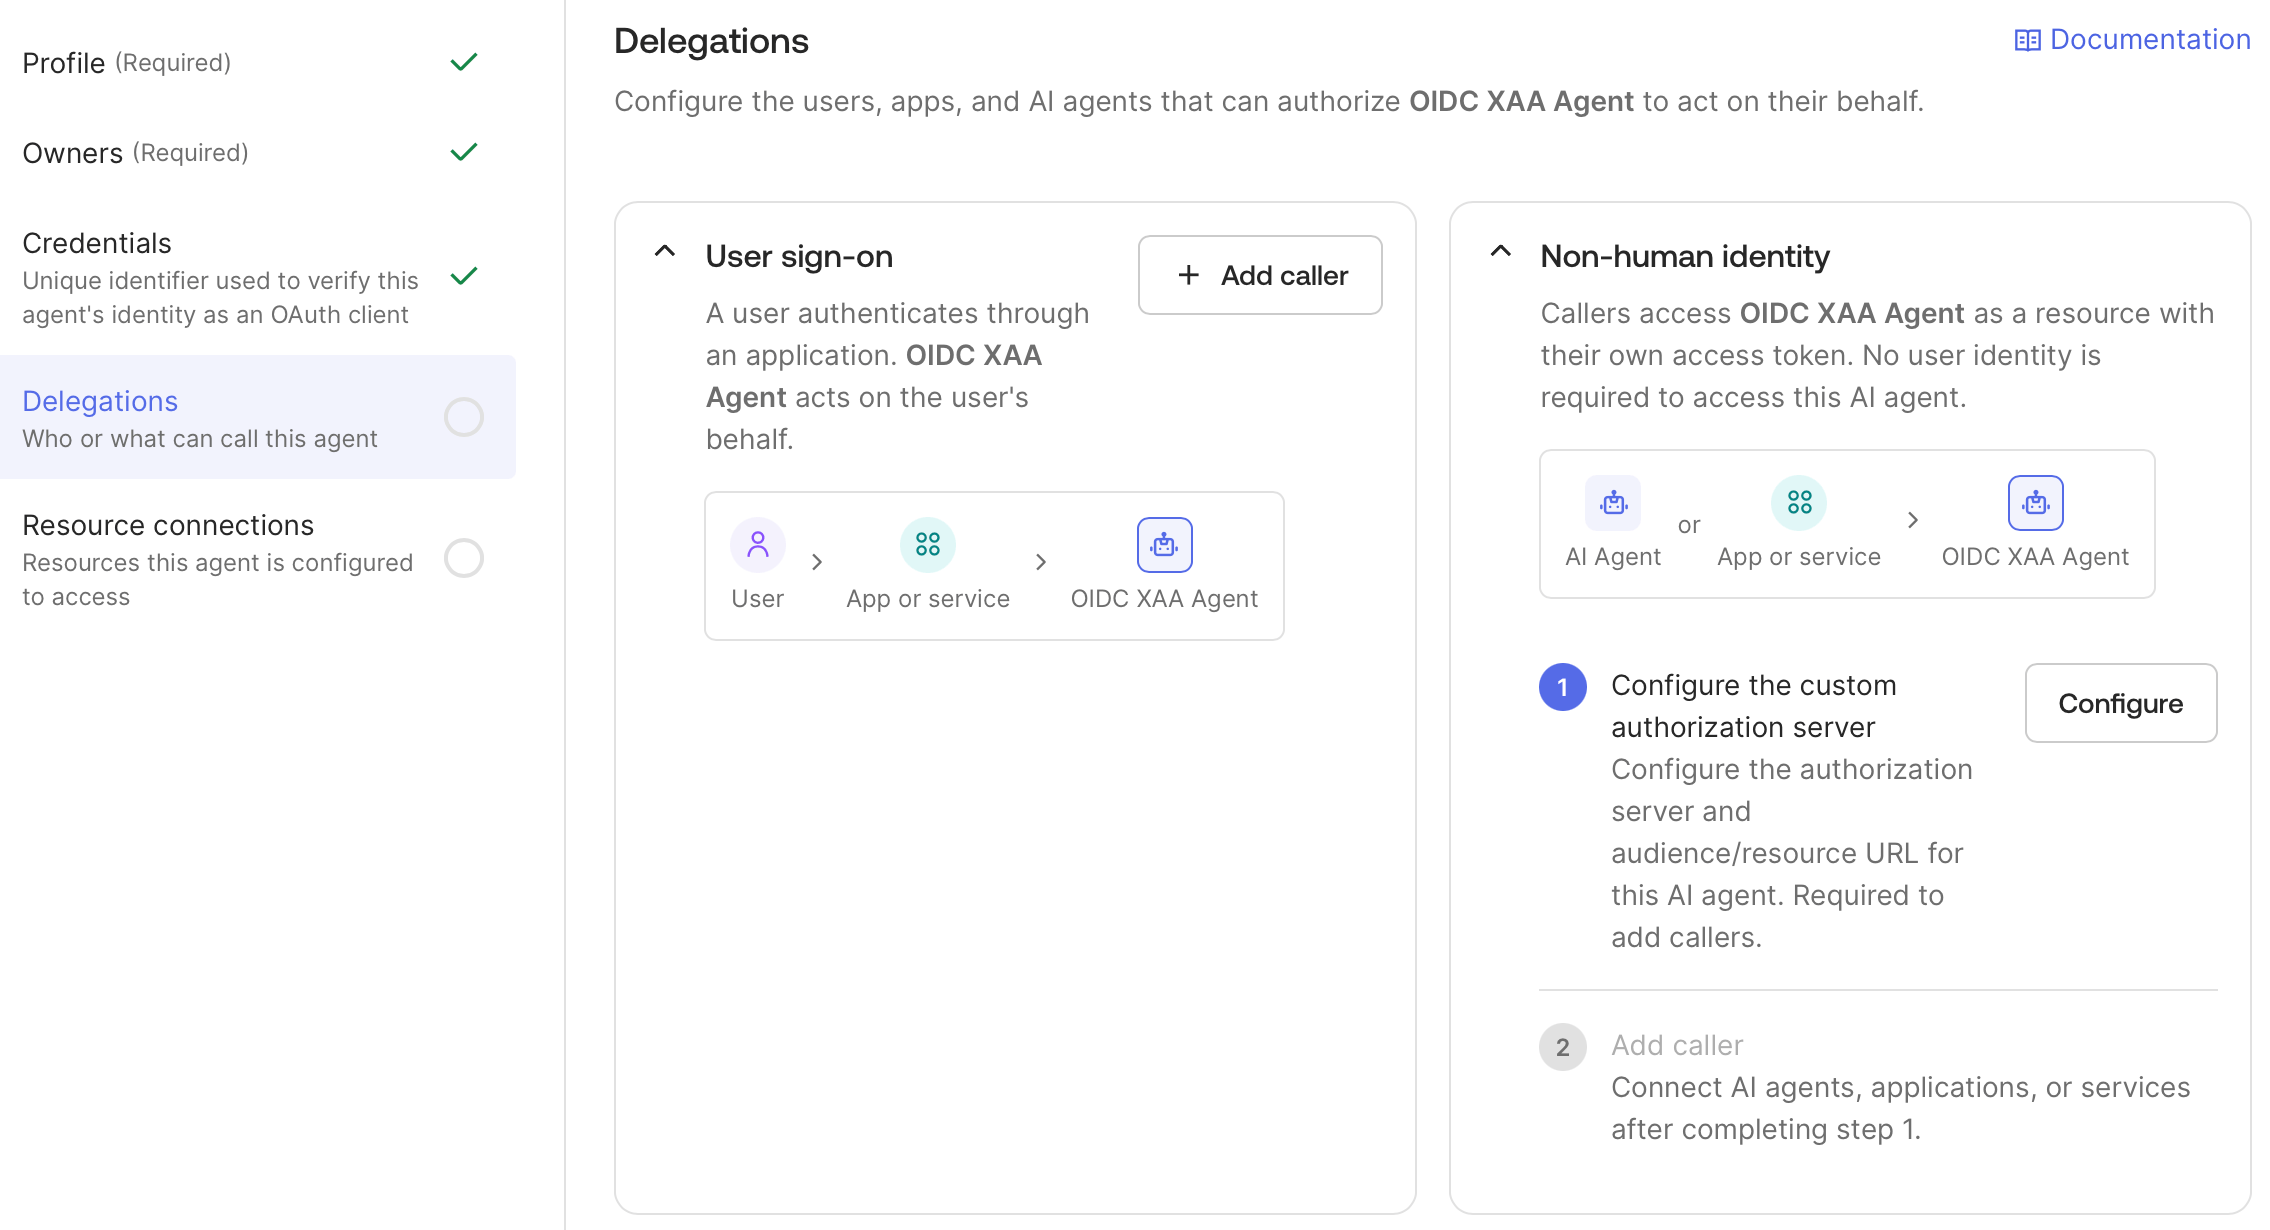
<Frame>
  <img src="https://mintcdn.com/docs-staging-chore-management-api-autoupdate/oO2QSWk9OPIJm0Gq/docs/images/xaa/xaa_okta_ai_agent_delegations_tab.png?fit=max&auto=format&n=oO2QSWk9OPIJm0Gq&q=85&s=5c7269b33575eef5d40099fb5cc2ae76" alt="" width="2270" height="1230" data-path="docs/images/xaa/xaa_okta_ai_agent_delegations_tab.png" />
</Frame>

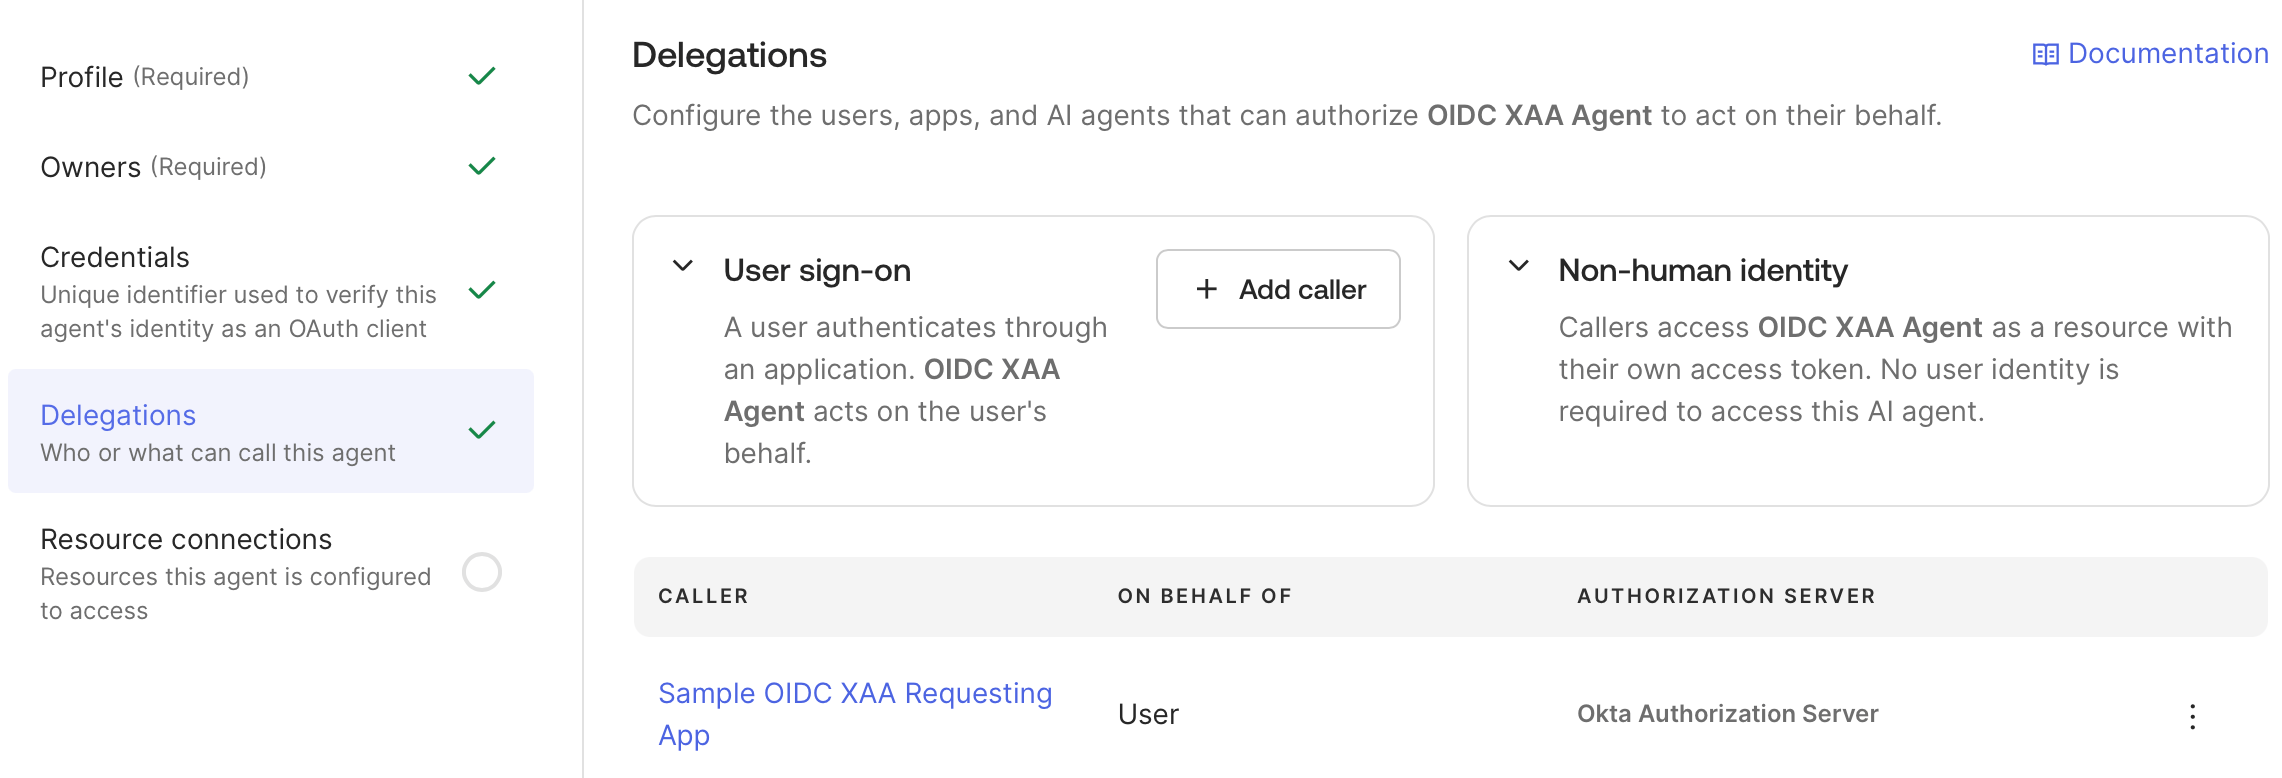
作成した Requesting Application を選択し、認可サーバーには **Okta Authorization Server** を選択します。
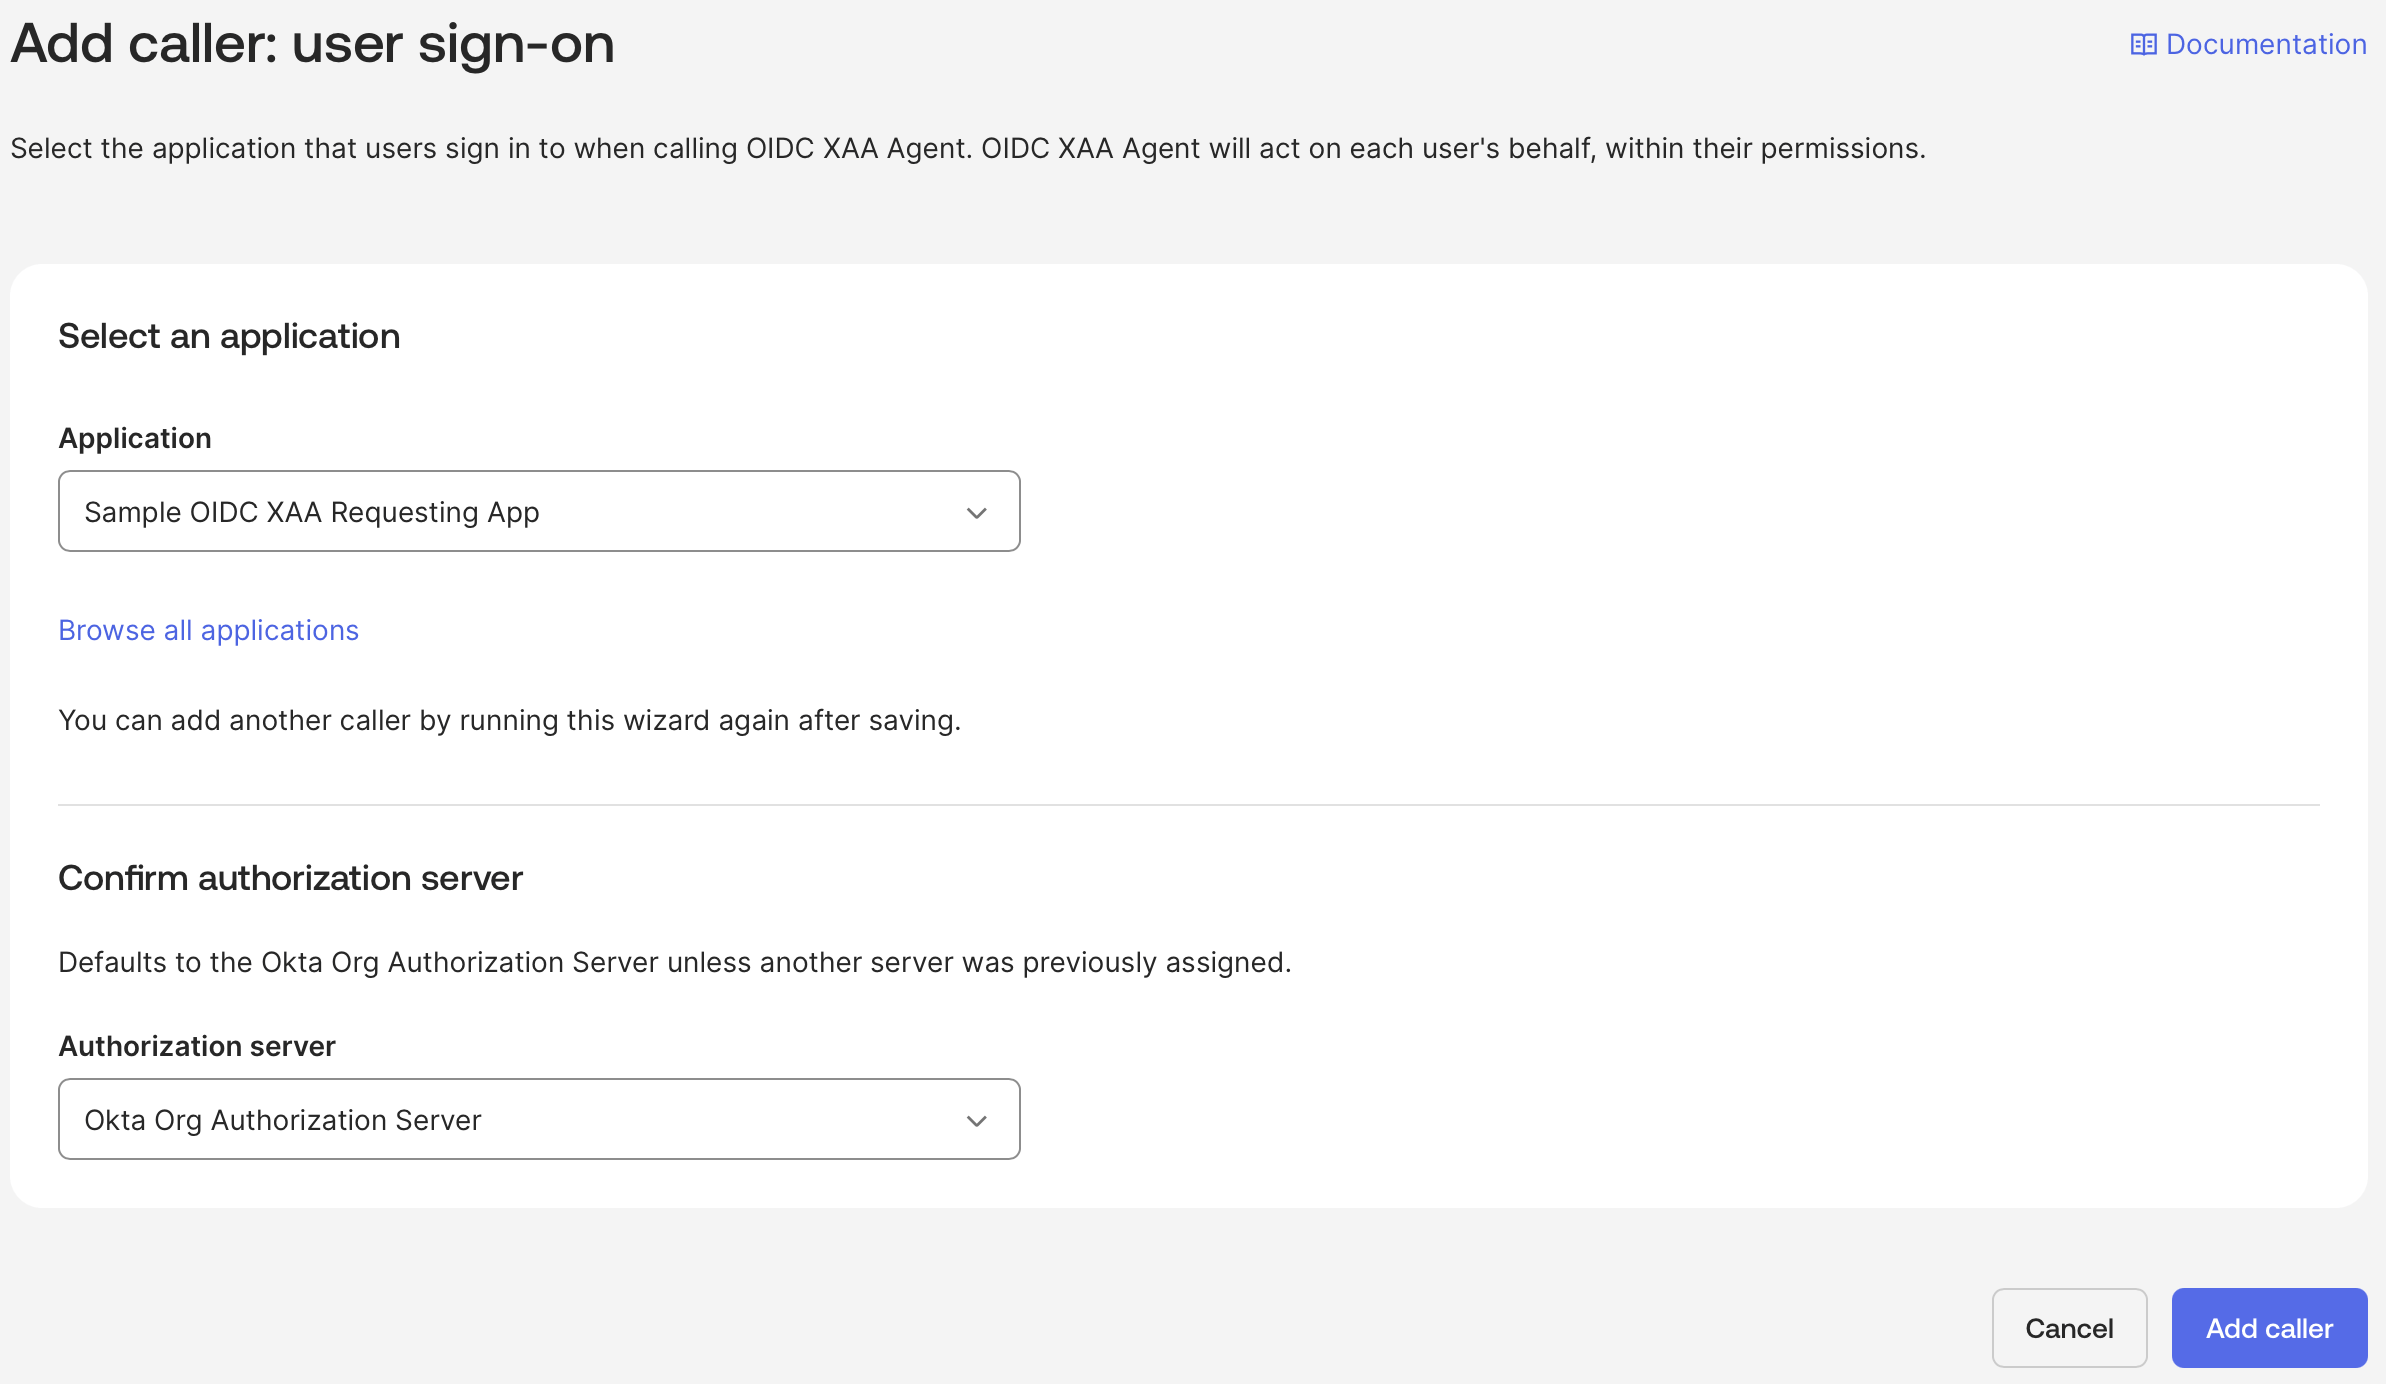
<Frame>
  <img src="https://mintcdn.com/docs-staging-chore-management-api-autoupdate/oO2QSWk9OPIJm0Gq/docs/images/xaa/xaa_okta_ai_agent_delegations_assign.png?fit=max&auto=format&n=oO2QSWk9OPIJm0Gq&q=85&s=72f4d41389903a43c389a515c358d86b" alt="" width="2386" height="1384" data-path="docs/images/xaa/xaa_okta_ai_agent_delegations_assign.png" />
</Frame>

エージェントの委譲を設定すると、タブの横にチェックマークが表示されます。

<Frame>
  <img src="https://mintcdn.com/docs-staging-chore-management-api-autoupdate/oO2QSWk9OPIJm0Gq/docs/images/xaa/xaa_okta_ai_agent_delegations_set.png?fit=max&auto=format&n=oO2QSWk9OPIJm0Gq&q=85&s=6c13b262cf86f9b53acef5d32ac8f86e" alt="" width="2282" height="778" data-path="docs/images/xaa/xaa_okta_ai_agent_delegations_set.png" />
</Frame>

<h3 id="add-agent-resource-connections">
  Agent Resource 接続を追加
</h3>

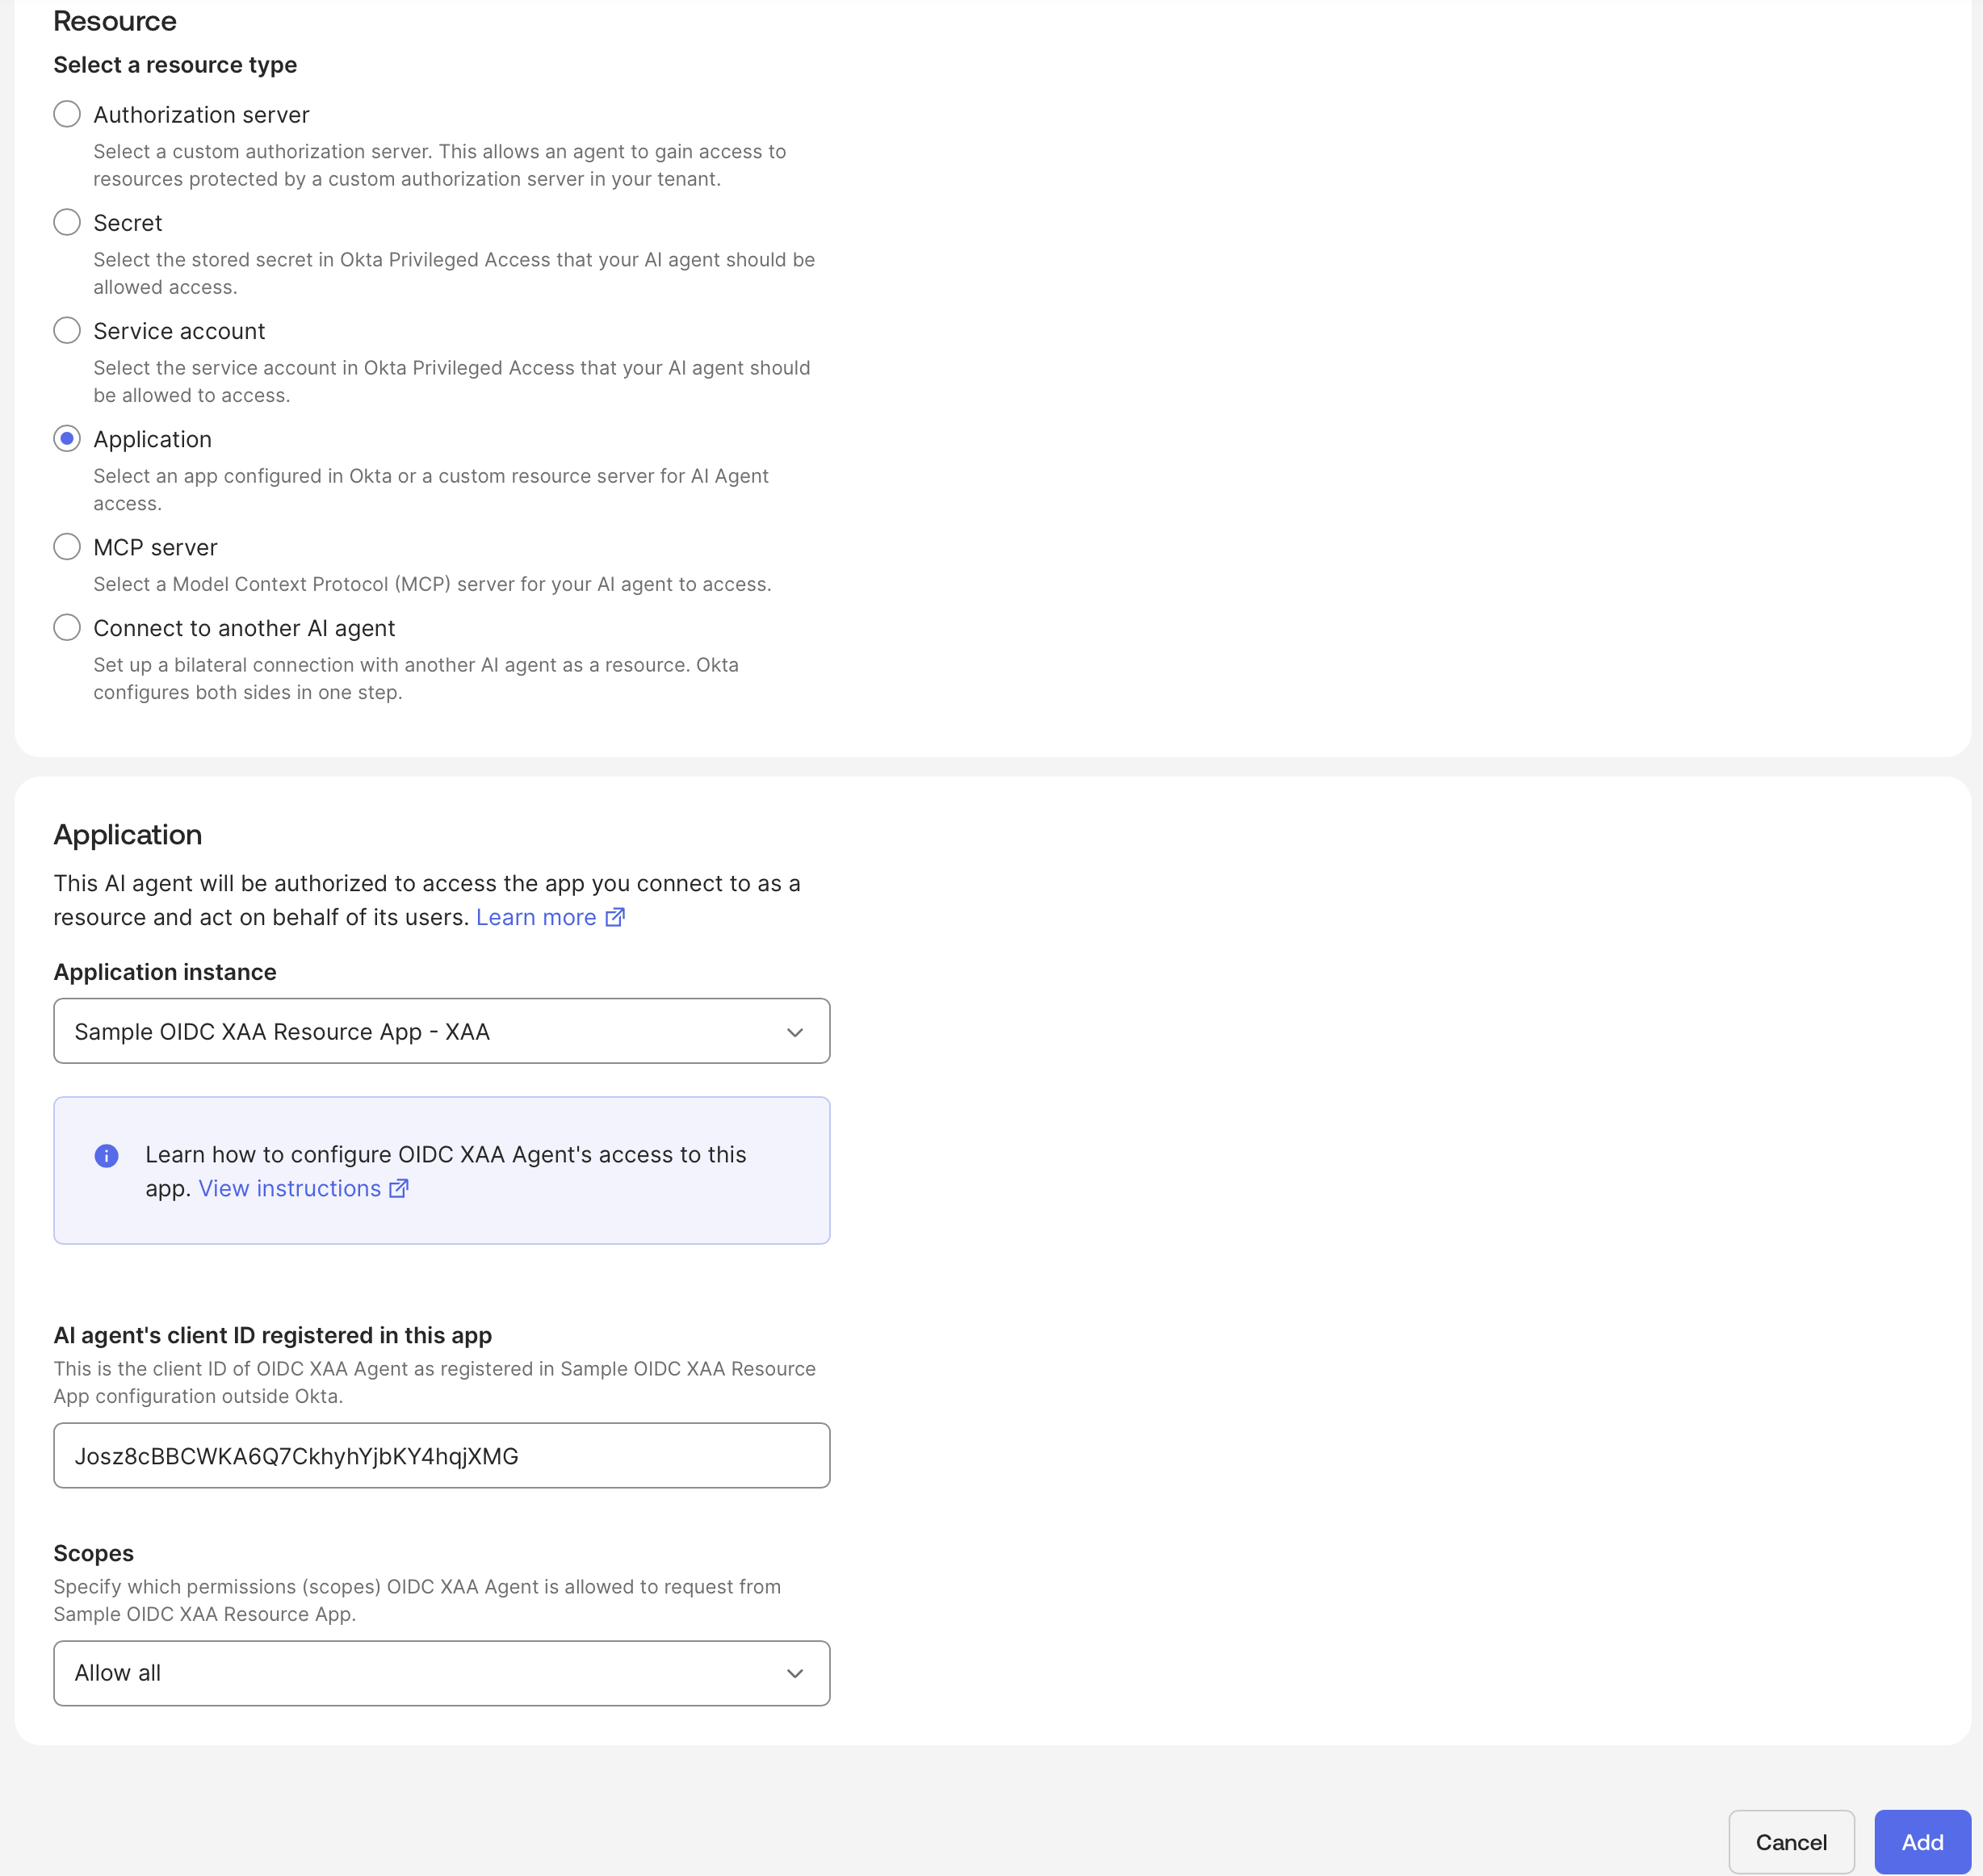
**Resource connections** タブで **Add resource connections** を選択し、**Resource type** に **Application** を選択します。

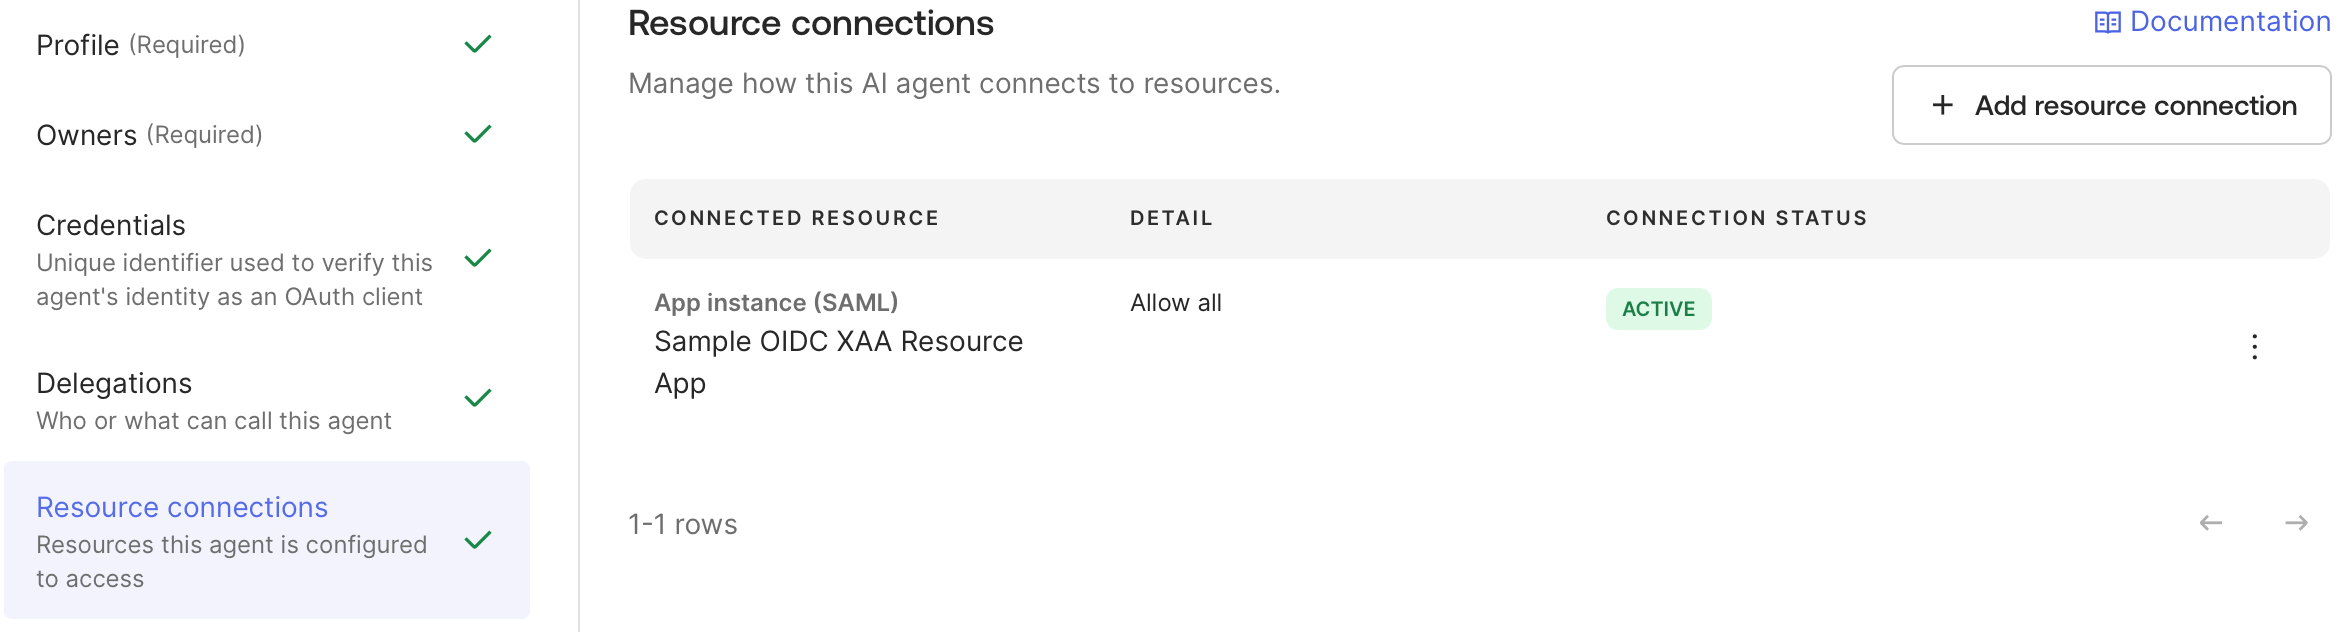
**Application** セクションで、作成した Resource App を選択し、**AI agent's client ID registered in the app** に、Auth0 テナント内の Agent0 アプリケーションの `client_id` を設定します。
<Frame>
  <img src="https://mintcdn.com/docs-staging-chore-management-api-autoupdate/oO2QSWk9OPIJm0Gq/docs/images/xaa/xaa_okta_ai_agent_resource_connections_tab.png?fit=max&auto=format&n=oO2QSWk9OPIJm0Gq&q=85&s=e0a91ca427de856785ca11646348d317" alt="" width="2456" height="2324" data-path="docs/images/xaa/xaa_okta_ai_agent_resource_connections_tab.png" />
</Frame>

リソース接続を設定すると、タブの横にチェックマークが表示されます。

<Frame>
  <img src="https://mintcdn.com/docs-staging-chore-management-api-autoupdate/oO2QSWk9OPIJm0Gq/docs/images/xaa/xaa_okta_ai_agent_resource_connections_set.png?fit=max&auto=format&n=oO2QSWk9OPIJm0Gq&q=85&s=b47581adf420b31838e80d4330e36131" alt="" width="2344" height="632" data-path="docs/images/xaa/xaa_okta_ai_agent_resource_connections_set.png" />
</Frame>

<h3 id="activate-the-agent">
  Agent を有効化する
</h3>

**Agent's Actions** ドロップダウンで **Activate** を選択し、**MANAGED STATUS** が **Active** になっていることを確認します。

<h2 id="configure-an-okta-workforce-enterprise-connection-in-auth0">
  Auth0 で Okta Workforce Enterprise 接続を設定する
</h2>

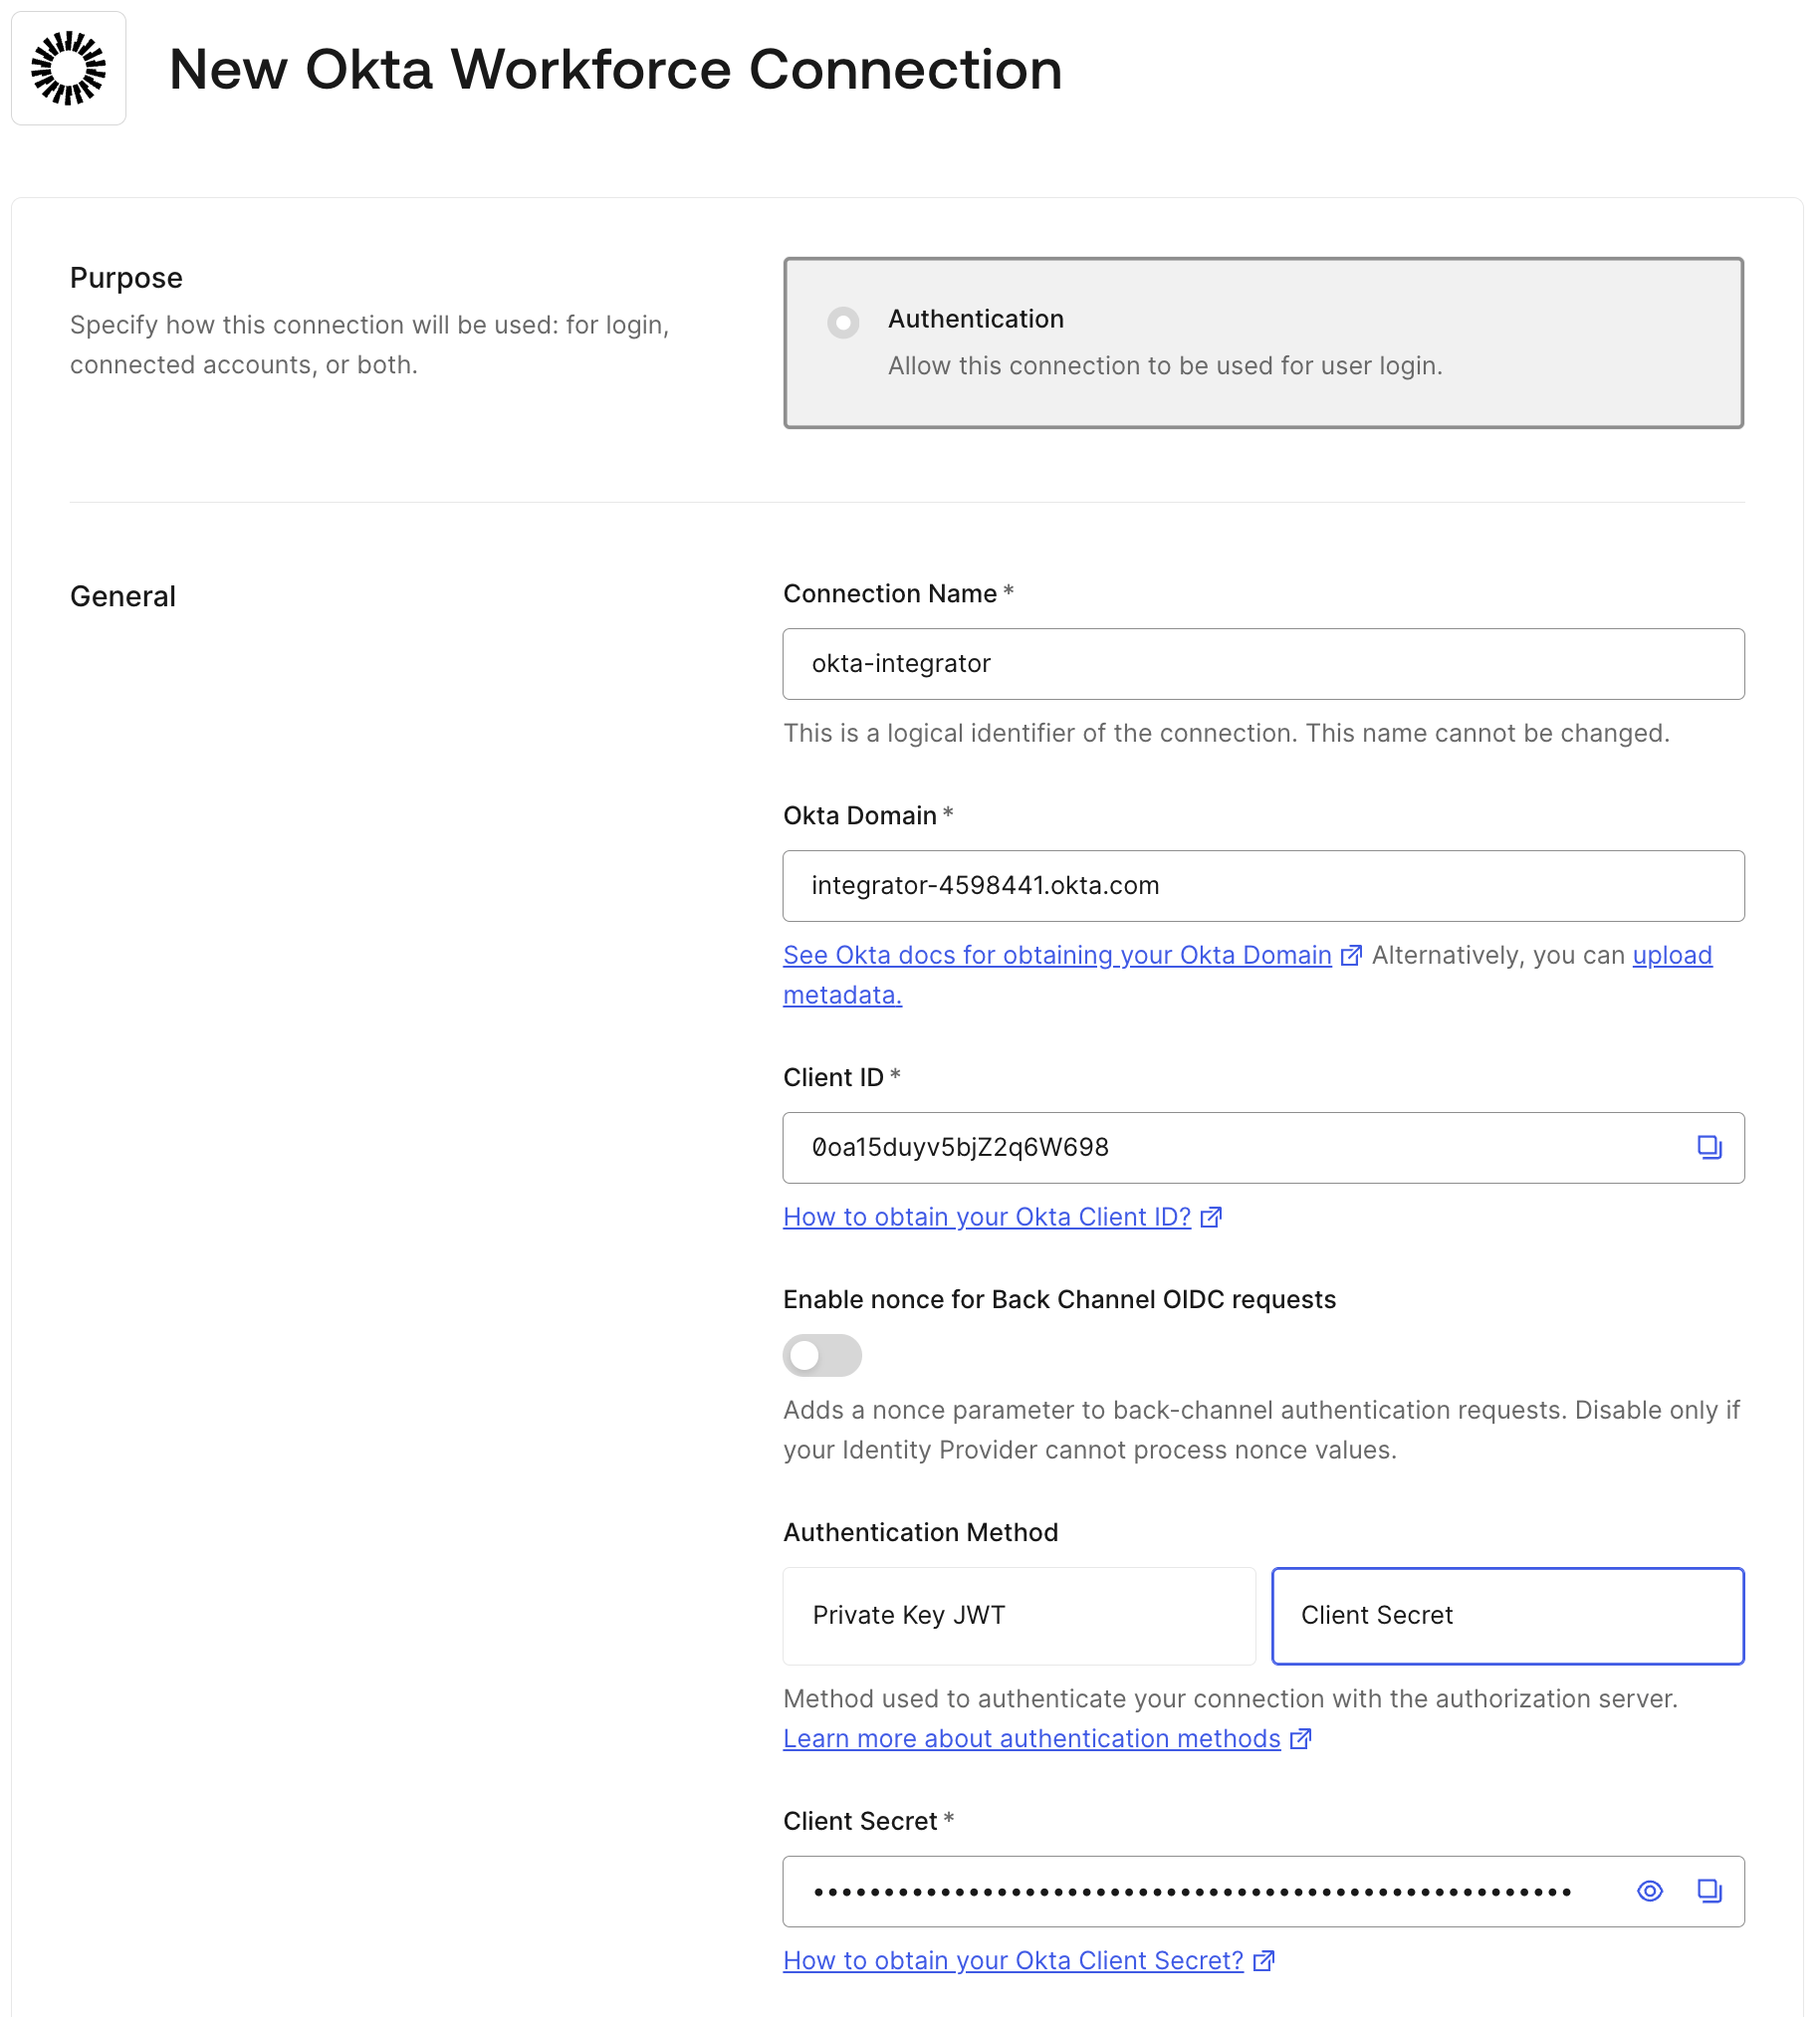
Resource App の `client_id` と `client_secret` を使用して、Auth0 テナントに[Okta Workforce Enterprise 接続を作成](/docs/ja-jp/authenticate/identity-providers/enterprise-identity-providers/okta/express-configuration)します。
Auth0 Dashboard で、**Authentication > Enterprise > Okta Workforce** に移動し、**Create Connection** を選択します。
<Frame>
  <img src="https://mintcdn.com/docs-staging-chore-management-api-autoupdate/QdI83TbahvpDNTUy/docs/images/xaa/xaa_auth0_new_okta_workforce_connection.png?fit=max&auto=format&n=QdI83TbahvpDNTUy&q=85&s=ee1705f60252ef813f3c7cb8a148327b" alt="" width="1828" height="2026" data-path="docs/images/xaa/xaa_auth0_new_okta_workforce_connection.png" />
</Frame>

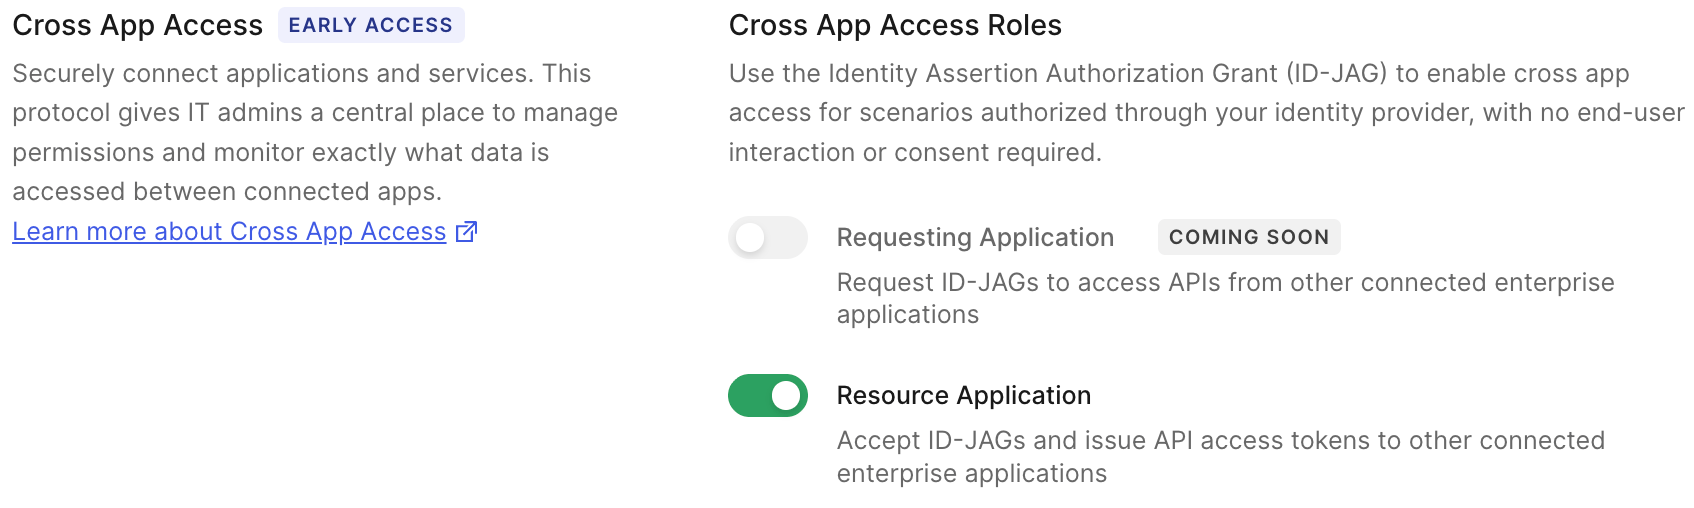
Okta Workforce Enterprise 接続を作成する際は、**Cross App Access - Resource Application** ロールを有効化します。これにより、Resource App は、その接続に関連付けられたエンタープライズ IdP (この場合は Okta テナント) が発行した ID-JAG を受け入れられるようになります。
<Frame>
  <img src="https://mintcdn.com/docs-staging-chore-management-api-autoupdate/QdI83TbahvpDNTUy/docs/images/xaa/xaa_auth0_connection_xaa_enabled.png?fit=max&auto=format&n=QdI83TbahvpDNTUy&q=85&s=d03ffa575f4e256e96e965bccf404b88" alt="" width="1694" height="508" data-path="docs/images/xaa/xaa_auth0_connection_xaa_enabled.png" />
</Frame>

Okta Workforce Enterprise 接続を作成したら、接続の設定にある **Callback URL provided by Auth0** が、Okta テナント内の **Resource App** のサインオンポリシーで設定されている **Redirect URI** と一致していることを確認します。

<Callout icon="file-lines" color="#0EA5E9" iconType="regular">
  サードパーティアプリケーションからこの接続へのアクセスを Cross App Access 経由のみにし、エンタープライズ IdP である Okta でアクセスを承認する場合は、[ドメインレベルに昇格](/docs/ja-jp/authenticate/identity-providers/promote-connections-to-domain-level)しないでください。昇格すると、この接続は Cross App Access 経由だけでなく、テナント内の任意のサードパーティアプリケーションの標準ログインフロー (`/authorize`) でも利用できるようになります。
</Callout>

<h3 id="test-connection-in-auth0">
  Auth0 で接続をテストする
</h3>

Auth0 Dashboard で、次の操作を行います。

* **Authentication > Enterprise > Okta Workforce** に移動します。
  * 作成した Okta Workforce Enterprise 接続を開き、**アプリケーション** タブを選択します。次に、その接続に対して作成した Requesting App を有効にします。
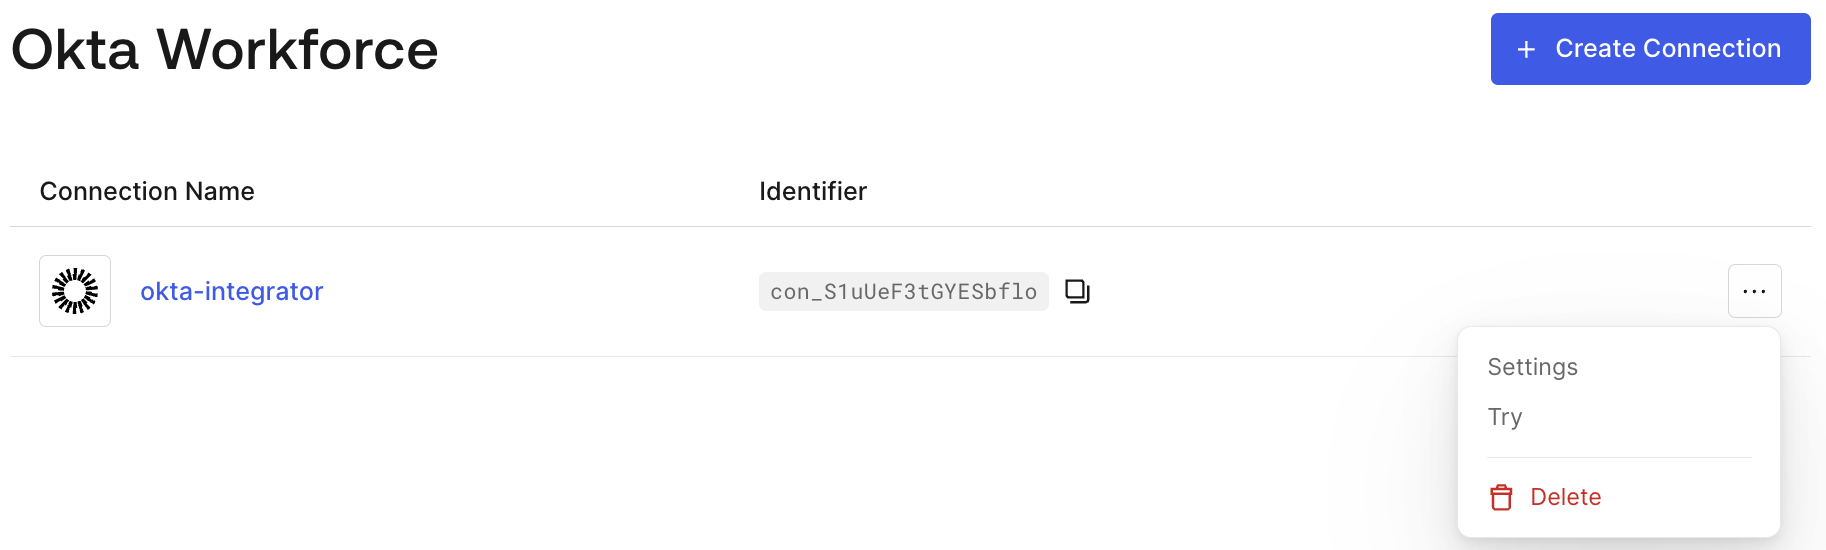
  * Okta Workforce 接続の一覧に戻ります。対象の接続の右側にある3点メニューを選択し、**Try** を選択します。テストユーザーでのログインを完了するため、Okta テナントでの認証画面にリダイレクトされます。
<Frame>
  <img src="https://mintcdn.com/docs-staging-chore-management-api-autoupdate/QdI83TbahvpDNTUy/docs/images/xaa/xaa_auth0_try_okta_connection.png?fit=max&auto=format&n=QdI83TbahvpDNTUy&q=85&s=475c912c574344123f08a997644d0370" alt="" width="1826" height="550" data-path="docs/images/xaa/xaa_auth0_try_okta_connection.png" />
</Frame>

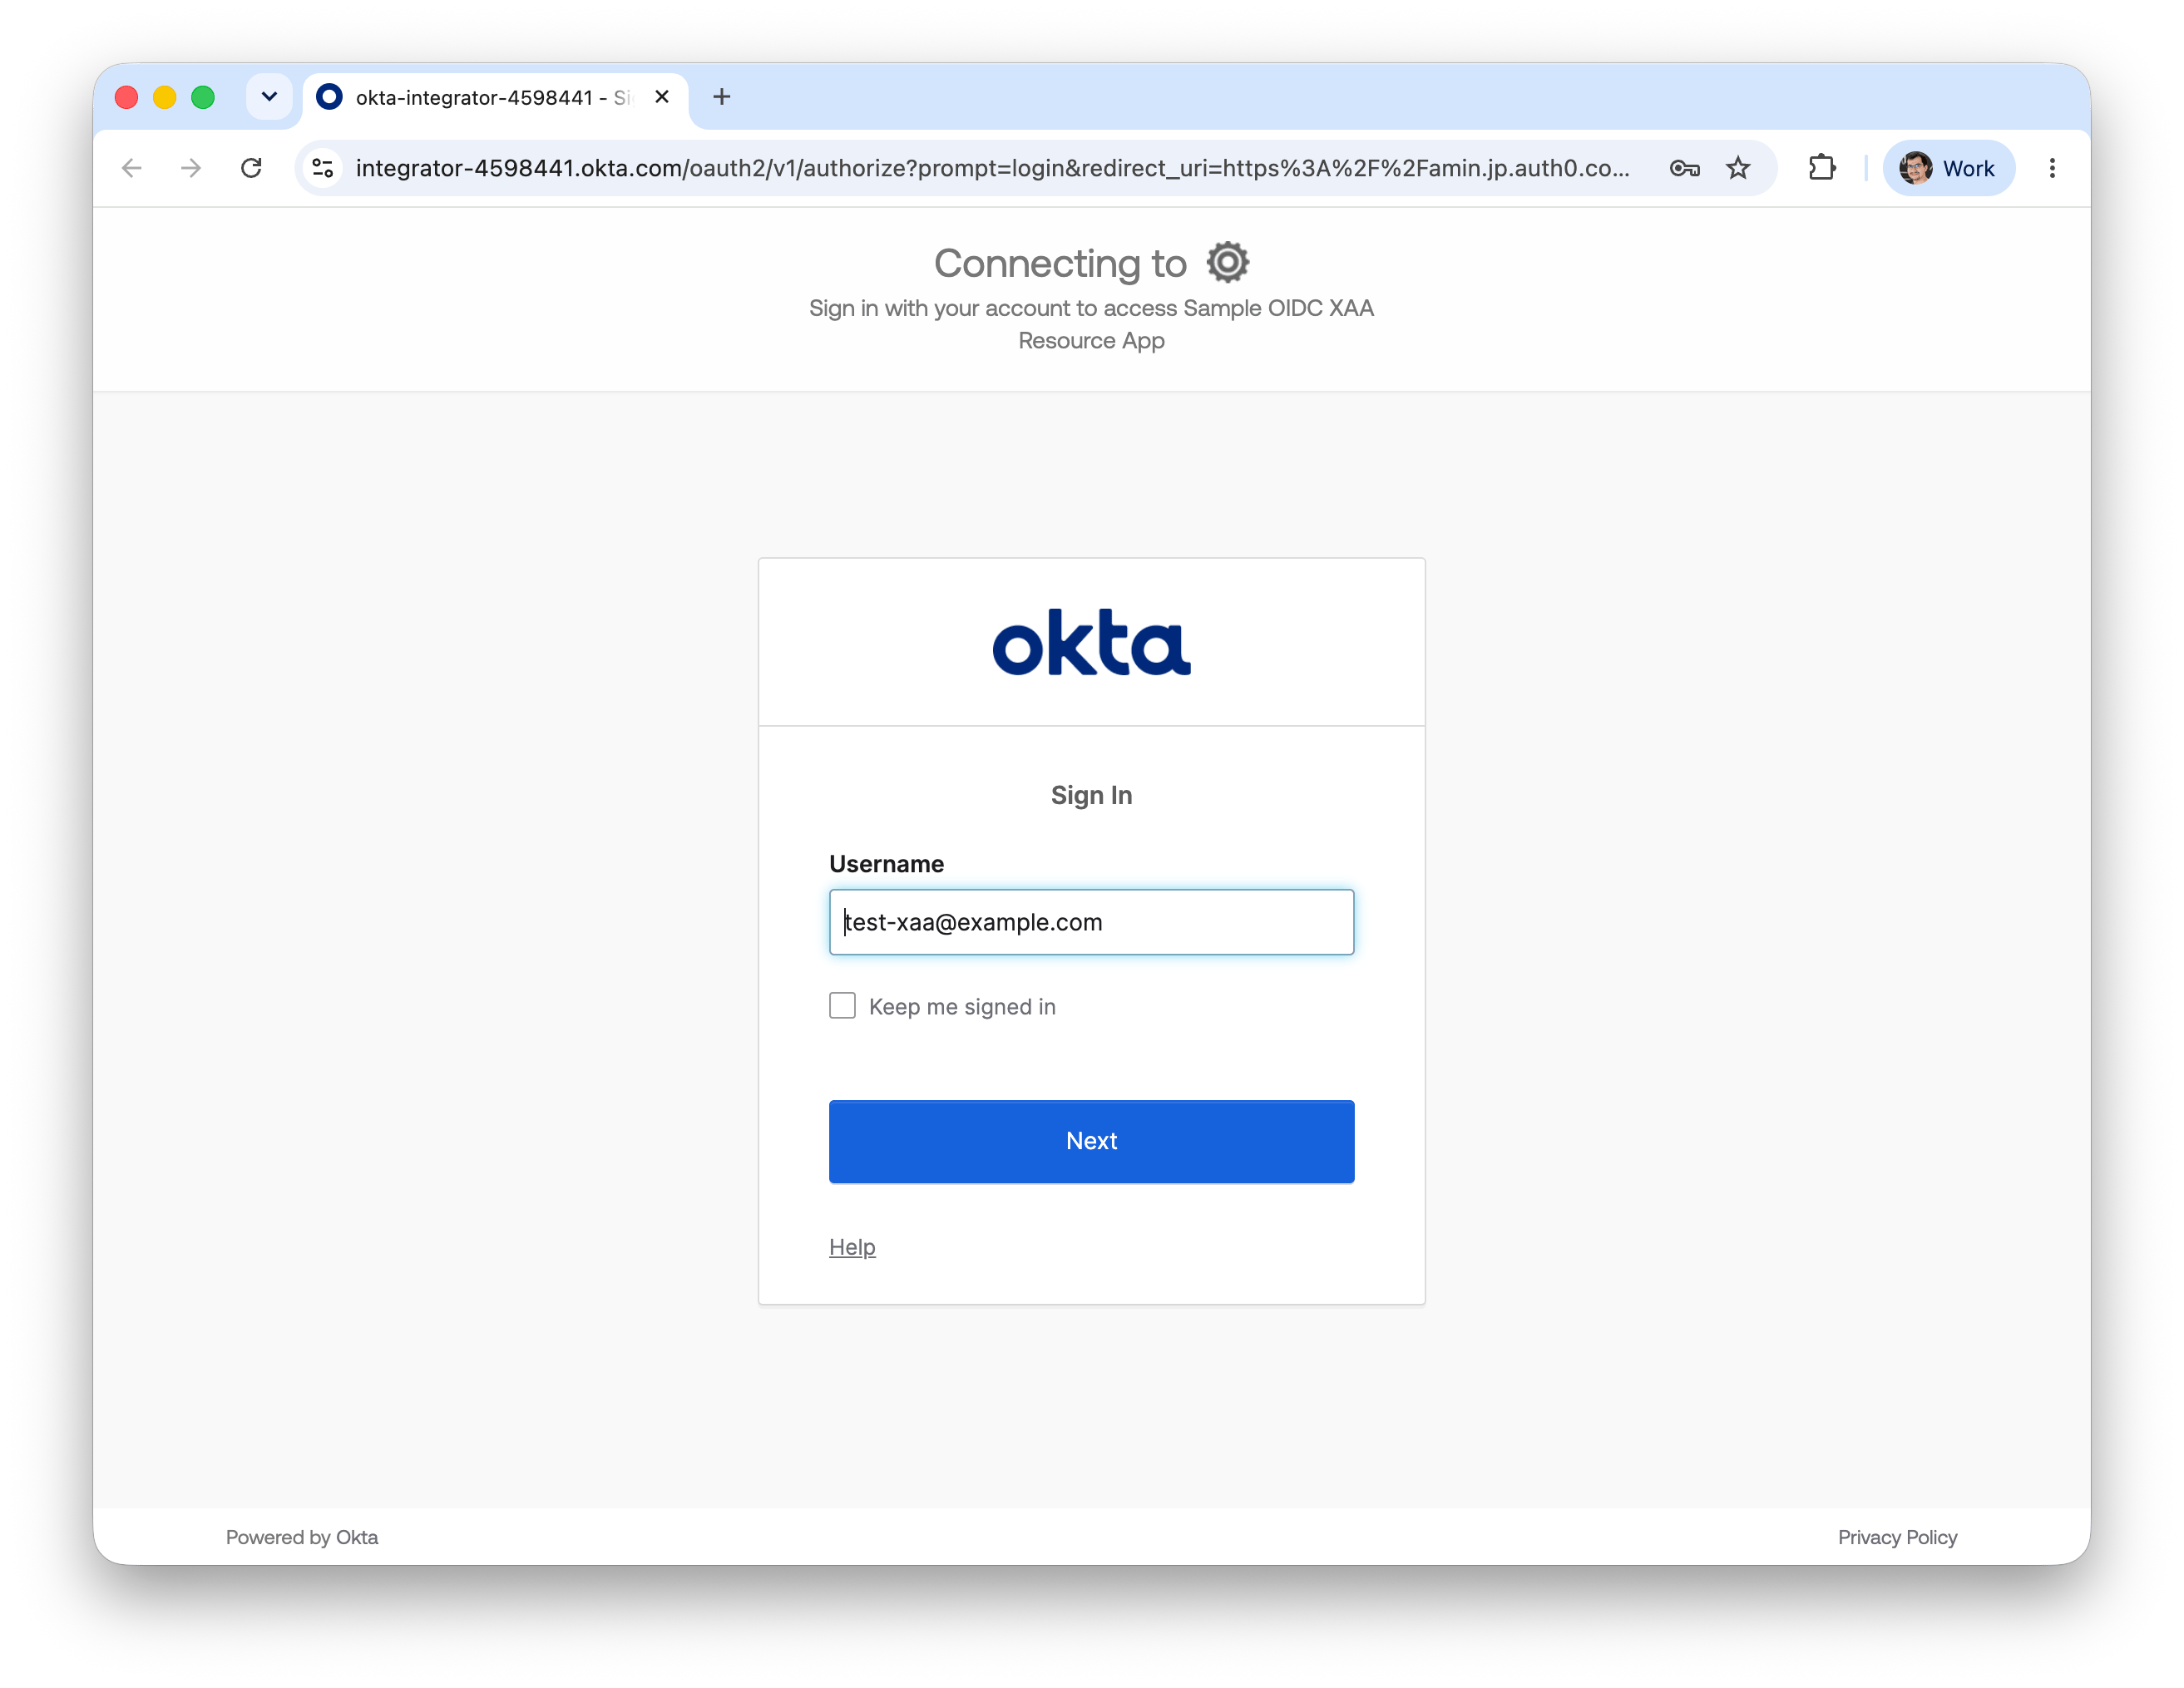
* XAA Resource App に割り当てたユーザーでログインします

<Frame>
  <img src="https://mintcdn.com/docs-staging-chore-management-api-autoupdate/oO2QSWk9OPIJm0Gq/docs/images/xaa/xaa_okta_login.png?fit=max&auto=format&n=oO2QSWk9OPIJm0Gq&q=85&s=27e9baaf6a58492fa541176d89d45958" alt="" width="2626" height="2030" data-path="docs/images/xaa/xaa_okta_login.png" />
</Frame>

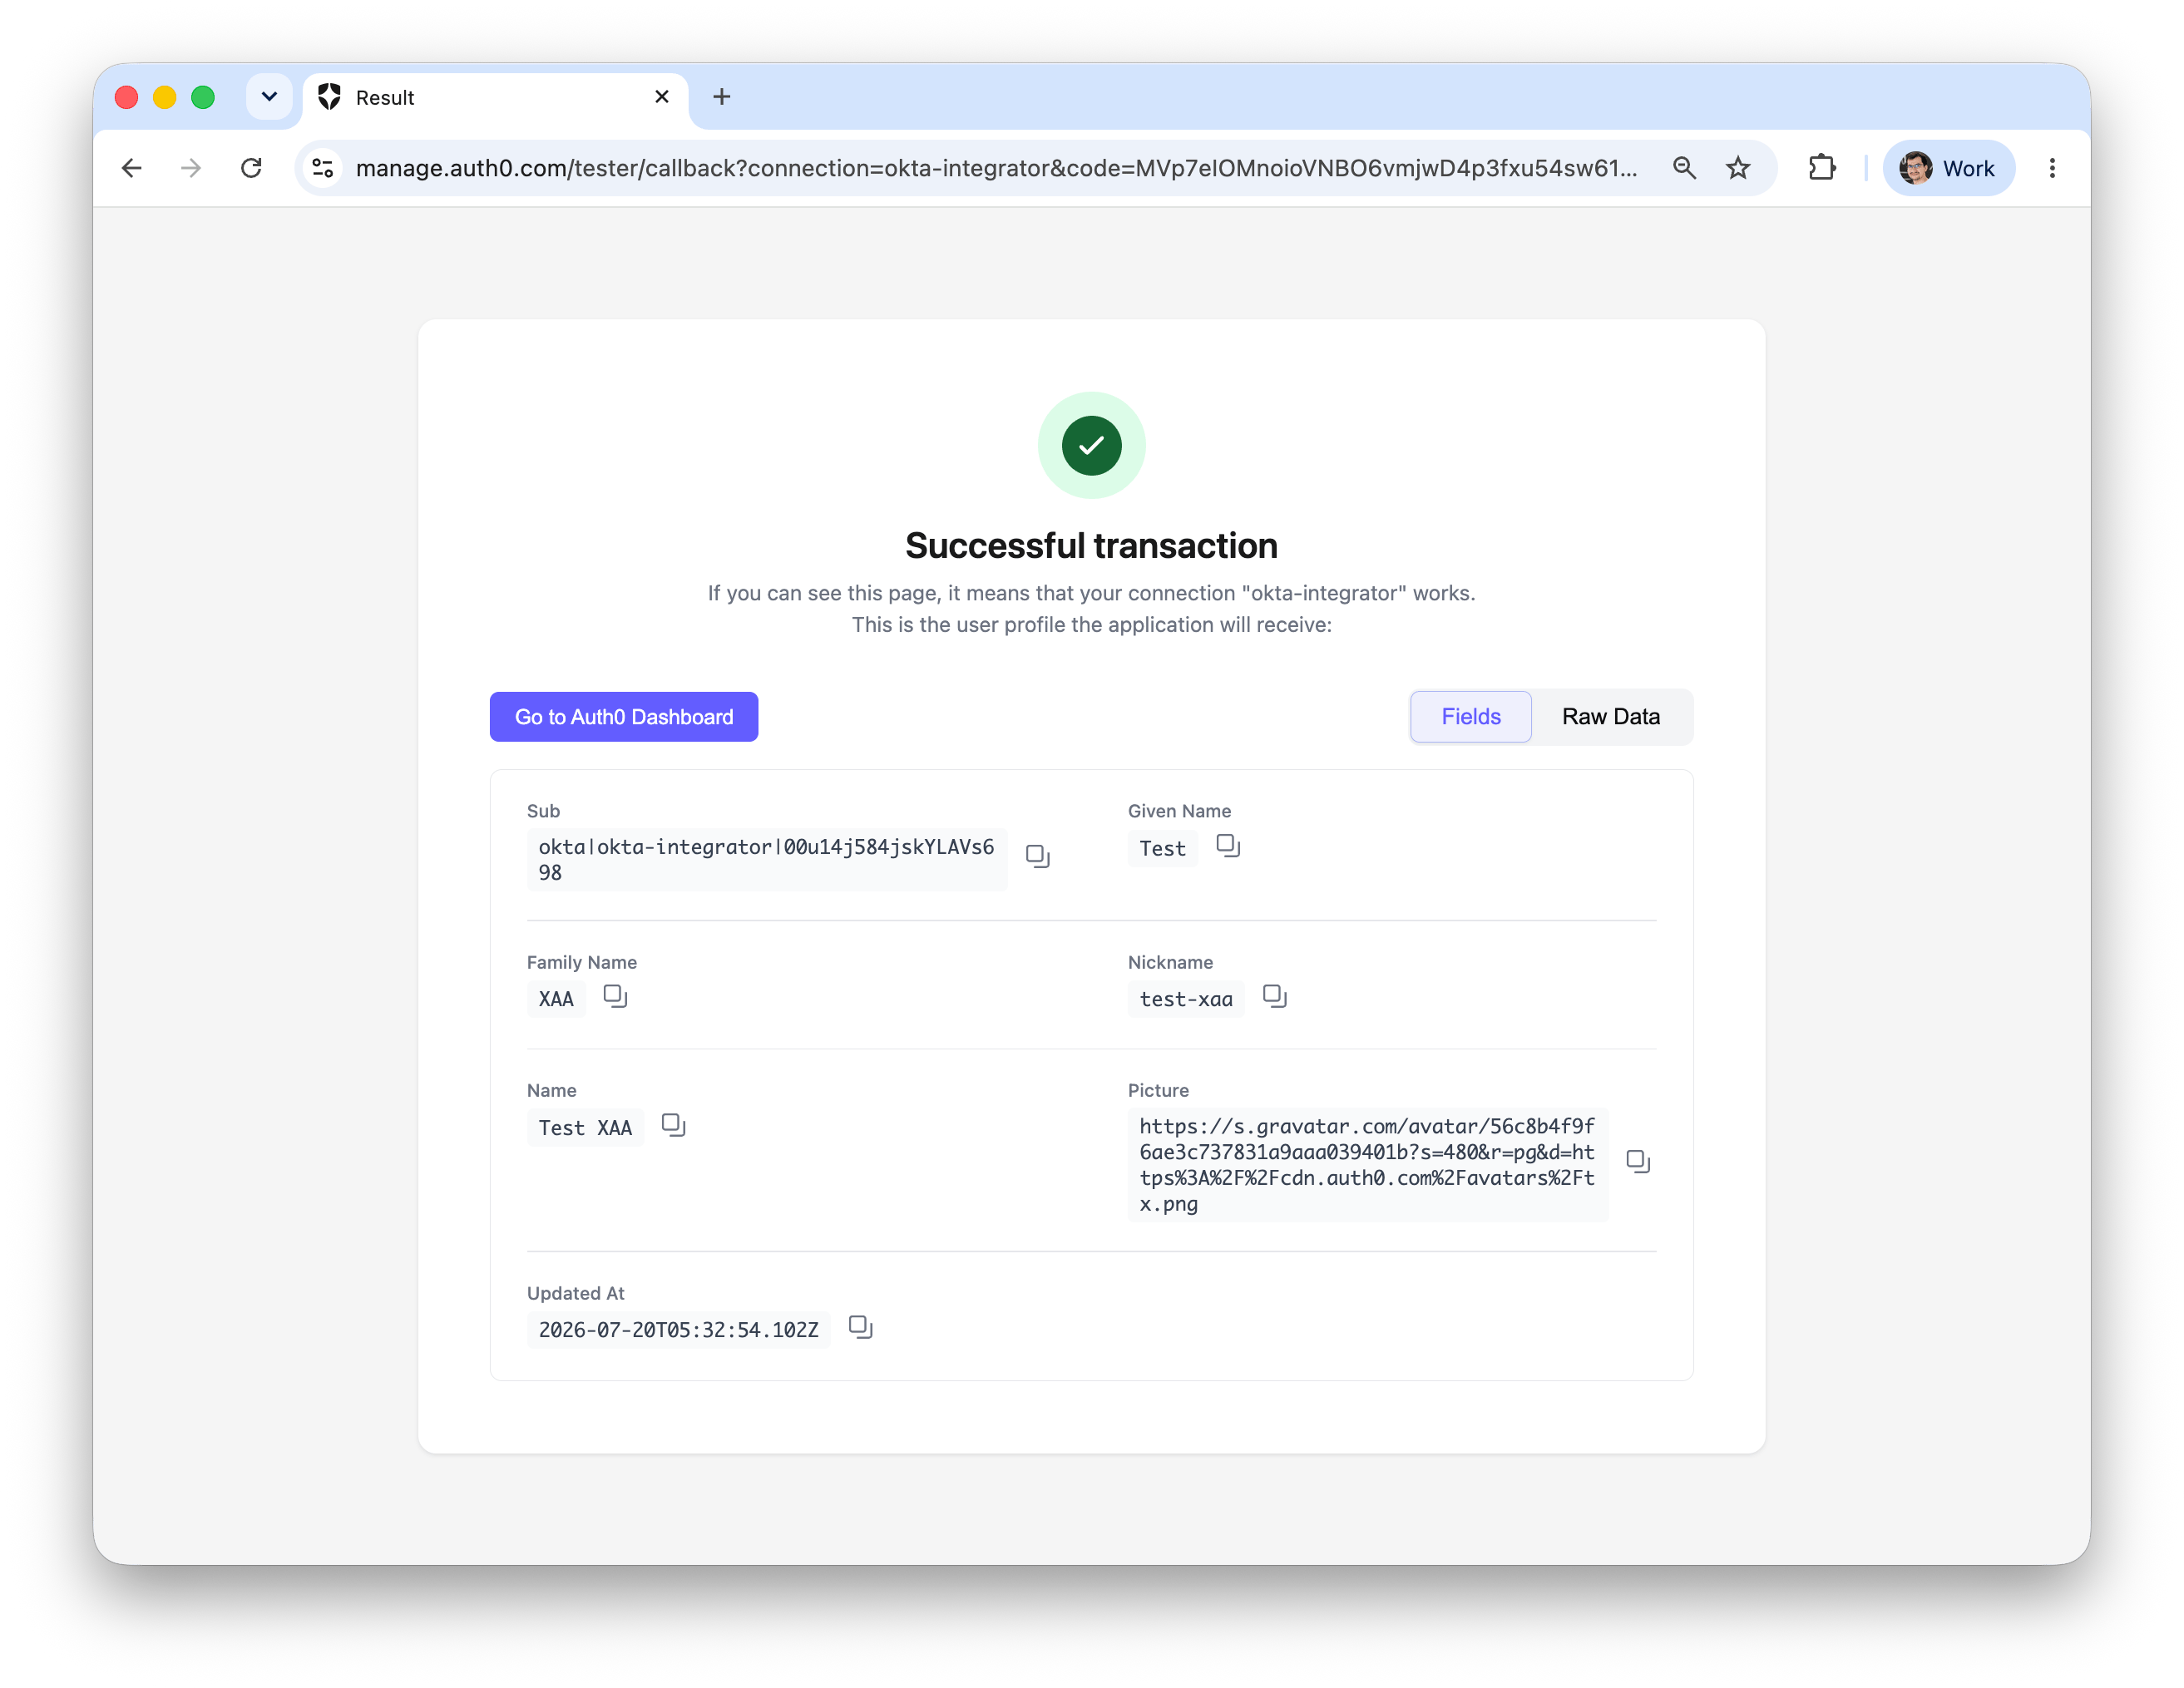
* ユーザーのログインが成功したことを確認します

<Frame>
  <img src="https://mintcdn.com/docs-staging-chore-management-api-autoupdate/QdI83TbahvpDNTUy/docs/images/xaa/xaa_auth0_try_success.png?fit=max&auto=format&n=QdI83TbahvpDNTUy&q=85&s=e2e420bbb61d96f6291acd4d08362f13" alt="" width="2626" height="2030" data-path="docs/images/xaa/xaa_auth0_try_success.png" />
</Frame>

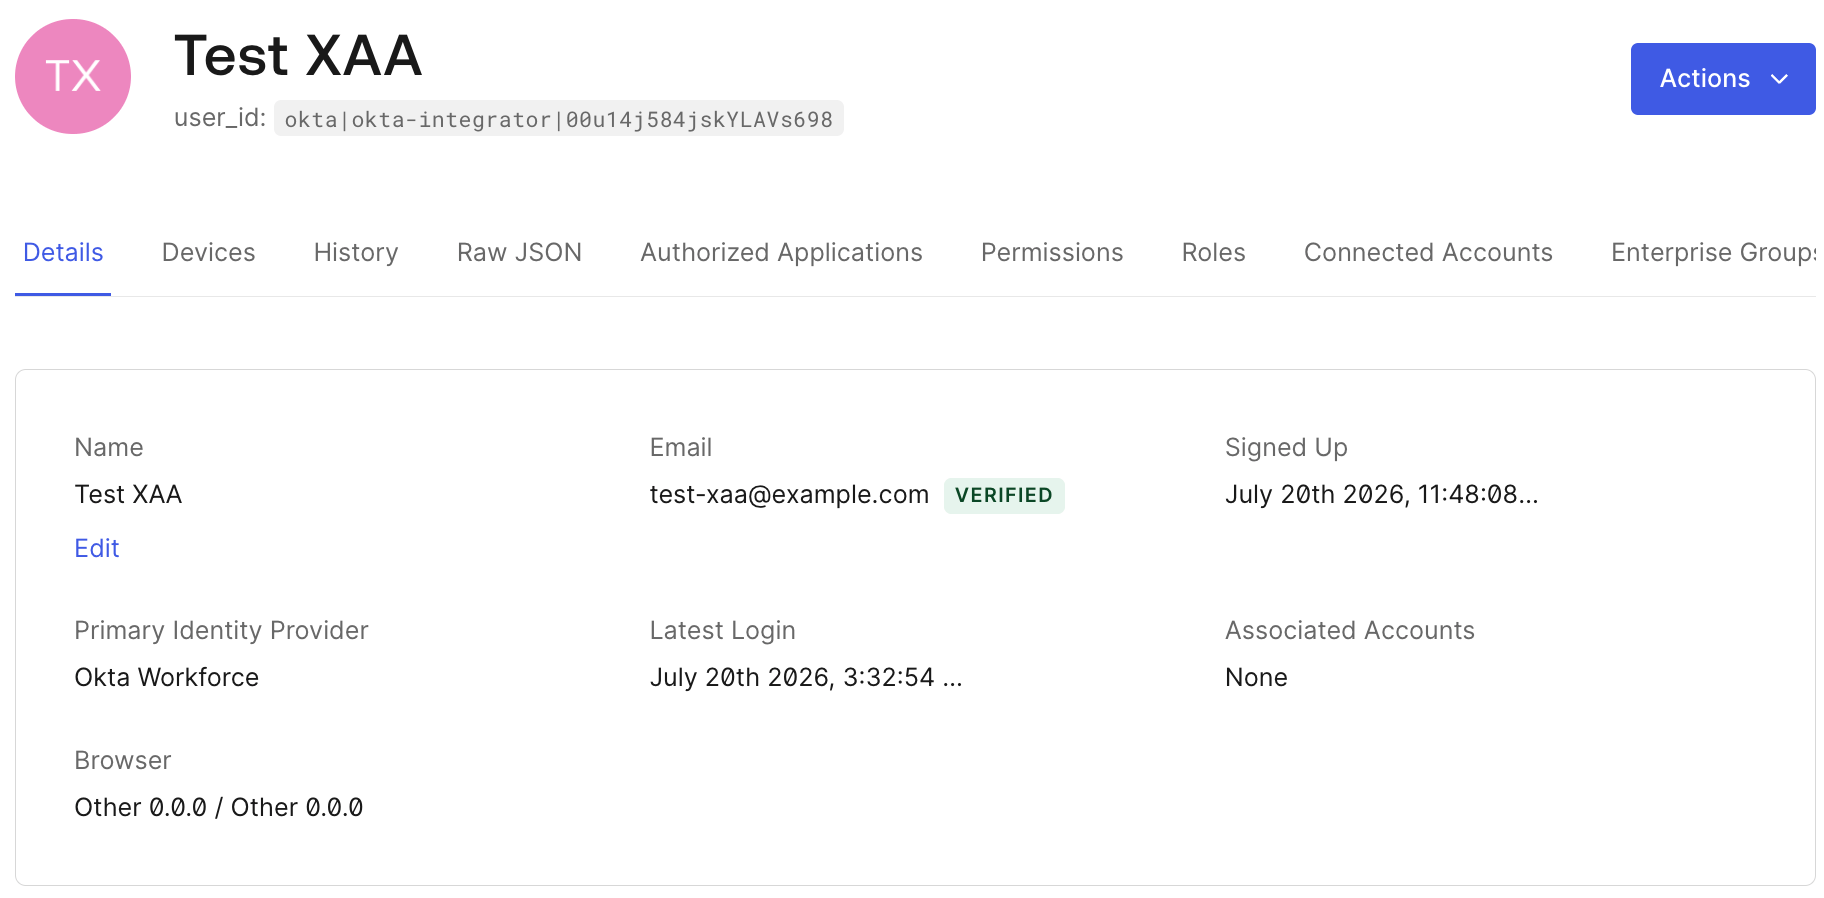
ユーザーがフェデレーション接続を使用して正常にログインすると、Auth0 にユーザープロファイルが作成されます。
<Frame>
  <img src="https://mintcdn.com/docs-staging-chore-management-api-autoupdate/QdI83TbahvpDNTUy/docs/images/xaa/xaa_auth0_try_profile.png?fit=max&auto=format&n=QdI83TbahvpDNTUy&q=85&s=0ee3b600351eed7565f0a329182cbb52" alt="" width="1824" height="898" data-path="docs/images/xaa/xaa_auth0_try_profile.png" />
</Frame>

<Callout icon="file-lines" color="#0EA5E9" iconType="regular">
  Auth0 にユーザープロファイルを作成するため、ユーザーは XAA 対応のエンタープライズ接続を使用して少なくとも1回ログインする必要があります。
  現時点で、Auth0 は ID-JAG による JIT ユーザー作成をサポートしていません。
</Callout>

<h2 id="publish-your-resource-app-in-oin">
  OIN で Resource App を公開する
</h2>

設定を完了し、[エンドツーエンドのフローをテスト](/docs/ja-jp/ai-agents-mcp/cross-app-access/end-to-end-testing)したら、B2B および SaaS プロバイダーは、Resource App を [Okta Integration Network (OIN)](https://www.okta.com/integrations/) に公開することで、Enterprise のお客様へのリーチを拡大できます。詳細については、[How to Build and List Secure Cross App Access Connections on OIN](https://developer.okta.com/blog/2026/07/06/submit-oin-xaa) の手順を参照してください。