> ## Documentation Index
> Fetch the complete documentation index at: https://docs-staging-chore-management-api-autoupdate.mintlify.site/llms.txt
> Use this file to discover all available pages before exploring further.

> Apprenez à configurer un formulaire de profil progressif à l’aide de Forms for Actions

# Cas d’utilisation : configurer un formulaire de profil progressif avec Forms

<Card title="Avant de commencer">
  1. Créez une [application machine-to-machine](/docs/fr-ca/get-started/auth0-overview/create-applications/machine-to-machine-apps) avec les portées suivantes activées :

  * `read:users`
  * `update:users`
  * `create:users`
  * `read:users_app_metadata`
  * `update:users_app_metadata`
  * `create:users_app_metadata`

  2. Ajoutez une [connexion Vault](/docs/fr-ca/customize/forms/vault) à l’aide des informations d’identification de l’application M2M.
</Card>

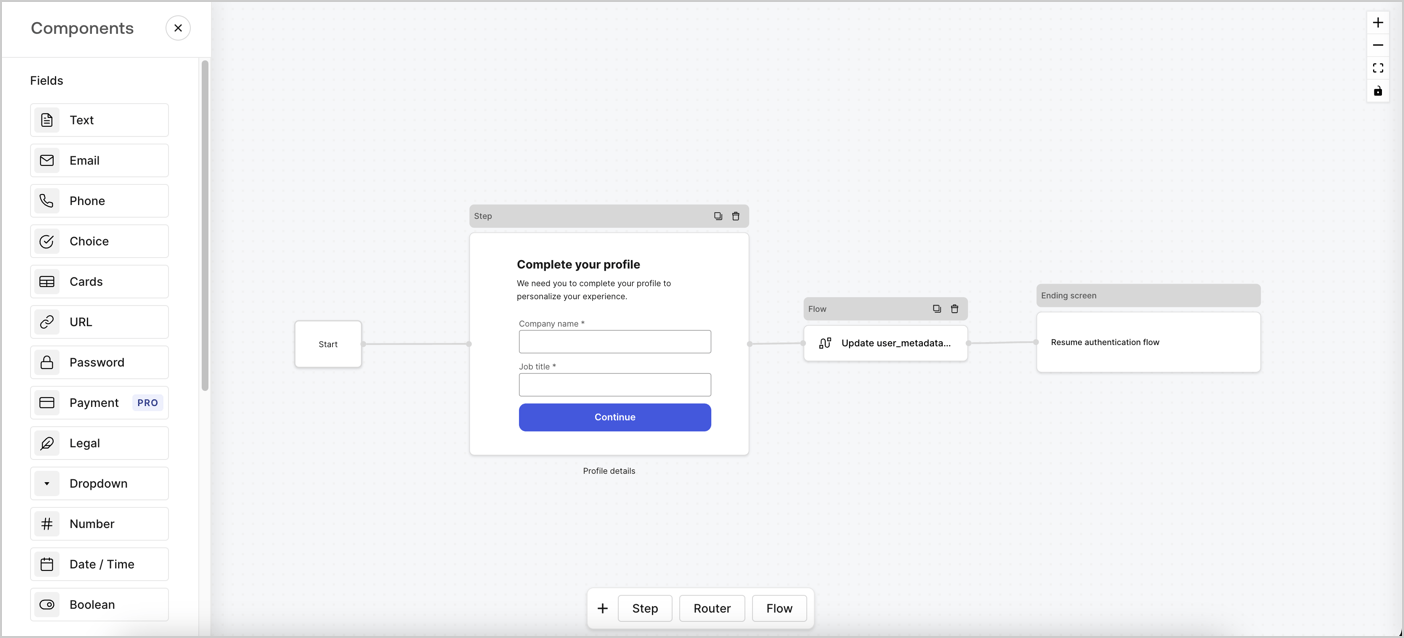
Forms for Actions vous permet de créer des flux de profil progressif afin de déterminer à quel moment demander aux utilisateurs de fournir les renseignements manquants, comme le nom de l’entreprise et le titre du poste, et de les stocker comme attributs `user_metadata`.
<Frame>
  <img src="https://mintcdn.com/docs-staging-chore-management-api-autoupdate/2q2UjVNt_eeGj7XX/docs/images/cdy7uua7fh8z/xUx9YmnHvnAqL19JvNtNP/60dae88f893d4ebe8e3523421e960596/Progressive-profle-overview.png?fit=max&auto=format&n=2q2UjVNt_eeGj7XX&q=85&s=483802c586250eb81591361675ea253c" alt="Dashboard > Actions > Forms > Form" data-og-width="1404" width="1404" data-og-height="638" height="638" data-path="docs/images/cdy7uua7fh8z/xUx9YmnHvnAqL19JvNtNP/60dae88f893d4ebe8e3523421e960596/Progressive-profle-overview.png" data-optimize="true" data-opv="3" srcset="https://mintcdn.com/docs-staging-chore-management-api-autoupdate/2q2UjVNt_eeGj7XX/docs/images/cdy7uua7fh8z/xUx9YmnHvnAqL19JvNtNP/60dae88f893d4ebe8e3523421e960596/Progressive-profle-overview.png?w=280&fit=max&auto=format&n=2q2UjVNt_eeGj7XX&q=85&s=fbf2acfd95eb4f8f1f33eb585b63e8d1 280w, https://mintcdn.com/docs-staging-chore-management-api-autoupdate/2q2UjVNt_eeGj7XX/docs/images/cdy7uua7fh8z/xUx9YmnHvnAqL19JvNtNP/60dae88f893d4ebe8e3523421e960596/Progressive-profle-overview.png?w=560&fit=max&auto=format&n=2q2UjVNt_eeGj7XX&q=85&s=791a1753ce6020eb5820094a7441a2a6 560w, https://mintcdn.com/docs-staging-chore-management-api-autoupdate/2q2UjVNt_eeGj7XX/docs/images/cdy7uua7fh8z/xUx9YmnHvnAqL19JvNtNP/60dae88f893d4ebe8e3523421e960596/Progressive-profle-overview.png?w=840&fit=max&auto=format&n=2q2UjVNt_eeGj7XX&q=85&s=1f1f2200593d2b86aba2a567c67a5840 840w, https://mintcdn.com/docs-staging-chore-management-api-autoupdate/2q2UjVNt_eeGj7XX/docs/images/cdy7uua7fh8z/xUx9YmnHvnAqL19JvNtNP/60dae88f893d4ebe8e3523421e960596/Progressive-profle-overview.png?w=1100&fit=max&auto=format&n=2q2UjVNt_eeGj7XX&q=85&s=6ae8eaa83d8907484c274b43beb29d40 1100w, https://mintcdn.com/docs-staging-chore-management-api-autoupdate/2q2UjVNt_eeGj7XX/docs/images/cdy7uua7fh8z/xUx9YmnHvnAqL19JvNtNP/60dae88f893d4ebe8e3523421e960596/Progressive-profle-overview.png?w=1650&fit=max&auto=format&n=2q2UjVNt_eeGj7XX&q=85&s=3c2832c281de490ef9e92d902a118b6a 1650w, https://mintcdn.com/docs-staging-chore-management-api-autoupdate/2q2UjVNt_eeGj7XX/docs/images/cdy7uua7fh8z/xUx9YmnHvnAqL19JvNtNP/60dae88f893d4ebe8e3523421e960596/Progressive-profle-overview.png?w=2500&fit=max&auto=format&n=2q2UjVNt_eeGj7XX&q=85&s=40bf1612a08b72ea55ea533e7347684a 2500w" />
</Frame>

Les sections ci-dessous expliquent comment créer un formulaire de profil progressif à l’aide de nœuds et de flux, ainsi que les étapes à suivre pour ajouter votre formulaire à une [Action Post Login](/docs/fr-ca/customize/actions/explore-triggers/signup-and-login-triggers/login-trigger).

<h2 id="create-a-form-from-scratch">
  Créer un formulaire à partir de zéro
</h2>

Suivez ces étapes pour créer un formulaire et recueillir des renseignements :

1. Ouvrez l’éditeur de formulaires en sélectionnant **Auth0 Dashboard > Actions > Forms.**
2. Sélectionnez **Create Form** > **Start from scratch**.

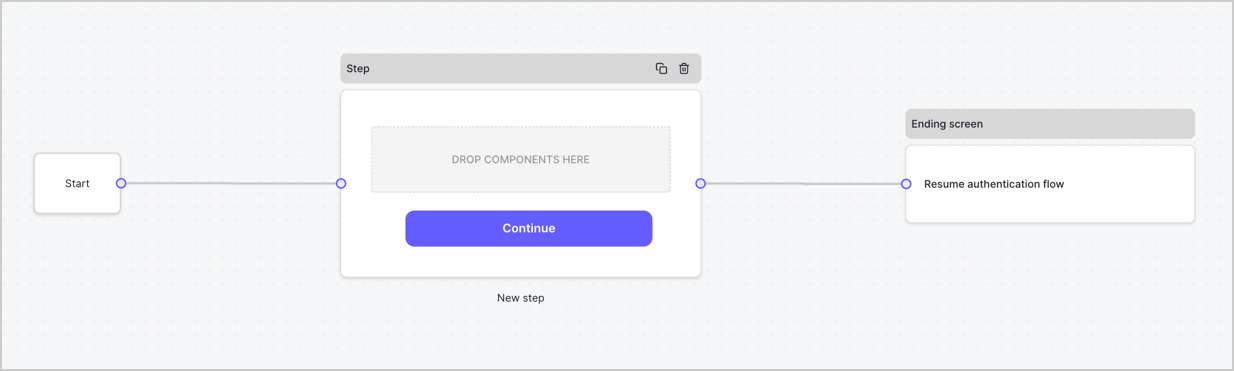
Par défaut, un nouveau formulaire contient un nœud Start, un nœud Step et un nœud Ending screen.
<Frame>
  <img src="https://mintcdn.com/docs-staging-chore-management-api-autoupdate/5OH5qupGbDGigNkI/docs/images/cdy7uua7fh8z/2TZ9jSjgEcARFpULI6hz4R/a4319a1bd482f2ee5cc23100fdb2f42c/New-form-Forms-for-action-use-case.png?fit=max&auto=format&n=5OH5qupGbDGigNkI&q=85&s=52ee07c6be793b8e3957427b4c06a70d" alt="Dashboard > Forms > Cas d’utilisation > Formulaire" data-og-width="1234" width="1234" data-og-height="371" height="371" data-path="docs/images/cdy7uua7fh8z/2TZ9jSjgEcARFpULI6hz4R/a4319a1bd482f2ee5cc23100fdb2f42c/New-form-Forms-for-action-use-case.png" data-optimize="true" data-opv="3" srcset="https://mintcdn.com/docs-staging-chore-management-api-autoupdate/5OH5qupGbDGigNkI/docs/images/cdy7uua7fh8z/2TZ9jSjgEcARFpULI6hz4R/a4319a1bd482f2ee5cc23100fdb2f42c/New-form-Forms-for-action-use-case.png?w=280&fit=max&auto=format&n=5OH5qupGbDGigNkI&q=85&s=c0e17107ac26ba6b92f7201dfbe34849 280w, https://mintcdn.com/docs-staging-chore-management-api-autoupdate/5OH5qupGbDGigNkI/docs/images/cdy7uua7fh8z/2TZ9jSjgEcARFpULI6hz4R/a4319a1bd482f2ee5cc23100fdb2f42c/New-form-Forms-for-action-use-case.png?w=560&fit=max&auto=format&n=5OH5qupGbDGigNkI&q=85&s=1ee8bf336acc45435e8780b5a515ebc5 560w, https://mintcdn.com/docs-staging-chore-management-api-autoupdate/5OH5qupGbDGigNkI/docs/images/cdy7uua7fh8z/2TZ9jSjgEcARFpULI6hz4R/a4319a1bd482f2ee5cc23100fdb2f42c/New-form-Forms-for-action-use-case.png?w=840&fit=max&auto=format&n=5OH5qupGbDGigNkI&q=85&s=abff23856df4920ddb687d97ad3722e6 840w, https://mintcdn.com/docs-staging-chore-management-api-autoupdate/5OH5qupGbDGigNkI/docs/images/cdy7uua7fh8z/2TZ9jSjgEcARFpULI6hz4R/a4319a1bd482f2ee5cc23100fdb2f42c/New-form-Forms-for-action-use-case.png?w=1100&fit=max&auto=format&n=5OH5qupGbDGigNkI&q=85&s=50b4052411d782feb91aab139f756af3 1100w, https://mintcdn.com/docs-staging-chore-management-api-autoupdate/5OH5qupGbDGigNkI/docs/images/cdy7uua7fh8z/2TZ9jSjgEcARFpULI6hz4R/a4319a1bd482f2ee5cc23100fdb2f42c/New-form-Forms-for-action-use-case.png?w=1650&fit=max&auto=format&n=5OH5qupGbDGigNkI&q=85&s=076022785762532eb39e28b1df3013b0 1650w, https://mintcdn.com/docs-staging-chore-management-api-autoupdate/5OH5qupGbDGigNkI/docs/images/cdy7uua7fh8z/2TZ9jSjgEcARFpULI6hz4R/a4319a1bd482f2ee5cc23100fdb2f42c/New-form-Forms-for-action-use-case.png?w=2500&fit=max&auto=format&n=5OH5qupGbDGigNkI&q=85&s=bb75874f6bd35e2bb7c9b62a5f1f3e01 2500w" />
</Frame>

<h3 id="configure-the-step-node">
  Configurer le nœud Step
</h3>

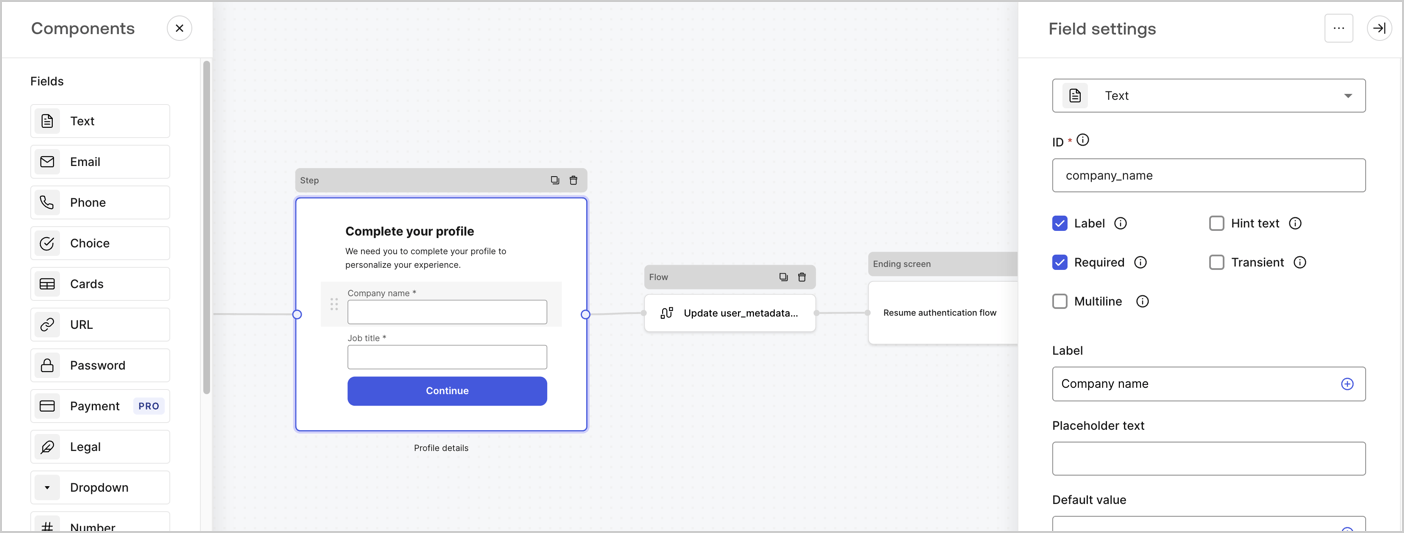
Le nœud Step est l’interface graphique que voient les utilisateurs. Ajoutez des [champs](/docs/fr-ca/customize/forms/nodes-and-components) au nœud Step pour recueillir le nom de l’entreprise et l’intitulé du poste de l’utilisateur en suivant ces étapes :

1. Faites glisser un champ **Rich text** du **menu Components** vers le nœud **Step**.

   * **Rich text** : Saisissez un message personnalisé.

     * **Exemple** : `Complétez votre profil ! Nous avons besoin de quelques renseignements pour personnaliser votre expérience.`
   * Sélectionnez **Enregistrer**.
2. Faites glisser un champ **Text** vers le nœud **Step**.

   * **ID** : Saisissez `company_name`.
   * **Label** : Cochez la case.
   * **Label** : Saisissez `Nom de l’entreprise`.
   * **Required** : Cochez la case.
   * Sélectionnez **Enregistrer**.
3. Faites glisser un champ **Text** vers le nœud **Step**.

   1. **ID** : Saisissez `job_title`.
   2. **Label** : Saisissez `Titre du poste`.
   3. **Label** : Cochez la case.
   4. **Required** : Cochez la case.
   5. Sélectionnez **Enregistrer**.
4. Sélectionnez **Publier** pour enregistrer.
<Frame>
  <img src="https://mintcdn.com/docs-staging-chore-management-api-autoupdate/oiDO-PkIrC6oywTQ/docs/images/cdy7uua7fh8z/6H1lRzwKyYioQyQJ9MtIoM/aa248e92fc028a68a5b92ff361a11644/progressive-profile-step.png?fit=max&auto=format&n=oiDO-PkIrC6oywTQ&q=85&s=9dd200b922f01674792dc47b298076b5" alt="Dashboard > Actions > Forms > Form > nœud Step" data-og-width="1404" width="1404" data-og-height="533" height="533" data-path="docs/images/cdy7uua7fh8z/6H1lRzwKyYioQyQJ9MtIoM/aa248e92fc028a68a5b92ff361a11644/progressive-profile-step.png" data-optimize="true" data-opv="3" srcset="https://mintcdn.com/docs-staging-chore-management-api-autoupdate/oiDO-PkIrC6oywTQ/docs/images/cdy7uua7fh8z/6H1lRzwKyYioQyQJ9MtIoM/aa248e92fc028a68a5b92ff361a11644/progressive-profile-step.png?w=280&fit=max&auto=format&n=oiDO-PkIrC6oywTQ&q=85&s=b1a399e2d5614900b7d9e7aaca182b28 280w, https://mintcdn.com/docs-staging-chore-management-api-autoupdate/oiDO-PkIrC6oywTQ/docs/images/cdy7uua7fh8z/6H1lRzwKyYioQyQJ9MtIoM/aa248e92fc028a68a5b92ff361a11644/progressive-profile-step.png?w=560&fit=max&auto=format&n=oiDO-PkIrC6oywTQ&q=85&s=a440350b575a861469ada94b67432b1d 560w, https://mintcdn.com/docs-staging-chore-management-api-autoupdate/oiDO-PkIrC6oywTQ/docs/images/cdy7uua7fh8z/6H1lRzwKyYioQyQJ9MtIoM/aa248e92fc028a68a5b92ff361a11644/progressive-profile-step.png?w=840&fit=max&auto=format&n=oiDO-PkIrC6oywTQ&q=85&s=e12bb1105ff3127b831e3aec9cd1ff5e 840w, https://mintcdn.com/docs-staging-chore-management-api-autoupdate/oiDO-PkIrC6oywTQ/docs/images/cdy7uua7fh8z/6H1lRzwKyYioQyQJ9MtIoM/aa248e92fc028a68a5b92ff361a11644/progressive-profile-step.png?w=1100&fit=max&auto=format&n=oiDO-PkIrC6oywTQ&q=85&s=e89fb08da990b6b57b0171243eb0d5d0 1100w, https://mintcdn.com/docs-staging-chore-management-api-autoupdate/oiDO-PkIrC6oywTQ/docs/images/cdy7uua7fh8z/6H1lRzwKyYioQyQJ9MtIoM/aa248e92fc028a68a5b92ff361a11644/progressive-profile-step.png?w=1650&fit=max&auto=format&n=oiDO-PkIrC6oywTQ&q=85&s=9ff0a61a18a0ac7a56610259a2c3a93c 1650w, https://mintcdn.com/docs-staging-chore-management-api-autoupdate/oiDO-PkIrC6oywTQ/docs/images/cdy7uua7fh8z/6H1lRzwKyYioQyQJ9MtIoM/aa248e92fc028a68a5b92ff361a11644/progressive-profile-step.png?w=2500&fit=max&auto=format&n=oiDO-PkIrC6oywTQ&q=85&s=5e0c44440c0dc44b85f0de34369a5f2e 2500w" />
</Frame>

<h3 id="configure-the-flow-node">
  Configurer le nœud de flux
</h3>

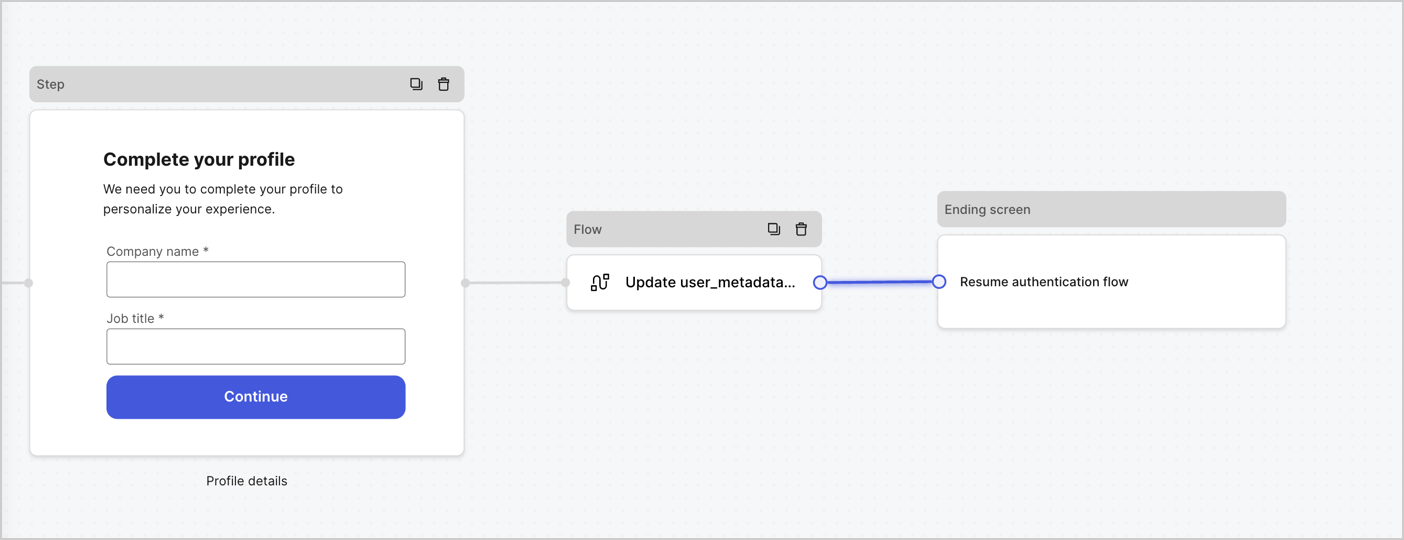
Ajoutez un nœud **Flow** après le nœud **Step** pour mettre à jour `user_metadata` et reprendre le flux d’authentification en suivant ces étapes :

1. Sélectionnez **Flow** au bas de l’éditeur de formulaires.
2. Supprimez le lien existant entre les nœuds **Step** et **Ending Screen**.
3. Sélectionnez le nouveau **Flow** > **Click to add a flow** > **Create a new flow.**

   * Saisissez `Update user_metadata` dans le champ **Name**.
   * Sélectionnez **Create**.
   * Sélectionnez **Save**.
4. Reliez le nœud **Flow** aux nœuds **Step** et **Ending Screen**, comme illustré ci-dessous.
5. Sélectionnez **Publish** pour enregistrer.
<Frame>
  <img src="https://mintcdn.com/docs-staging-chore-management-api-autoupdate/uxaWpNuZEjMCtl4x/docs/images/cdy7uua7fh8z/5C91DaWn4LGtJT9BF87ssu/095171d0c452a287c44bfde12fd6d13f/link-nodes.png?fit=max&auto=format&n=uxaWpNuZEjMCtl4x&q=85&s=362f152eb77fb683fa17fa7c082e2b19" alt="Dashboard > Actions > Forms > Form" data-og-width="1404" width="1404" data-og-height="540" height="540" data-path="docs/images/cdy7uua7fh8z/5C91DaWn4LGtJT9BF87ssu/095171d0c452a287c44bfde12fd6d13f/link-nodes.png" data-optimize="true" data-opv="3" srcset="https://mintcdn.com/docs-staging-chore-management-api-autoupdate/uxaWpNuZEjMCtl4x/docs/images/cdy7uua7fh8z/5C91DaWn4LGtJT9BF87ssu/095171d0c452a287c44bfde12fd6d13f/link-nodes.png?w=280&fit=max&auto=format&n=uxaWpNuZEjMCtl4x&q=85&s=1d58e96bd53195ae23e0ced292a65c12 280w, https://mintcdn.com/docs-staging-chore-management-api-autoupdate/uxaWpNuZEjMCtl4x/docs/images/cdy7uua7fh8z/5C91DaWn4LGtJT9BF87ssu/095171d0c452a287c44bfde12fd6d13f/link-nodes.png?w=560&fit=max&auto=format&n=uxaWpNuZEjMCtl4x&q=85&s=3ec2335bf3ca2f0ad8ae4d7ad5845174 560w, https://mintcdn.com/docs-staging-chore-management-api-autoupdate/uxaWpNuZEjMCtl4x/docs/images/cdy7uua7fh8z/5C91DaWn4LGtJT9BF87ssu/095171d0c452a287c44bfde12fd6d13f/link-nodes.png?w=840&fit=max&auto=format&n=uxaWpNuZEjMCtl4x&q=85&s=1a3055a9534e0df7025c7ff4d3e8c040 840w, https://mintcdn.com/docs-staging-chore-management-api-autoupdate/uxaWpNuZEjMCtl4x/docs/images/cdy7uua7fh8z/5C91DaWn4LGtJT9BF87ssu/095171d0c452a287c44bfde12fd6d13f/link-nodes.png?w=1100&fit=max&auto=format&n=uxaWpNuZEjMCtl4x&q=85&s=15ebd0fa702ea4d6ed0fa0c1185f3f12 1100w, https://mintcdn.com/docs-staging-chore-management-api-autoupdate/uxaWpNuZEjMCtl4x/docs/images/cdy7uua7fh8z/5C91DaWn4LGtJT9BF87ssu/095171d0c452a287c44bfde12fd6d13f/link-nodes.png?w=1650&fit=max&auto=format&n=uxaWpNuZEjMCtl4x&q=85&s=15f7d61fcce814299e9b9504348c65d5 1650w, https://mintcdn.com/docs-staging-chore-management-api-autoupdate/uxaWpNuZEjMCtl4x/docs/images/cdy7uua7fh8z/5C91DaWn4LGtJT9BF87ssu/095171d0c452a287c44bfde12fd6d13f/link-nodes.png?w=2500&fit=max&auto=format&n=uxaWpNuZEjMCtl4x&q=85&s=4482aa0c2c1b738f2c7f9ab50f9c3bf7 2500w" />
</Frame>

Ajoutez une action Auth0 **Update user** au flux en suivant ces étapes :

1. Sélectionnez le flux **Update user\_metadata**, puis sélectionnez **Edit Flow** pour ouvrir l’éditeur de flux dans un nouvel onglet.
2. Sous l’action **Start**, sélectionnez l’icône **+** pour ajouter une action **Update user**. Remplissez les champs ci-dessous, puis sélectionnez **Save** pour continuer.

   * **Connection** : Dans la liste déroulante, sélectionnez la connexion Vault de votre application M2M.

   * **User ID** : Saisissez `{{context.user.user_id}}`.

   * **Body** : Copiez-collez le code suivant pour mettre à jour `user_metadata` avec les propriétés `job_title` et `company_name`.

     ```json lines theme={null}
     {
        "user_metadata": {
           "job_title": "{{fields.job_title}}",
           "company_name": "{{fields.company_name}}"
        }
     }
     ```

   * Sélectionnez **Save**.
3. Sélectionnez **Publish** pour enregistrer.

<Frame>
  <img src="https://mintcdn.com/docs-staging-chore-management-api-autoupdate/Hlj5AELI6oQmnetW/docs/images/cdy7uua7fh8z/65Jx4W5oIZJyyvA8z4HqIx/0661b1a8ca6361c54fc4fef07ba59f0b/update-user.png?fit=max&auto=format&n=Hlj5AELI6oQmnetW&q=85&s=7643cd77ff5f5eabd1e1afaf5753fb6d" alt="Dashboard > Actions > Forms > Flows" data-og-width="1404" width="1404" data-og-height="244" height="244" data-path="docs/images/cdy7uua7fh8z/65Jx4W5oIZJyyvA8z4HqIx/0661b1a8ca6361c54fc4fef07ba59f0b/update-user.png" data-optimize="true" data-opv="3" srcset="https://mintcdn.com/docs-staging-chore-management-api-autoupdate/Hlj5AELI6oQmnetW/docs/images/cdy7uua7fh8z/65Jx4W5oIZJyyvA8z4HqIx/0661b1a8ca6361c54fc4fef07ba59f0b/update-user.png?w=280&fit=max&auto=format&n=Hlj5AELI6oQmnetW&q=85&s=7320a0bac71c909cd34474e398f458ae 280w, https://mintcdn.com/docs-staging-chore-management-api-autoupdate/Hlj5AELI6oQmnetW/docs/images/cdy7uua7fh8z/65Jx4W5oIZJyyvA8z4HqIx/0661b1a8ca6361c54fc4fef07ba59f0b/update-user.png?w=560&fit=max&auto=format&n=Hlj5AELI6oQmnetW&q=85&s=001d09183bdf58c3e6d19a0128d2d30d 560w, https://mintcdn.com/docs-staging-chore-management-api-autoupdate/Hlj5AELI6oQmnetW/docs/images/cdy7uua7fh8z/65Jx4W5oIZJyyvA8z4HqIx/0661b1a8ca6361c54fc4fef07ba59f0b/update-user.png?w=840&fit=max&auto=format&n=Hlj5AELI6oQmnetW&q=85&s=fe4820b4cdf17aef9fa7caa3ca695fe8 840w, https://mintcdn.com/docs-staging-chore-management-api-autoupdate/Hlj5AELI6oQmnetW/docs/images/cdy7uua7fh8z/65Jx4W5oIZJyyvA8z4HqIx/0661b1a8ca6361c54fc4fef07ba59f0b/update-user.png?w=1100&fit=max&auto=format&n=Hlj5AELI6oQmnetW&q=85&s=a737a402e83499131508383254542746 1100w, https://mintcdn.com/docs-staging-chore-management-api-autoupdate/Hlj5AELI6oQmnetW/docs/images/cdy7uua7fh8z/65Jx4W5oIZJyyvA8z4HqIx/0661b1a8ca6361c54fc4fef07ba59f0b/update-user.png?w=1650&fit=max&auto=format&n=Hlj5AELI6oQmnetW&q=85&s=b80eb0a7b77d4139224c22ec495be152 1650w, https://mintcdn.com/docs-staging-chore-management-api-autoupdate/Hlj5AELI6oQmnetW/docs/images/cdy7uua7fh8z/65Jx4W5oIZJyyvA8z4HqIx/0661b1a8ca6361c54fc4fef07ba59f0b/update-user.png?w=2500&fit=max&auto=format&n=Hlj5AELI6oQmnetW&q=85&s=91030c6fc8bfa4ee8715b980f9c0f827 2500w" />
</Frame>

<h3 id="retrieve-the-form-render-code">
  Récupérer le code de rendu du formulaire
</h3>

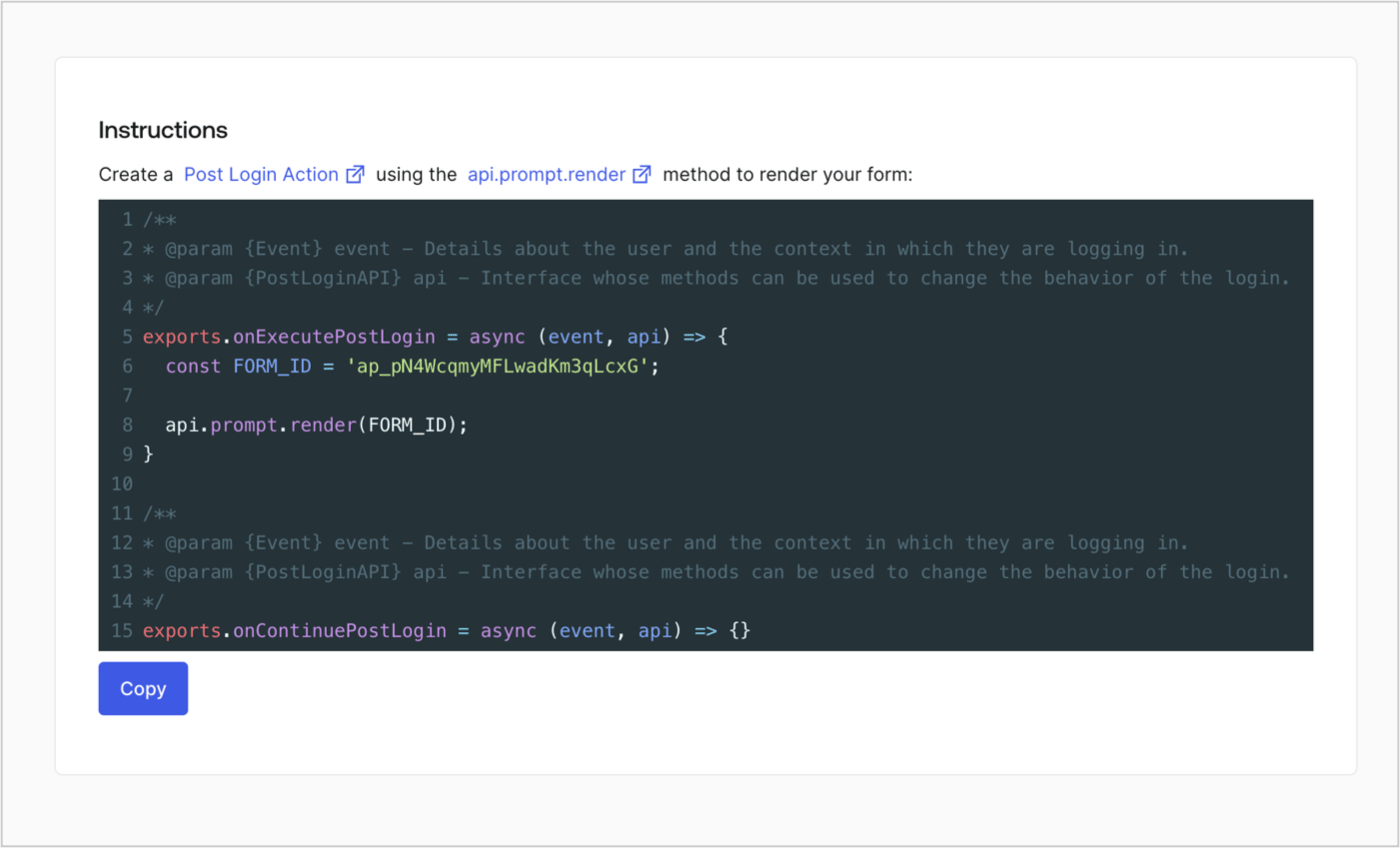
Récupérez le code de rendu du formulaire pour l’afficher à l’aide d’une Action Post Login personnalisée en suivant ces étapes :

* Dans l’éditeur de formulaires, sélectionnez **`<> Render`**.
* Sélectionnez **Copy**.
<Frame>
  <img src="https://mintcdn.com/docs-staging-chore-management-api-autoupdate/oVD85MvA7ZVayXF0/docs/images/cdy7uua7fh8z/2EIUzc539sq9lwoTKbjoJv/496a864c0fc44a782c9cadca119dbfb0/embed.png?fit=max&auto=format&n=oVD85MvA7ZVayXF0&q=85&s=23db17feff5783488b80b783cd37bc1e" alt="Dashboard > Actions > Forms > Form > Embed" data-og-width="1400" width="1400" data-og-height="848" height="848" data-path="docs/images/cdy7uua7fh8z/2EIUzc539sq9lwoTKbjoJv/496a864c0fc44a782c9cadca119dbfb0/embed.png" data-optimize="true" data-opv="3" srcset="https://mintcdn.com/docs-staging-chore-management-api-autoupdate/oVD85MvA7ZVayXF0/docs/images/cdy7uua7fh8z/2EIUzc539sq9lwoTKbjoJv/496a864c0fc44a782c9cadca119dbfb0/embed.png?w=280&fit=max&auto=format&n=oVD85MvA7ZVayXF0&q=85&s=88af01e18dfda65e15c8eb68c011f272 280w, https://mintcdn.com/docs-staging-chore-management-api-autoupdate/oVD85MvA7ZVayXF0/docs/images/cdy7uua7fh8z/2EIUzc539sq9lwoTKbjoJv/496a864c0fc44a782c9cadca119dbfb0/embed.png?w=560&fit=max&auto=format&n=oVD85MvA7ZVayXF0&q=85&s=e8f06dfd4ffc9450f98542b62a8888d9 560w, https://mintcdn.com/docs-staging-chore-management-api-autoupdate/oVD85MvA7ZVayXF0/docs/images/cdy7uua7fh8z/2EIUzc539sq9lwoTKbjoJv/496a864c0fc44a782c9cadca119dbfb0/embed.png?w=840&fit=max&auto=format&n=oVD85MvA7ZVayXF0&q=85&s=14e3d15cd1189eabb74dfbf256ed2a22 840w, https://mintcdn.com/docs-staging-chore-management-api-autoupdate/oVD85MvA7ZVayXF0/docs/images/cdy7uua7fh8z/2EIUzc539sq9lwoTKbjoJv/496a864c0fc44a782c9cadca119dbfb0/embed.png?w=1100&fit=max&auto=format&n=oVD85MvA7ZVayXF0&q=85&s=54814b0bcc88702b3dd22c1c6e7973fa 1100w, https://mintcdn.com/docs-staging-chore-management-api-autoupdate/oVD85MvA7ZVayXF0/docs/images/cdy7uua7fh8z/2EIUzc539sq9lwoTKbjoJv/496a864c0fc44a782c9cadca119dbfb0/embed.png?w=1650&fit=max&auto=format&n=oVD85MvA7ZVayXF0&q=85&s=45e97eff68fb5e1188c8b64d86b91e10 1650w, https://mintcdn.com/docs-staging-chore-management-api-autoupdate/oVD85MvA7ZVayXF0/docs/images/cdy7uua7fh8z/2EIUzc539sq9lwoTKbjoJv/496a864c0fc44a782c9cadca119dbfb0/embed.png?w=2500&fit=max&auto=format&n=oVD85MvA7ZVayXF0&q=85&s=78ba3303d36d196439c571f270cdd8b9 2500w" />
</Frame>

<h2 id="create-a-post-login-action">
  Créer une Action Post Login
</h2>

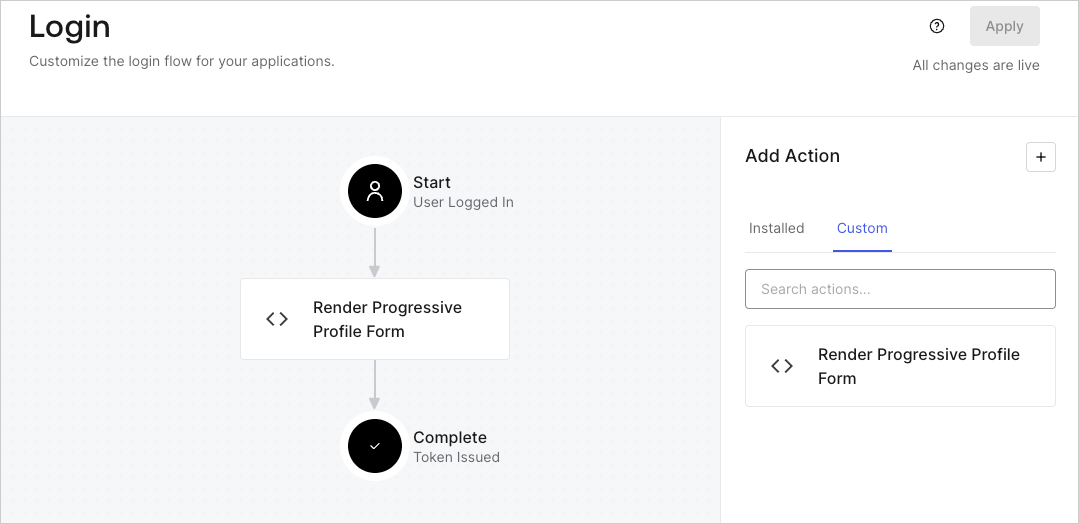
Créez une Action post-login pour afficher votre formulaire en suivant ces étapes :

1. Accédez à **Auth0 Dashboard > Actions > Flows > Login.**
2. Sélectionnez l’icône **+**, puis **Build from scratch** :

   * **Name** : Entrez `Render Progressive Profile Form`.
   * **Trigger** : Sélectionnez `Login / Post Login`.
   * **Runtime** : Sélectionnez la version recommandée.
3. Sélectionnez **Create**.

Pour configurer l’Action post-login :

1. Supprimez le code existant dans l’éditeur Code.
2. Collez le code d’intégration du formulaire dans l’éditeur Code.
3. Modifiez le code pour définir la logique conditionnelle qui affichera le formulaire.

   ```javascript lines theme={null}
   /**
   * @param {Event} event - Détails sur l’utilisateur et le contexte dans lequel il se connecte.
   * @param {PostLoginAPI} api - Interface dont les méthodes peuvent être utilisées pour modifier le comportement de la connexion.
   */
   exports.onExecutePostLogin = async (event, api) => {
     const FORM_ID = 'REPLACE_WITH_YOUR_FORM_ID';

     if (
       event.stats.logins_count > 2 &&
       !event.user.user_metadata.company_name &&
       !event.user.user_metadata.job_title
     ) {
       api.prompt.render(FORM_ID);
     }
   }

   exports.onContinuePostLogin = async (event, api) => { }
   ```

   <Callout icon="file-lines" color="#0EA5E9" iconType="regular">
     L’exemple de code ci-dessus affiche le formulaire lorsqu’un utilisateur a un nombre de connexions > 2 et que les propriétés de métadonnées utilisateur company\_name et job\_title sont absentes.
   </Callout>
4. Sélectionnez **Deploy.**
5. Glissez-déposez l’Action **Render Progressive Profile Form** dans le **Login flow**.
   <Frame>
     <img src="https://mintcdn.com/docs-staging-chore-management-api-autoupdate/NGsN03aWsmM_uYNN/docs/images/cdy7uua7fh8z/1QjjZdpTqTxx012UDN4xk9/99fba5ef4068a5688f1762eea7f42976/renderprogessiveprofile.png?fit=max&auto=format&n=NGsN03aWsmM_uYNN&q=85&s=aec487b70c9b7c1d47e20cec4ee6bf24" alt="Dashboard > Forms > Use Cases Progressive Profile Login Action" data-og-width="1079" width="1079" data-og-height="524" height="524" data-path="docs/images/cdy7uua7fh8z/1QjjZdpTqTxx012UDN4xk9/99fba5ef4068a5688f1762eea7f42976/renderprogessiveprofile.png" data-optimize="true" data-opv="3" srcset="https://mintcdn.com/docs-staging-chore-management-api-autoupdate/NGsN03aWsmM_uYNN/docs/images/cdy7uua7fh8z/1QjjZdpTqTxx012UDN4xk9/99fba5ef4068a5688f1762eea7f42976/renderprogessiveprofile.png?w=280&fit=max&auto=format&n=NGsN03aWsmM_uYNN&q=85&s=b241c0a41f526156f62bcabc132f231f 280w, https://mintcdn.com/docs-staging-chore-management-api-autoupdate/NGsN03aWsmM_uYNN/docs/images/cdy7uua7fh8z/1QjjZdpTqTxx012UDN4xk9/99fba5ef4068a5688f1762eea7f42976/renderprogessiveprofile.png?w=560&fit=max&auto=format&n=NGsN03aWsmM_uYNN&q=85&s=3f11458bc2d0ac77d706c45812fd1d13 560w, https://mintcdn.com/docs-staging-chore-management-api-autoupdate/NGsN03aWsmM_uYNN/docs/images/cdy7uua7fh8z/1QjjZdpTqTxx012UDN4xk9/99fba5ef4068a5688f1762eea7f42976/renderprogessiveprofile.png?w=840&fit=max&auto=format&n=NGsN03aWsmM_uYNN&q=85&s=2a6764ae25829f684ebe28bace88fc24 840w, https://mintcdn.com/docs-staging-chore-management-api-autoupdate/NGsN03aWsmM_uYNN/docs/images/cdy7uua7fh8z/1QjjZdpTqTxx012UDN4xk9/99fba5ef4068a5688f1762eea7f42976/renderprogessiveprofile.png?w=1100&fit=max&auto=format&n=NGsN03aWsmM_uYNN&q=85&s=5f326b0a1ddee79d8d5fe5635a9daff1 1100w, https://mintcdn.com/docs-staging-chore-management-api-autoupdate/NGsN03aWsmM_uYNN/docs/images/cdy7uua7fh8z/1QjjZdpTqTxx012UDN4xk9/99fba5ef4068a5688f1762eea7f42976/renderprogessiveprofile.png?w=1650&fit=max&auto=format&n=NGsN03aWsmM_uYNN&q=85&s=fd1888e82dee1f6d6c0c4be9add772ef 1650w, https://mintcdn.com/docs-staging-chore-management-api-autoupdate/NGsN03aWsmM_uYNN/docs/images/cdy7uua7fh8z/1QjjZdpTqTxx012UDN4xk9/99fba5ef4068a5688f1762eea7f42976/renderprogessiveprofile.png?w=2500&fit=max&auto=format&n=NGsN03aWsmM_uYNN&q=85&s=c16037c369ebac741b30a19592c2572d 2500w" />
   </Frame>
6. Sélectionnez **Apply**.

<h3 id="test-implementation">
  Tester la mise en œuvre
</h3>

Testez la mise en œuvre en suivant ces étapes :

1. Connectez-vous avec un utilisateur existant dont le nombre de connexions est supérieur à 2 et dont les attributs `user_metadata` `company_name` et `job_title` sont vides.
2. L’action post-login du Login flow affichera le formulaire et demandera ces renseignements.
3. Sélectionnez **Auth0 Dashboard > User Management > Users,** repérez l’utilisateur et vérifiez que les attributs `user_metadata` `company_name` et `job_title` contiennent bien des renseignements.
